
TLDR overview
- SonarQube Agentic Analysis provides CI-grade code verification within AI agent workflows to catch bugs before pull requests.
- Users configure the Sonarqube MCP Server in VS Code to trigger analysis that includes cross-file data flow and taint analysis.
- A VERIFY directive in
.github/copilot-instructions.mdautomates the analyze-fix-verify loop for GitHub Copilot in agent mode. - Developers achieve faster Agent Centric Development by resolving critical issues locally using cached project context from SonarQube Cloud.
Overview
SonarQube Agentic Analysis sends code to SonarQube Cloud's remote analysis engine and returns findings in real time. The engine draws on project context cached from your last CI scan, so the agent gets the same rules and quality profile your pipeline enforces. By the end of this blueprint, GitHub Copilot in agent mode runs a complete analysis loop inside VS Code: analyze changed files, fix what it introduced, and re-verify before any code reaches a pull request.
This setup covers the Verify stage of the Agent Centric Development Cycle. The examples use Microsoft's GCToolKit, an open-source Java library for analyzing garbage collection logs. If you use Claude Code or Codex CLI instead, see the companion blueprints: Claude Code and Codex CLI.
When to use this
You use VS Code with GitHub Copilot, your project is on SonarQube Cloud, and you want CI-grade code verification inside the agent's workflow (inner loop) instead of waiting for the quality gate to fail on the PR.
What you'll achieve
- SonarQube MCP Server configured for Agentic Analysis in VS Code's
.vscode/mcp.jsonformat - A
.github/copilot-instructions.mddirective that triggers analysis after code generation - A working analysis loop (analyze, fix, re-verify) running inside Copilot agent mode
- Sonar Context Augmentation (Guide stage) available alongside Agentic Analysis with no extra configuration
Architecture
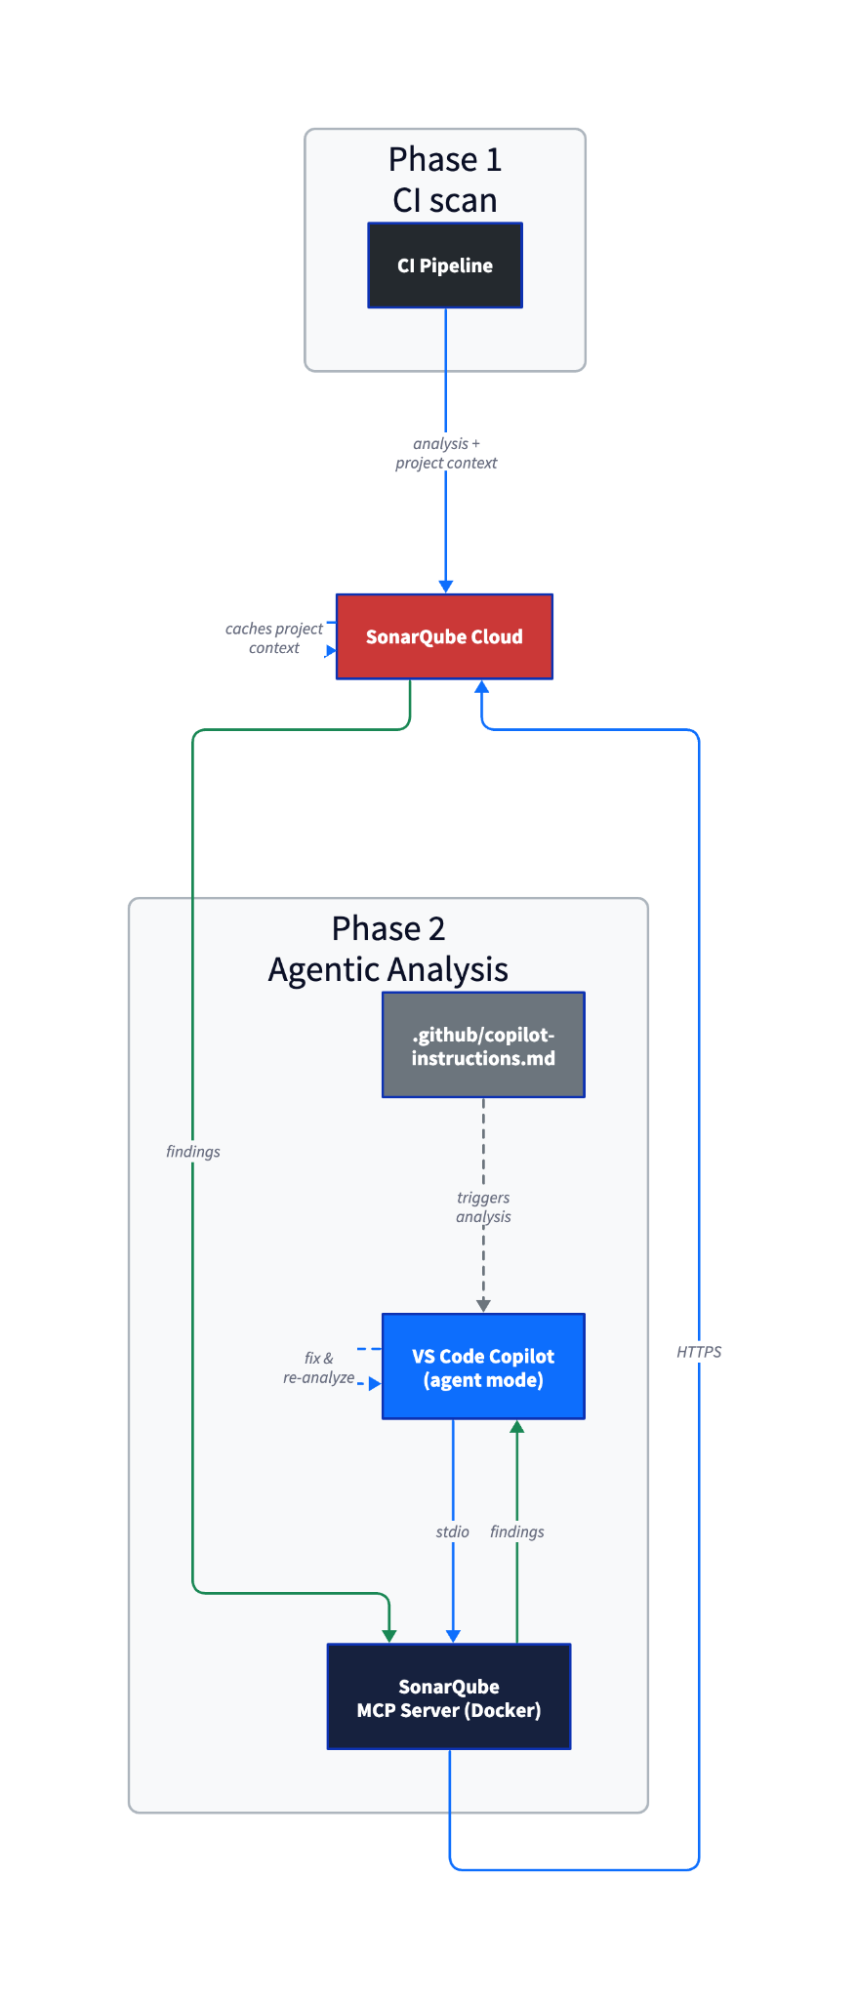
Phase 1 happens during your regular CI scan. SonarQube Cloud stores the project context from that scan: how types resolve, what your quality profile enforces, which dependencies are in play. Phase 2 happens on demand inside VS Code. When Copilot calls run_advanced_code_analysis, SonarQube Cloud restores the cached context and runs the same analysis engine your pipeline uses. Single-file analysis typically completes in under a minute.
Agentic Analysis has cross-file data flow and taint analysis because it has your full project context from CI, which is the key difference from local linting, where each file is analyzed in isolation.
Prerequisites
- VS Code 1.99 or later, which is the minimum version for agent mode with MCP support
- GitHub Copilot extension (includes Chat and agent mode functionality)
- GitHub Copilot subscription
- SonarQube Cloud on a Team or Enterprise plan with Agentic Analysis enabled on your project (open beta)
- A completed CI scan on the branch you'll analyze
- Docker running
- A SonarQube Cloud user token, not a project, organization, or global token. Generate one at My Account > Security in SonarQube Cloud. Generate the token after Agentic Analysis is enabled on your organization, because tokens created before enablement may lack the required permissions.
- Supported languages: Java, JavaScript/TypeScript, Python, C#, VB.NET, C++, CSS, HTML, XML, plus secrets detection and IaC (Docker, Kubernetes, Terraform). Check the official docs for the latest list.
If your GitHub organization has Copilot policies configured, an admin may need to enable MCP server access in the org's Copilot settings.
Step 1 — Base MCP Server installed via one-click button
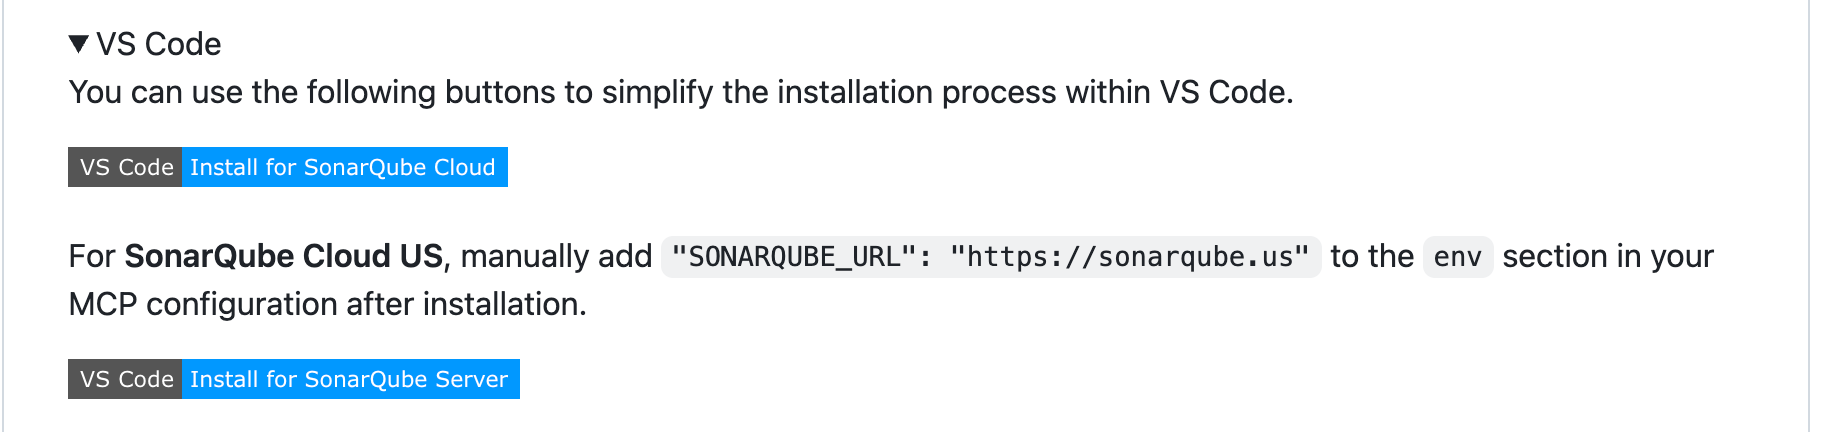
The fastest path to a working config is the one-click install button in the SonarQube MCP Server README. Open the README, scroll to the VS Code section, and click "Install for SonarQube Cloud." VS Code opens a dialog to confirm the server installation. Accept it, and VS Code creates a .vscode/mcp.json file in your project with the correct format and prompts for your token and organization key (the token input is masked).

The generated config looks like this:
{
  "servers": {
    "sonarqube": {
      "command": "docker",
      "args": [
        "run", "--init", "--pull=always", "-i", "--rm",
        "-e", "SONARQUBE_TOKEN",
        "-e", "SONARQUBE_ORG",
        "mcp/sonarqube"
      ],
      "env": {
        "SONARQUBE_TOKEN": "${input:SONARQUBE_TOKEN}",
        "SONARQUBE_ORG": "${input:SONARQUBE_ORG}"
      },
      "type": "stdio"
    }
  },
  "inputs": [
    {
      "id": "SONARQUBE_TOKEN",
      "type": "promptString",
      "description": "SonarQube Cloud Token",
      "password": true
    },
    {
      "id": "SONARQUBE_ORG",
      "type": "promptString",
      "description": "SonarQube Cloud Organization Key",
      "password": false
    }
  ]
}
This base config gives you the standard SonarQube MCP tools (issues, rules, quality gates) but does not enable Agentic Analysis yet. Step 2 extends it with the workspace mount and project key that Agentic Analysis requires.
Step 2 — Agentic Analysis enabled
Extend the config from Step 1 with a workspace mount and project key. These two additions are what activate Agentic Analysis.
Add -e, "SONARQUBE_PROJECT_KEY" and the -v volume mount to the args array (before "mcp/sonarqube"), and add the project key to env. The complete config:
{
  "servers": {
    "sonarqube": {
      "command": "docker",
      "args": [
        "run", "--init", "--pull=always", "-i", "--rm",
        "-e", "SONARQUBE_TOKEN",
        "-e", "SONARQUBE_ORG",
        "-e", "SONARQUBE_PROJECT_KEY",
        "-v", "<ABSOLUTE_PATH_TO_YOUR_PROJECT>:/app/mcp-workspace:rw",
        "mcp/sonarqube"
      ],
      "env": {
        "SONARQUBE_TOKEN": "${input:SONARQUBE_TOKEN}",
        "SONARQUBE_ORG": "${input:SONARQUBE_ORG}",
        "SONARQUBE_PROJECT_KEY": "<YOUR_PROJECT_KEY>"
      },
      "type": "stdio"
    }
  },
  "inputs": [
    {
      "id": "SONARQUBE_TOKEN",
      "type": "promptString",
      "description": "SonarQube Cloud User Token",
      "password": true
    },
    {
      "id": "SONARQUBE_ORG",
      "type": "promptString",
      "description": "SonarQube Cloud Organization Key",
      "password": false
    }
  ]
}
Replace the two placeholders:
<ABSOLUTE_PATH_TO_YOUR_PROJECT>is the full path to your project directory (e.g.,/Users/dev/my-project). Relative paths are not accepted, and Docker fails silently if you use one. The volume mount lets the MCP Server read files from disk for analysis.<YOUR_PROJECT_KEY>is the SonarQube Cloud project key, visible on the Project Information page or insonar-project.properties.
The token and org key are not placeholders in the file because VS Code prompts for them at server startup via the ${input:} variables defined in the inputs block.
SONARQUBE_TOOLSETS is not required. The default includes all toolsets: analysis, Context Augmentation, issues, rules, quality gates, and more. Only set it explicitly if you want to restrict which tools appear.
For US-region SonarQube Cloud, add -e, "SONARQUBE_URL" to the args and "SONARQUBE_URL": "https://sonarqube.us" to the env block. The default (no SONARQUBE_URL) assumes EU region.
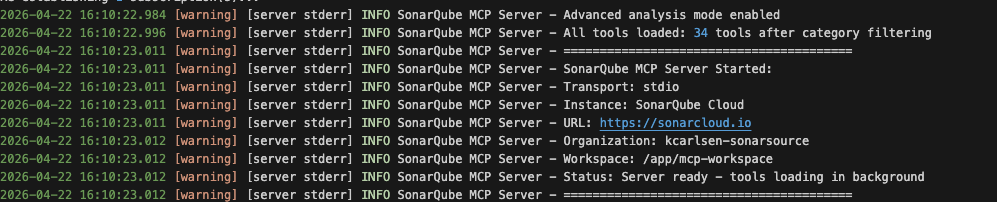
Restart the MCP server: open the Command Palette (Cmd+Shift+P), run "MCP: List Servers", and restart the SonarQube MCP Server. The Output panel should show:
INFO SonarQube MCP Server - Advanced analysis mode enabledCheck the tool count in the same output. With Agentic Analysis enabled and default toolsets, the server loads around 34 tools. If you see significantly fewer, or if the log says Could not retrieve A3S org config ... Access Denied, it’s possible that the token was generated before Agentic Analysis was enabled. Generate a fresh user token and restart the server.
If the log says Advanced analysis mode enabled, but no workspace path configured, the volume mount path is wrong or the directory does not exist.
Alternative: shell environment variables. If you prefer not to use ${input:} prompts, you can export the token and org key in your shell before opening VS Code and reference them with ${env:SONARQUBE_TOKEN} in the config. The ${input:} approach avoids shell exports and keeps the token out of your shell history.
Step 3 — Agent mode active with verified connection
Open the chat view with Cmd+Ctrl+I (macOS) or Ctrl+Alt+I (Windows/Linux). At the top of the chat panel, click the mode dropdown and select "Agent". MCP tools are only available in agent mode; regular Chat mode and Edits mode do not call them.
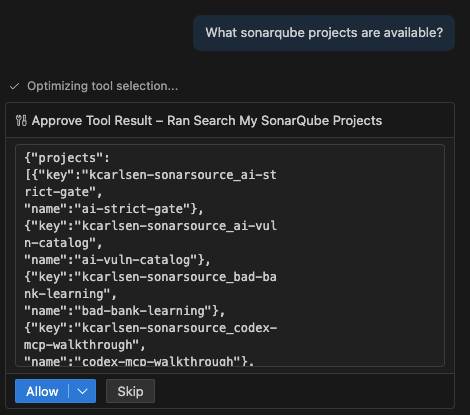
Test the connection by asking Copilot:
What SonarQube projects are available?Copilot calls search_my_sonarqube_projects through the MCP server and returns your project list. A tool approval dialog appears with Allow and Skip buttons. Click Allow. Your target project should appear in the results. If it does not, verify that your token has access to the organization and that the project key in .vscode/mcp.json is correct.
Step 4 — VERIFY directive added
Create .github/copilot-instructions.md in your project root. This file is Copilot's equivalent of Claude Code's CLAUDE.md, and VS Code reads it automatically in agent mode conversations.
# SonarQube Agentic Analysis — VERIFY Directive

## After generating or modifying code

You must strictly follow this analyze-then-commit workflow for every code
modification. No code is considered complete until it has passed the following
SonarQube verification loop:

1. **Read Phase:** After any modification or before commit, use the `Read` tool
   to load the current state of all relevant source files.
2. **Analysis Phase:** For every new or modified file, call
   `run_advanced_code_analysis` with:
   - `filePath`: Project-relative path (e.g., `src/main/java/MyClass.java`)
   - `branchName`: The active development branch
   - `fileScope`: `MAIN` or `TEST` depending on the code type
3. **Evaluation & Remediation:**
   - Review every issue returned by the analysis
   - Fix CRITICAL or HIGH severity issues immediately
4. **Verification:** Re-run analysis after fixes to confirm resolution and
   no regressions
Copilot also reads AGENTS.md and CLAUDE.md files, so if you already have one from another agent setup, Copilot picks it up too. The .github/copilot-instructions.md is the Copilot-native location. The official Agentic Analysis docs provide a more complete "Guide-and-Verify" directive that also integrates Sonar Context Augmentation.
Step 5 — First analysis run
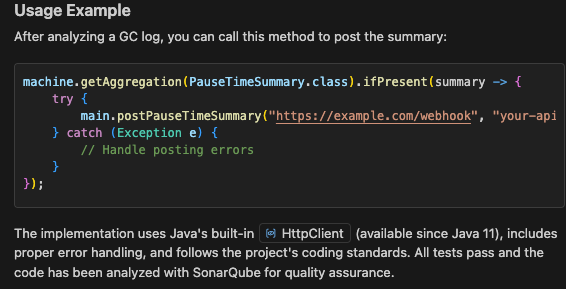
In agent mode, ask Copilot to generate or modify code. Do not mention analysis in the prompt, because the directive from Step 4 should trigger it automatically.
Add a method that posts GC pause time summaries to a webhook URL with an API keyCopilot generates the code, builds and tests it, then calls run_advanced_code_analysis on the changed files per the directive. No explicit analysis instruction was needed. Copilot analyzes the changed files sequentially.
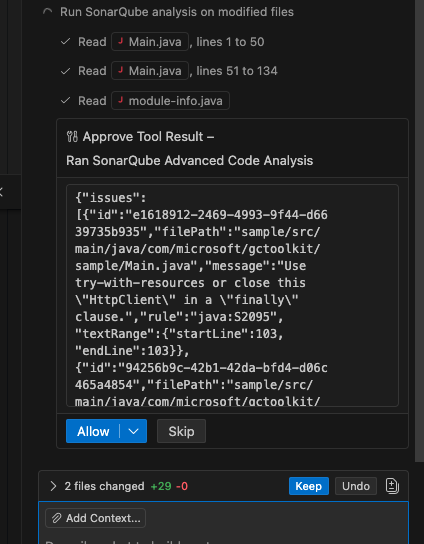
SonarQube Cloud returned 11 issues on Main.java. One was new, introduced by the agent's code:
- java:S2095 (line 103), "Use try-with-resources or close this HttpClient in a finally clause." Severity: BLOCKER. Type: BUG.
The other 10 issues (S106, S1602, S3457) were pre-existing in the file. run_advanced_code_analysis returns all issues in the analyzed file, not just issues introduced by recent changes. The agent is expected to focus on what it introduced.
Copilot then looked up the rule details via show_rule to understand the finding before attempting a fix.
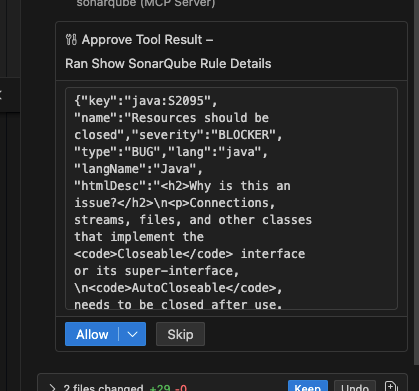
Step 6 — Issue fixed and re-verified
Copilot interpreted the S2095 finding (unclosed HttpClient resource at line 103), applied a fix, and re-ran run_advanced_code_analysis on the same file. The re-analysis returned 10 issues, all pre-existing. The BLOCKER that Copilot had introduced was resolved.
Copilot correctly distinguished the one issue it introduced from the 10 pre-existing issues and fixed only its own. It also rebuilt the project and re-ran the test suite after the fix to confirm nothing broke. The full sequence, from code generation through analysis, rule lookup, fix, re-analysis, and rebuild, completed in a single agent mode conversation without any additional user prompts beyond the initial request.
Verify the setup
Ask Copilot to write or modify code in agent mode. If the .github/copilot-instructions.md directive is in place, Copilot should analyze the code automatically. A successful setup produces this sequence:
- Copilot generates or modifies code
- Copilot calls
run_advanced_code_analysison the changed files - SonarQube Cloud returns findings (or confirms the file is clean)
- If findings exist, Copilot looks up rule details, applies fixes, and re-analyzes
- The re-analysis shows the new issues resolved
The two config files from this blueprint are the .vscode/mcp.json from Step 2 and the .github/copilot-instructions.md directive from Step 4.
How this compares to Claude Code and Codex CLI
The same SonarQube MCP Server and run_advanced_code_analysis tool work across all three clients. The setup differs in config format, directive file location, and how much automation each client provides around the analysis loop.
When to choose VS Code / Copilot: You already work in VS Code and want the analysis loop visible in your IDE rather than in a terminal. Copilot reads all three directive file formats (.github/copilot-instructions.md, AGENTS.md, CLAUDE.md), which makes it a flexible option for teams whose developers use different agents.
What to know
- Agentic Analysis is in open beta. See the product release lifecycle
- SonarQube Cloud only; Agentic Analysis is not yet available on SonarQube Server (self-managed).
- Requires a Team or Enterprise plan
- When Agentic Analysis is active,
run_advanced_code_analysisappears instead ofanalyze_code_snippet, determined at server startup based on your org's entitlement — restarting the server after disabling Agentic Analysis on the org restores the local tool. - File paths passed to
run_advanced_code_analysismust be project-relative. Passsrc/main/java/com/example/Foo.java, not the absolute path. - The
branchNameparameter must match a branch that SonarQube Cloud has analyzed via CI. A branch with no CI analysis history returns empty results. - Docker requires an absolute path for the
-vbind mount. Relative paths (./,../) fail silently. - If
run_advanced_code_analysisdoes not appear in the tool list after configuration, five conditions must all be met: stdio transport, token set, org key set and not an unresolved placeholder, Agentic Analysis entitlement check passing, and workspace mounted at/app/mcp-workspace. The most common failure is a stale token generated before Agentic Analysis was enabled on the org.
Next steps
- Sonar Context Augmentation gives your agent project context before it writes code, mapping to the Guide stage of AC/DC. It is available by default with the configuration in this blueprint, with no extra setup required. Learn more
- SonarQube for IDE provides inline issue highlighting directly in VS Code as you type, complementing the agent-driven analysis from this blueprint with real-time editor feedback.
- Claude Code companion blueprint covers the same Agentic Analysis setup for terminal-based workflows with hooks and
sonar integrate. Read the blueprint - Codex CLI companion blueprint covers setup for OpenAI's Codex in TOML format with
AGENTS.md. Read the blueprint - Official Agentic Analysis documentation for the full reference on parameters, supported languages, and configuration options