
TLDR overview
- The SonarQube plugin for Antigravity brings issue scanning, quality gate checks, code coverage, dependency risks, secrets scanning, and Sonar Vortex into Antigravity through dedicated
/sonarqube:*skills, the SonarQube MCP Server, and an integrate command that installs the plugin's hooks and rules. - This setup fits Antigravity users who want SonarQube results in their agent session instead of waiting on a PR or CI run.
- SonarQube findings and fixes inside Antigravity compress the development cycle from prompting and PR-time review to analysis, remediation, and verification in a single agent session.
- Setup installs the plugin bundle with
agy plugin install, runssonar integrate antigravityto wire authentication, the MCP server, a secrets-scanning hook, prompt-secrets rules, and Sonar Vortex into the project.
This blueprint configures the SonarQube plugin for Antigravity so that issue scanning, quality gates, coverage, dependency risks, secrets detection, and Sonar Vortex are accessible from inside the same Antigravity sessions that write your code. The plugin contributes a pre-defined /sonarqube:* skill set, the SonarQube MCP Server, and the agent rules the sonar integrate antigravity command builds on to wire authentication and agent hooks into your project. Under the hood, the SonarQube CLI is the runtime the plugin depends on. Our step-by-step walkthrough follows the Python-based AWS CLI, but the steps apply to any project written in any SonarQube-supported language. If you're coming from the Gemini CLI, a dedicated section at the end of this blueprint walks through migrating an existing SonarQube Gemini extension to the native Antigravity plugin.
When to use this
- You drive Antigravity as your primary AI coding agent and want SonarQube capabilities available without leaving the agent session.
- You want issue surfacing, rule-driven fixes, and architectural context inside the same session that writes your code, not waiting on the next CI run or a PR-time review.
What you'll achieve
- SonarQube plugin installed in Antigravity with the SonarQube MCP Server and the
/sonarqube:*skill set available in the agent. - An agents directory wired with the secrets-scanning hook, the prompt-secrets rule, and Sonar Vortex context augmentation skill (for context and constraints) and agentic analysis rule (for agentic loop verification), with the MCP server registered in your gemini directory.
- A working loop where Antigravity writes code informed by your project structure and coding standards, runs agentic loop verification at end-of-turn, surfaces findings, and applies rule-driven fixes inline.
Architecture
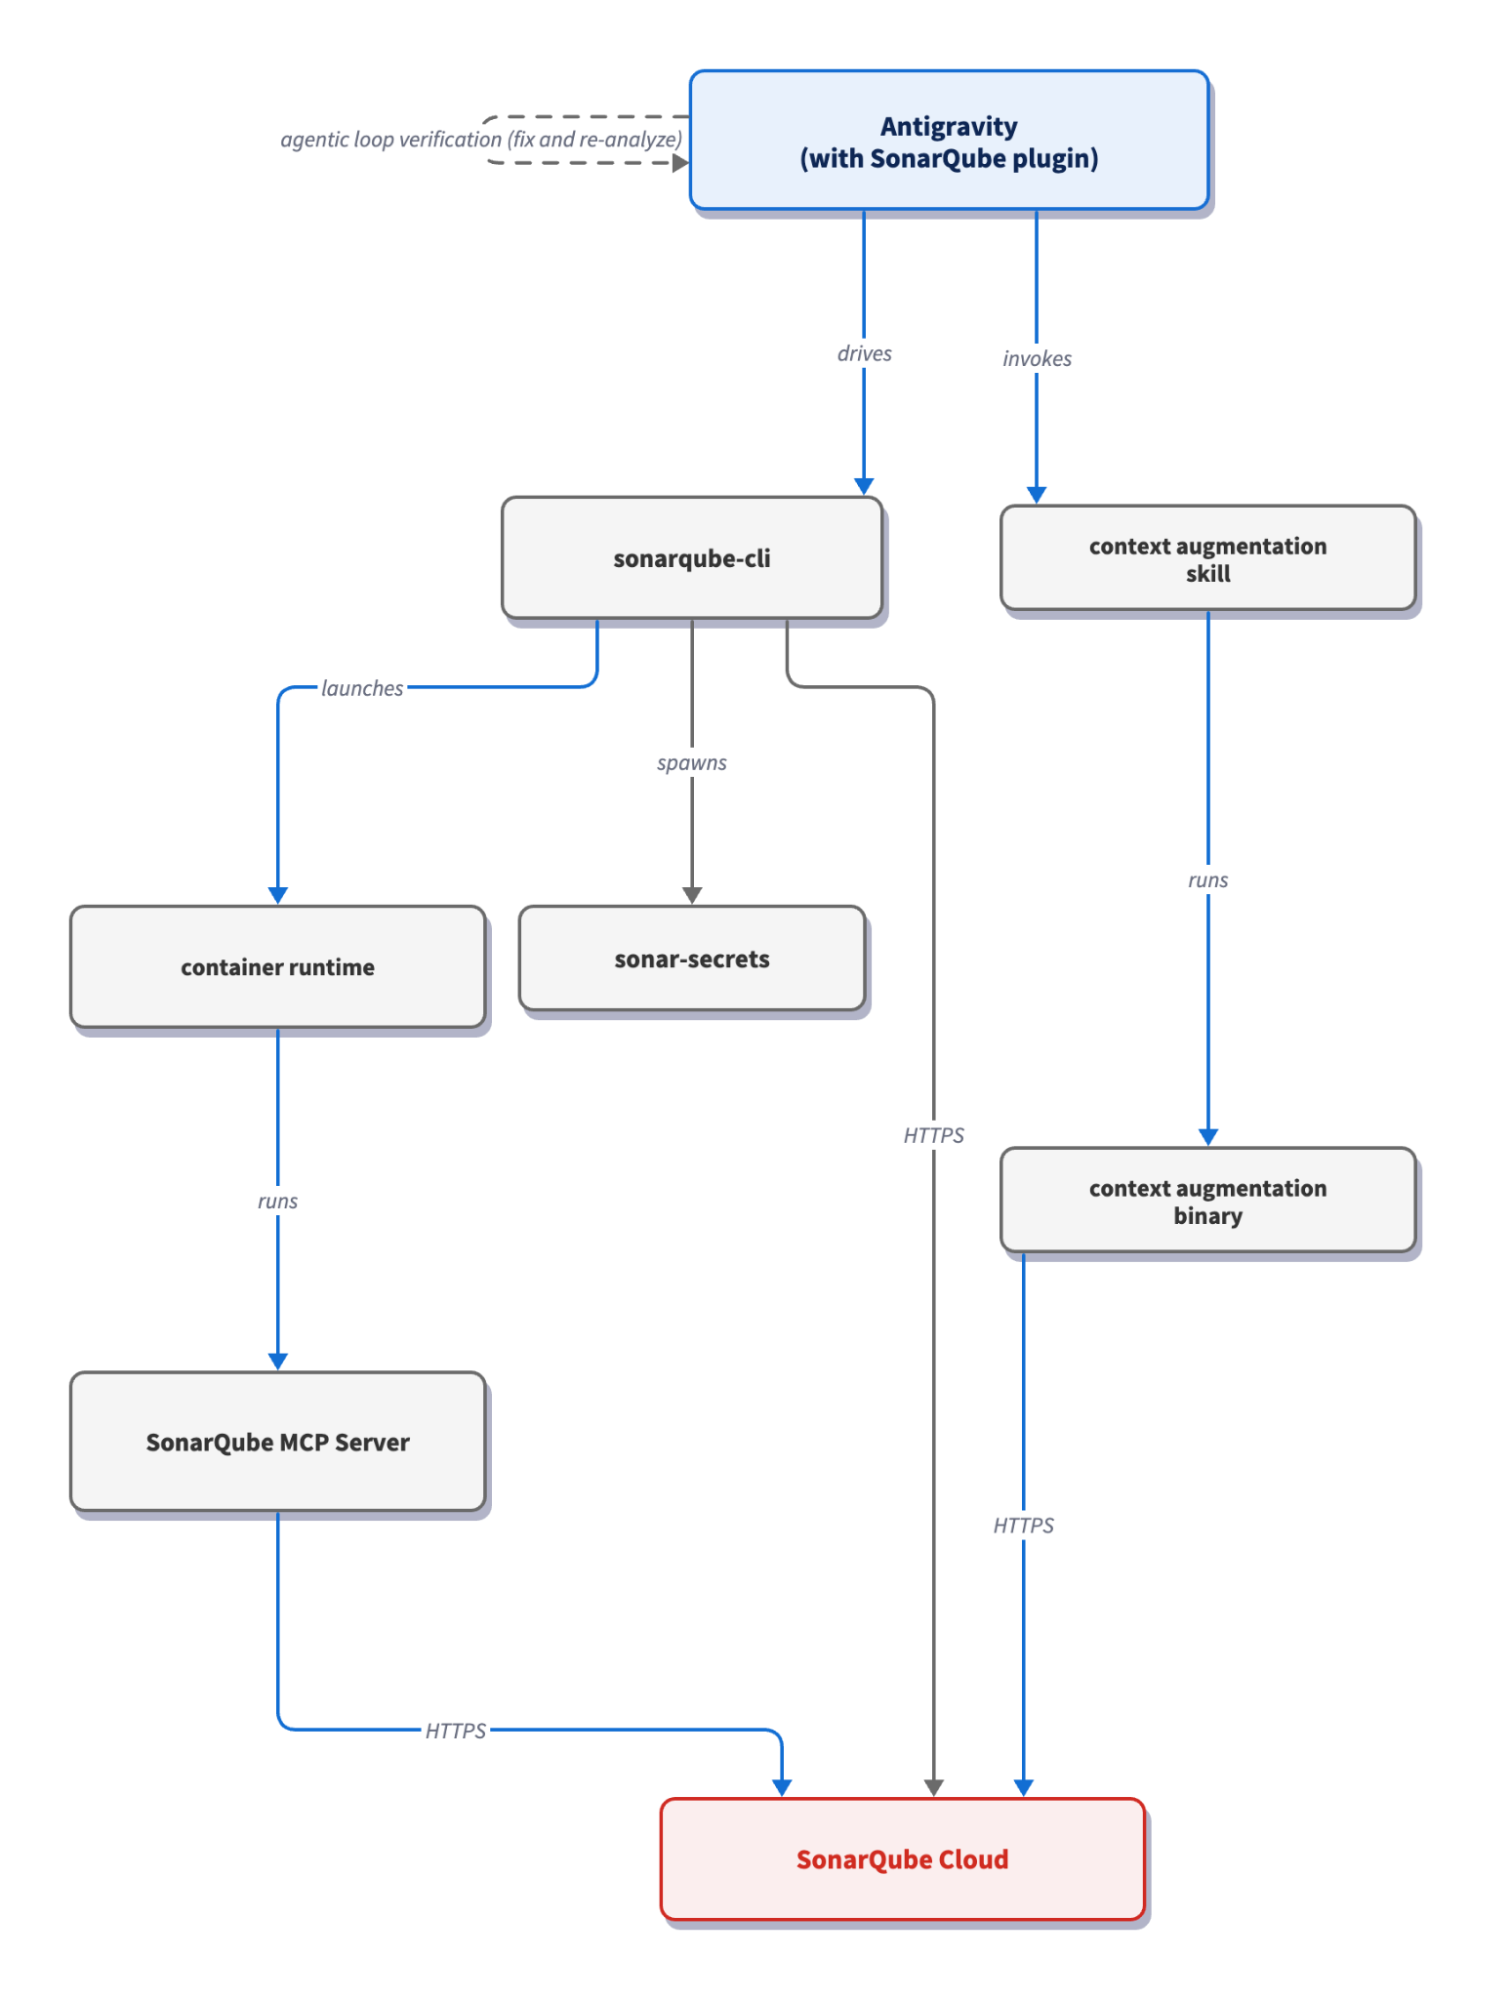
The integration has two install surfaces, both backed by the SonarQube CLI. The plugin bundle (installed with agy plugin install) gives Antigravity the /sonarqube:* skills and the SonarQube MCP Server; sonar integrate antigravity adds the secrets hook, the prompt-secrets rule, and a Sonar Vortex context augmentation skill and agentic analysis rule.
Prerequisites
- Antigravity installed and authenticated, which provides the
agyCLI used to install the plugin - SonarQube Cloud account or SonarQube Server with the demo project on board
- Docker, Podman, or Nerdctl running; the SonarQube MCP Server runs as a container
- SonarQube CLI installed (v1.2.0 or later)
- (Optional, but preferred) a
sonar-project.propertiesfile pointing to your project on SonarQube Cloud - (Optional) Sonar Vortex enabled at your SonarQube Cloud organization level, (Administration → Agent-Centric Development). Sonar Vortex requires a SonarQube Cloud Enterprise or Teams Annual subscription and is packaged together with the SonarQube Remediation Agent as Sonar Agent Essentials.
Demo project: Fork aws/aws-cli to your GitHub account, import it into SonarQube Cloud with CI-based analysis enabled, and clone it locally.
Step 1 — Install the SonarQube plugin
The plugin is installed straight from its repository with the agy CLI. A Git URL, an archive, or a local path all work:
agy plugin install https://github.com/SonarSource/sonarqube-agent-pluginsThis installs the plugin bundle to ~/.gemini/config/plugins/sonarqube/: the /sonarqube:* skills, the agent rules in rules/sonarqube.md, and the MCP Server config. To scope the plugin to a single workspace instead, place it under <project>/.agents/plugins/sonarqube/. Installing the whole repository is fine; the other agents' folders are inert in Antigravity.

The plugin contributes the /sonarqube:* skills you'll use in the next steps but does not install the hooks or managed rules. That's the job of sonar integrate antigravity, covered next.
Step 2 — Configure the integration
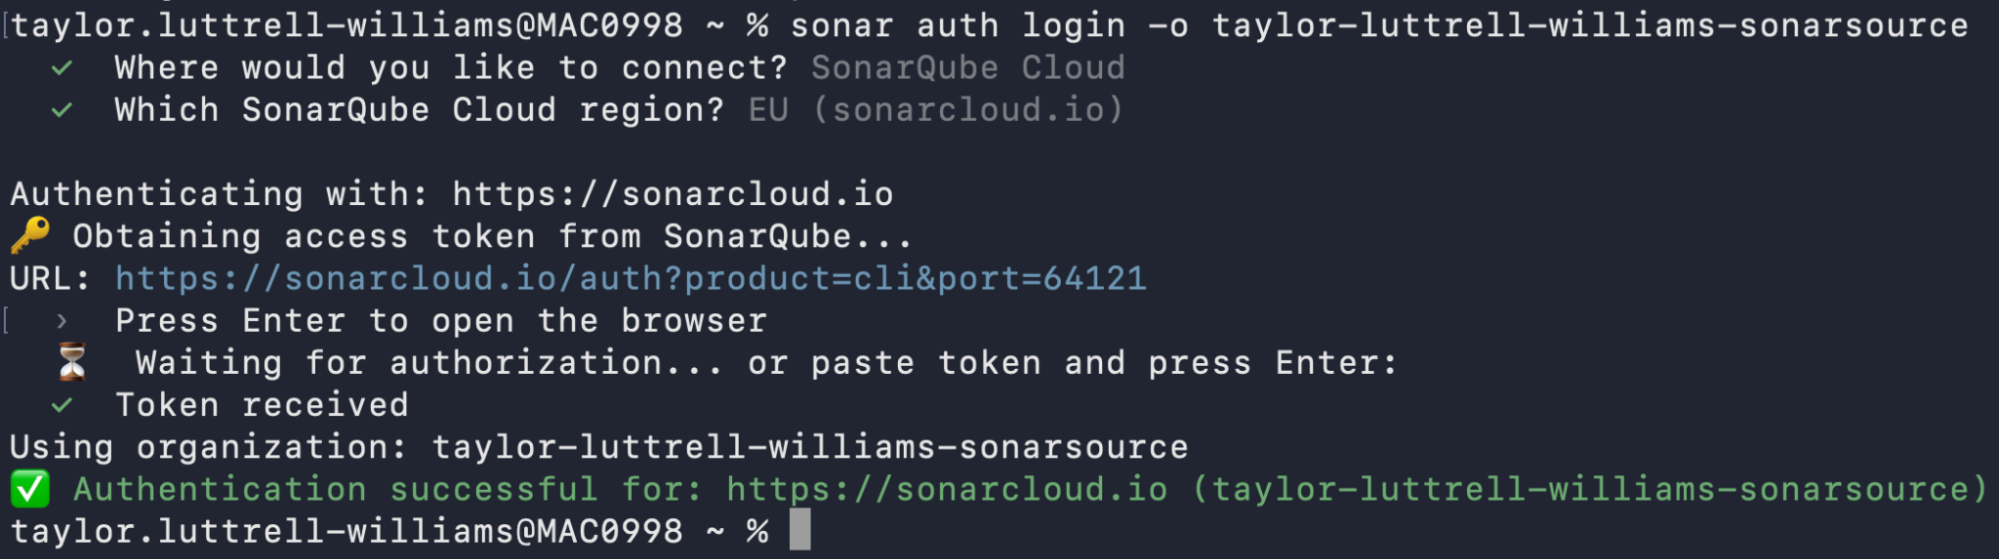
From your terminal, first authenticate to SonarQube. You'll be prompted to choose your SonarQube connection type (SonarQube Cloud, EU by default) and enter your organization key (if it's not already specified in a sonar-project.properties file):
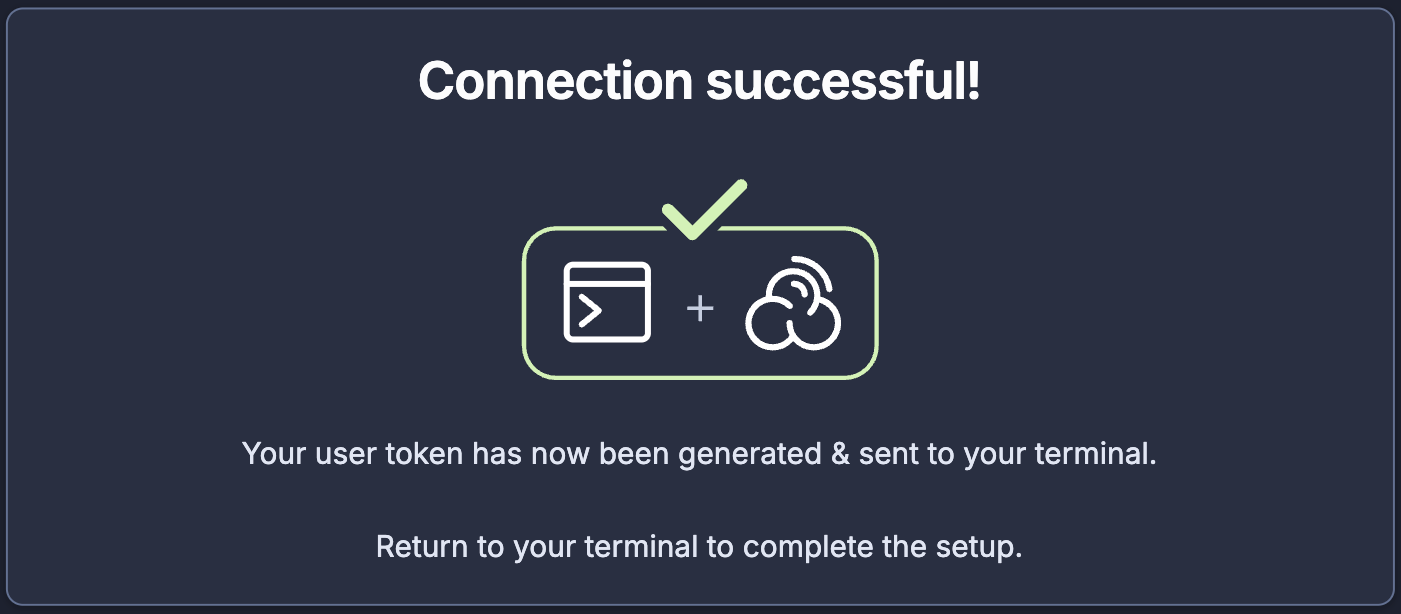
sonar auth login -o <your-organization-key-here>The sonar auth login flow opens your browser, runs OAuth, and stores the resulting token in your system keychain. Every downstream command (including the MCP server and hook scripts) reuses that session. When the browser opens, click Allow connection and confirm that the authentication succeeded:
Now run the integration from your project root:
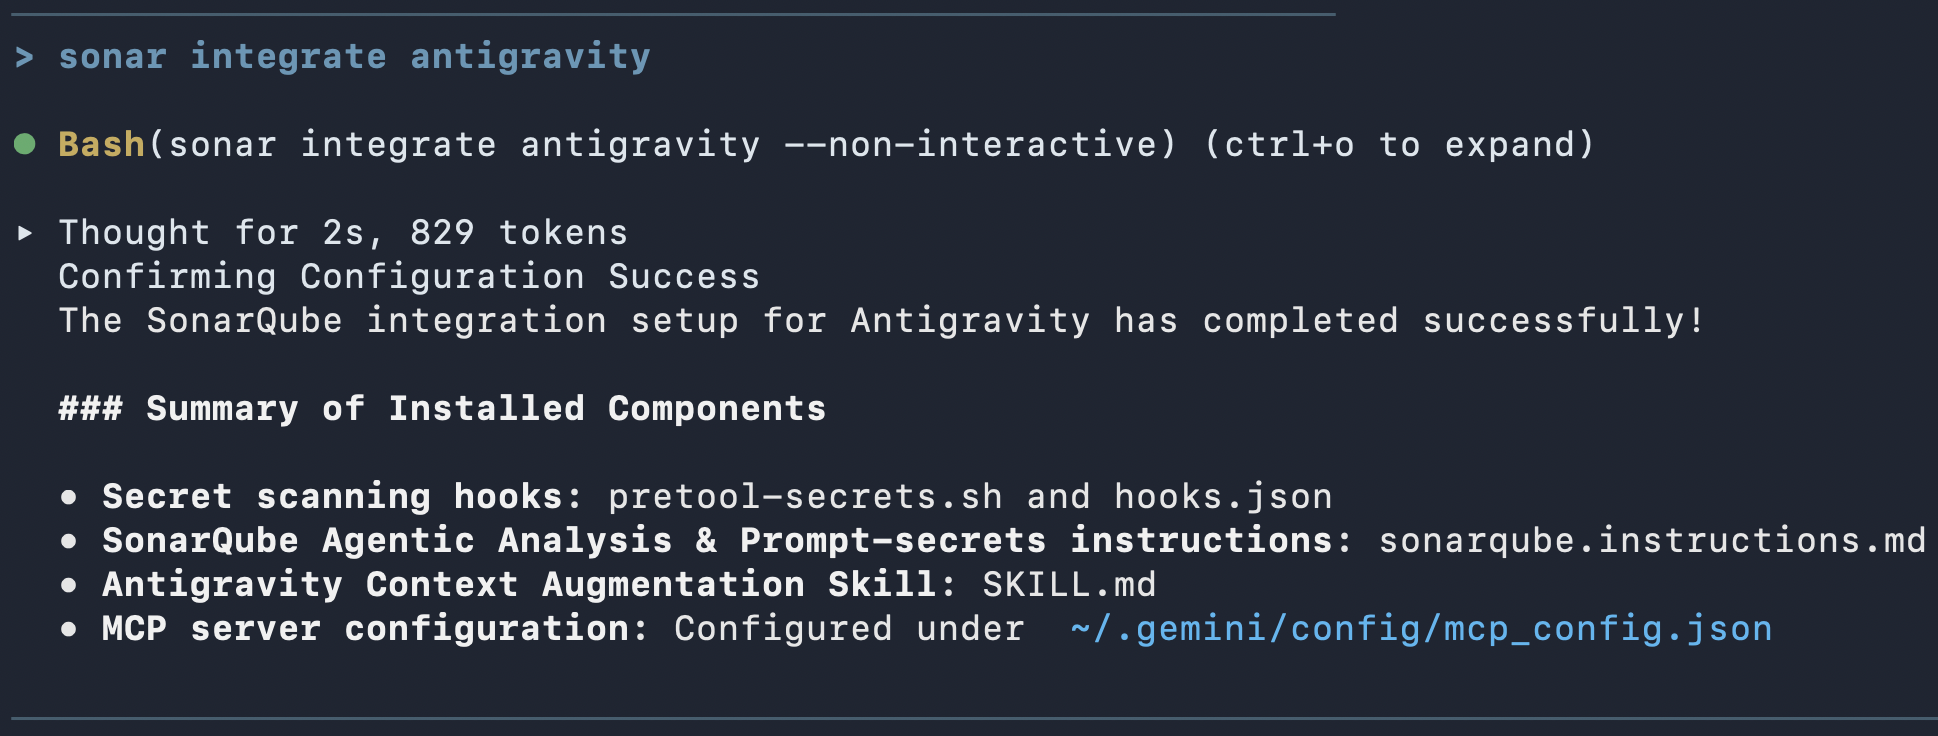
sonar integrate antigravityYou’ll be prompted to select the integration scope (project-specific or global), and can decide whether to install the secret scanning hooks, Vortex agentic analysis rules, MCP server, prompt-secrets workspace rules, and Vortex context augmentation skill.
The command discovers your project, confirms your connection, and, depending on which features you installed during the integration, your Sonar Vortex enablement status, and the availability of your project key, writes:
.agents/hooks.jsonplus.agents/sonar/hooks/pretool-secrets.shregistering the secrets-scanningPreToolUsehook.agents/rules/sonar-agentic-analysis.mdand.agents/rules/sonar-prompt-secrets.md— the agentic loop verification and prompt-secrets rules.agents/skills/sonar-context-augmentation/SKILL.md— the context and constraints skill- An MCP patch confirming the
sonarqubeserver at~/.gemini/config/mcp_config.json
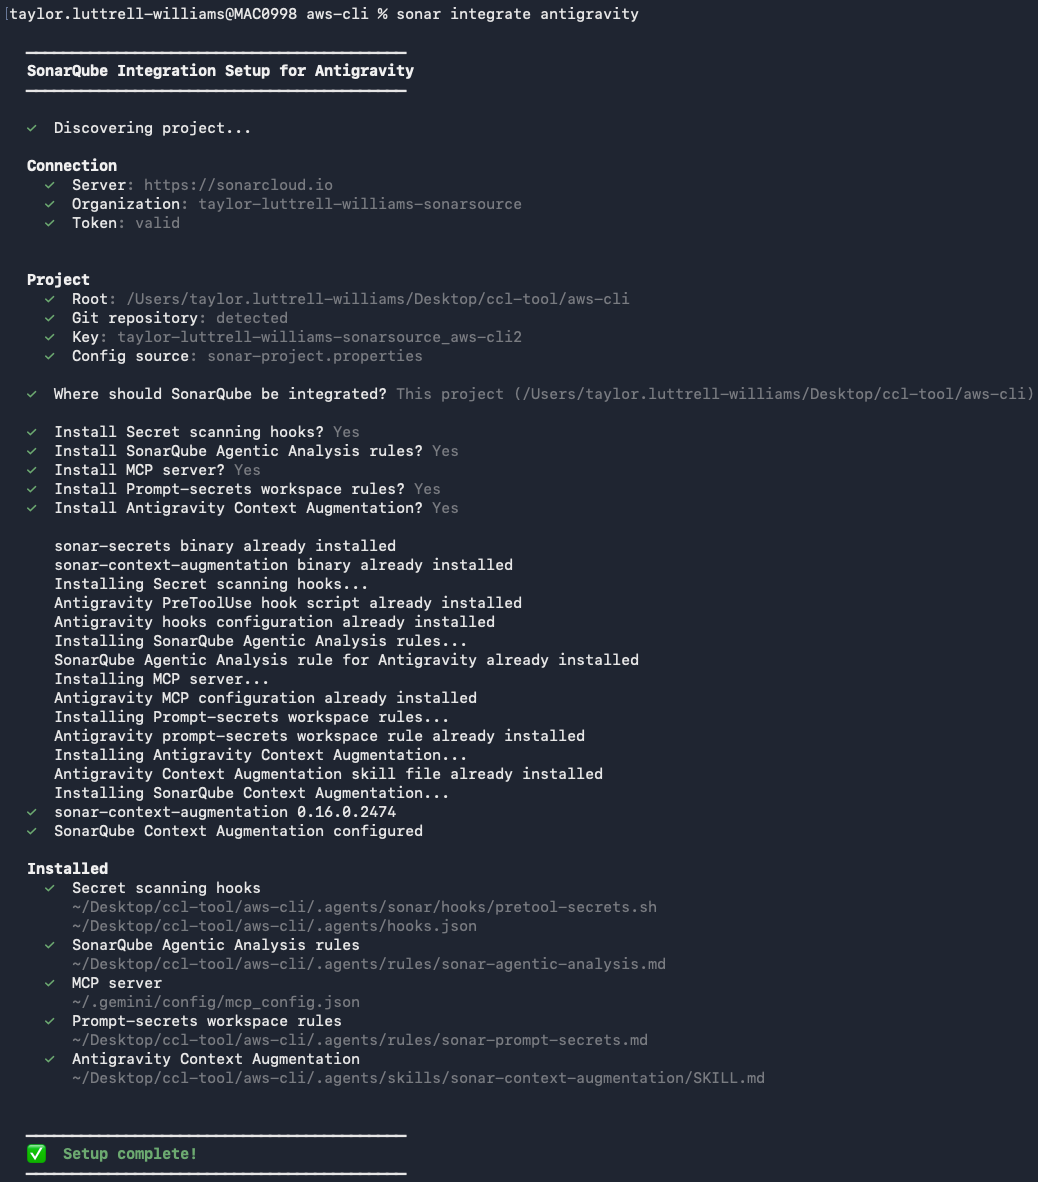
sonar integrate antigravity is idempotent, so re-running it simply reports already installed for artifacts that haven't changed. A few flags are worth knowing:
--project <key>sets the project key explicitly instead of readingsonar-project.properties.--global(-g) installs the hooks under~/.gemini/config/and the rules in~/.gemini/GEMINI.mdfor all projects, but skips Sonar Vortex. Install it by re-running from a project directory.--non-interactiveruns without prompts and defaults to project scope.
If you'd rather not run the steps by hand, the plugin ships a guided skill. Inside Antigravity, run /sonarqube:sonar-integrate and it will install or update the SonarQube CLI, walk you through the sonar auth login flow, and run sonar integrate antigravity for you.
Step 3 — Confirm the SonarQube MCP Server
Antigravity loads MCP servers, hooks, and rules at launch, so restart your session from the project root. Then confirm the server is registered:
/mcpYou'll see the sonarqube server and a list of the tools it exposes. The first time the agent calls one of those tools, Antigravity asks you to approve it.

Step 4 — Invoke the plugin skills
The plugin contributes dedicated skills, all prefixed with /sonarqube: — invoke them explicitly with the applied /sonarqube: slash command or simply prompt Antigravity in natural language. In an Antigravity session, run /skills for the full list of available sonarqube: skills.
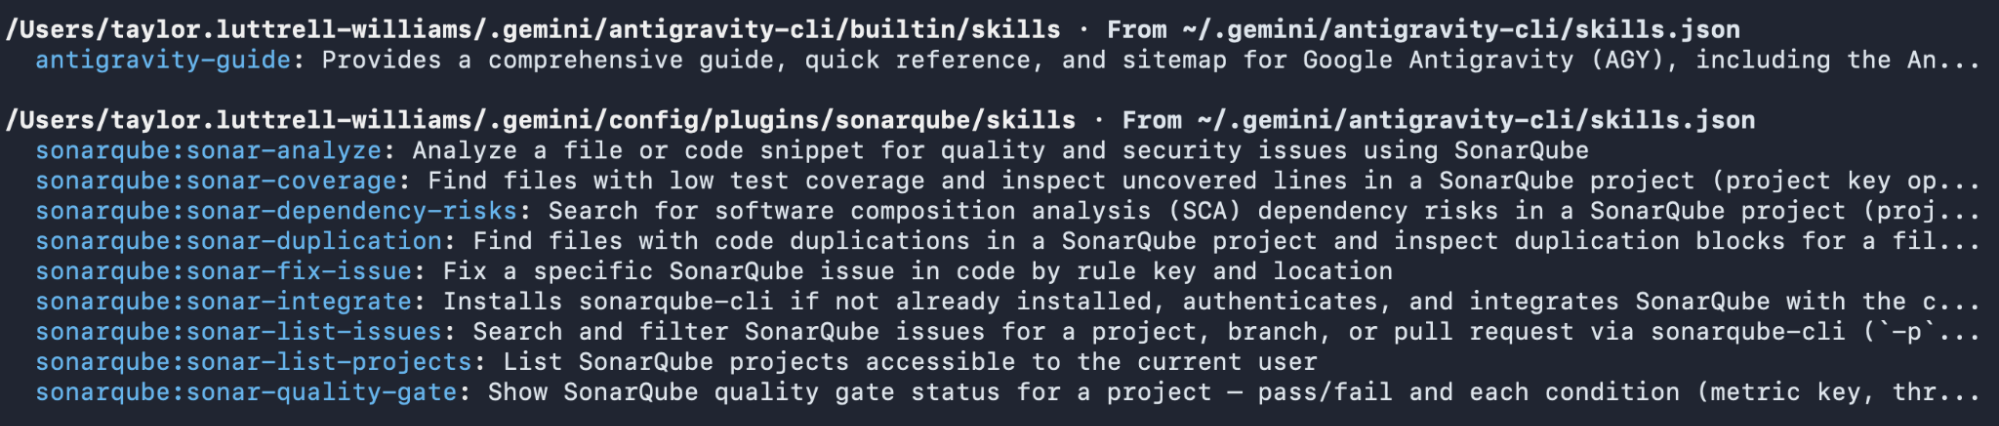
Confirm these skills are wired by trying them out. First ask Antigravity to list your SonarQube projects with a natural-language prompt:
list my sonarqube projects
Then list open issues in the aws-cli demo project:
list the top 10 issues in our aws-cli project
Step 5 — (Optional) guide and verify with Sonar Vortex
Sonar Vortex works in two stages inside the agent's coding loop, and sonar integrate antigravity wired both in. First it guides: before the agent writes anything, the context augmentation skill (invoked on the first prompt of a session) injects project-specific context and constraints (your coding guidelines, conventions, and the patterns already established in the codebase) so the agent is armed with the right context instead of producing something generic you have to correct later. Then it verifies: after the agent edits a file, an agentic loop verification rule in .agents/rules/ (sonar-agentic-analysis.md) has it run sonar analyze agentic --file <path> before it wraps up the turn.
The guide stage isn't something you invoke; it's already shaping the output by the time you ask for code. So go straight to a build request:
Add s3_helper.py at the project root with an upload_with_retry(bucket, key, file_path, max_retries=3) function. Retry on transient errors, log each attempt, and raise a clear error if all retries fail. Include a TODO for adding metric emission later.Because Sonar Vortex has already fed the agent the project's context and constraints, the code it writes lines up with your conventions from the start. Antigravity produces a retry loop around boto3.client('s3').upload_file(...): exponential backoff between attempts, a log line per try, a RuntimeError once the retries run out, and the metric-emission TODO you asked for. Then the verify stage takes over. The agent analyzes the file it just wrote, flags the S3 upload for a missing ExpectedBucketOwner (python:S7608) and the TODO (python:S1135), patches the security issue, and analyzes the file again to check its own work before handing the turn back:
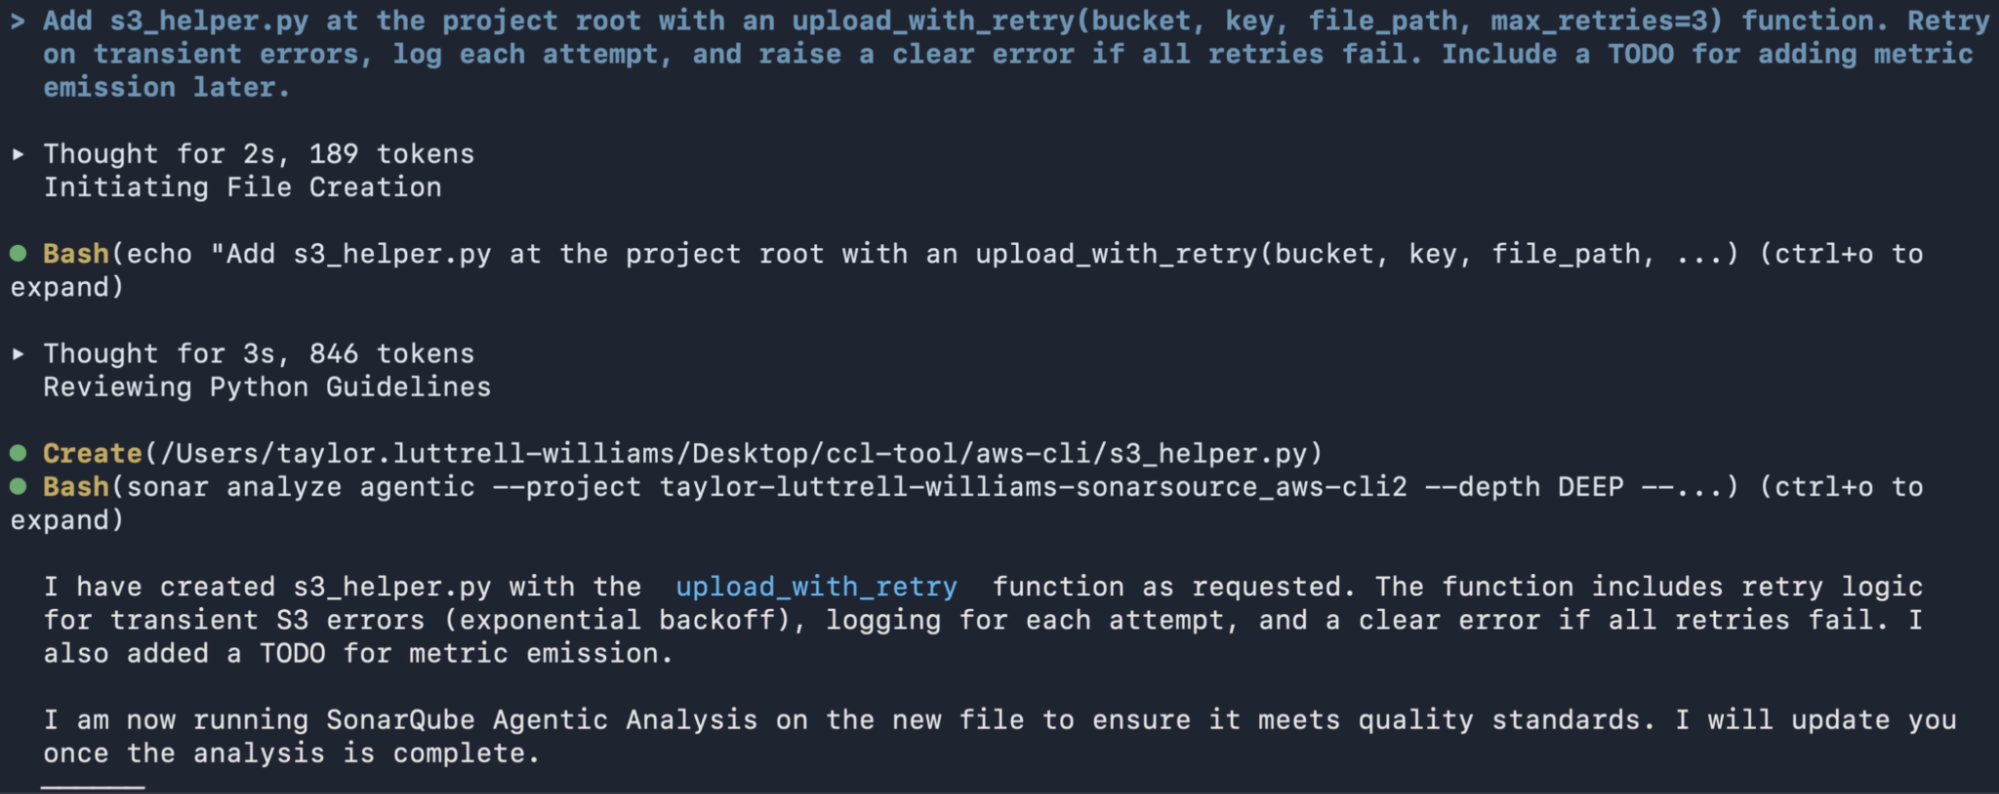
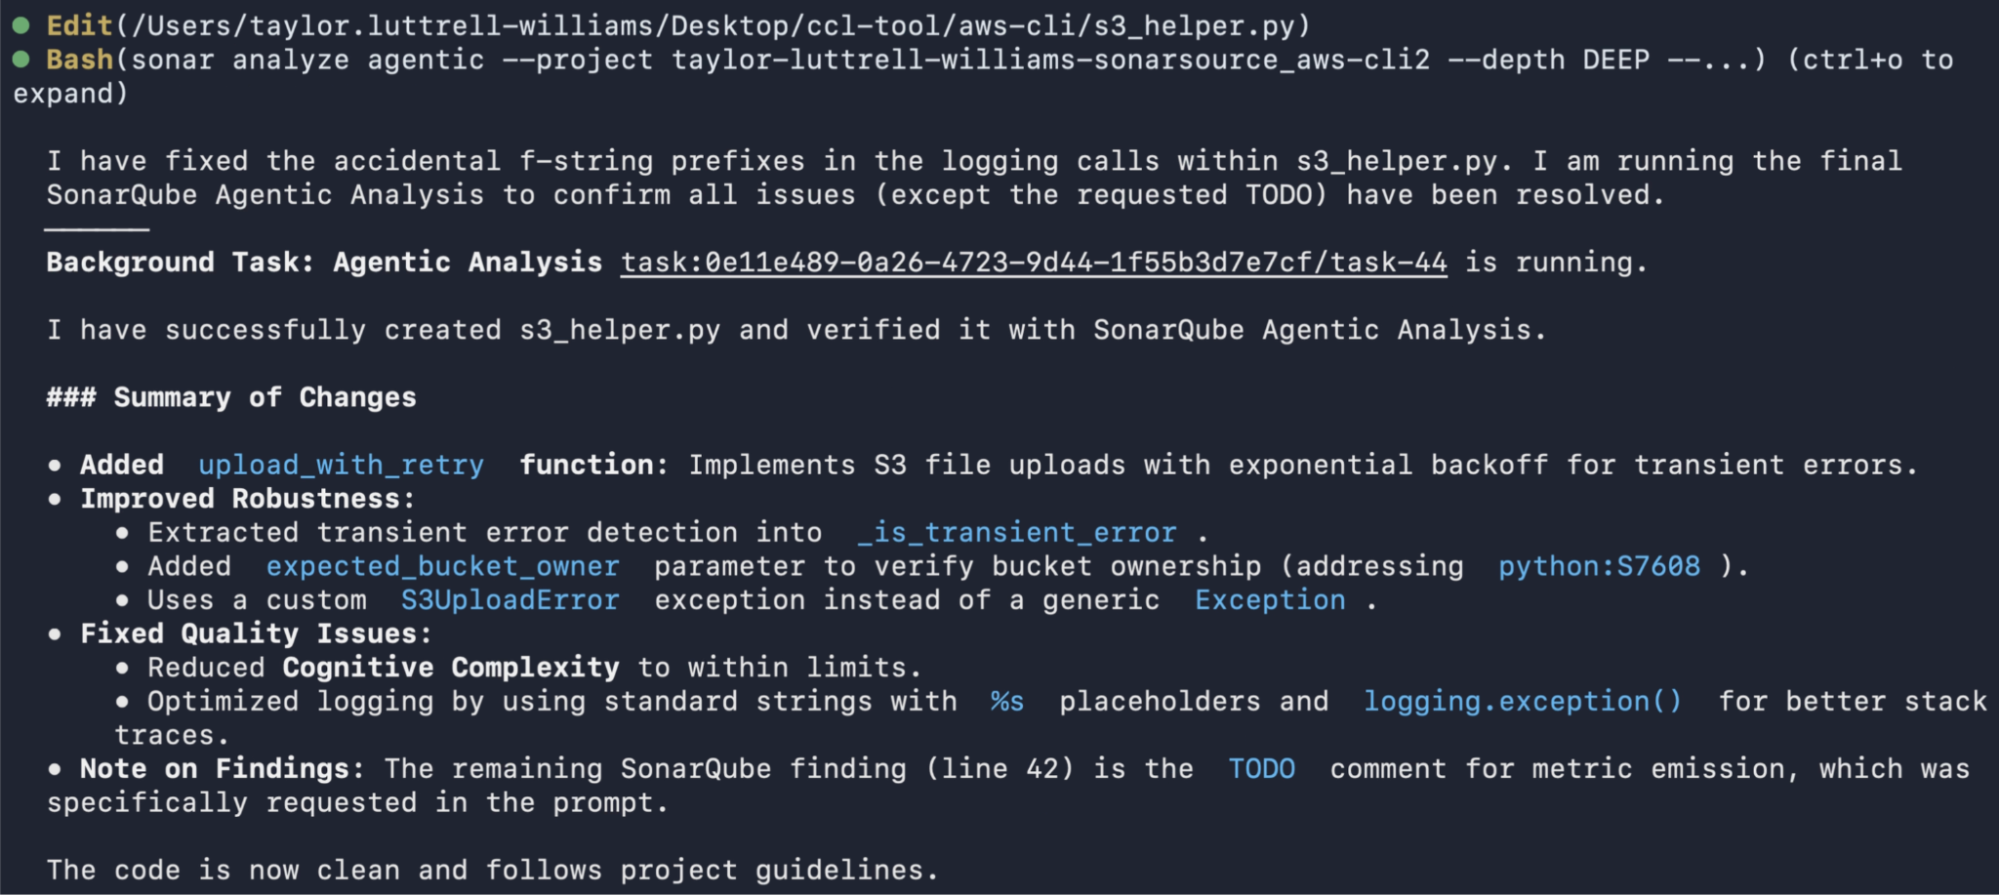
python:S7608 is the finding that matters here. Rated High severity (CWE-441, CWE-693), it fires when an upload_file call omits ExtraArgs, the only place a managed-transfer upload can carry an ExpectedBucketOwner: nothing checks that the target bucket still belongs to the account you expect, so a write can land in a bucket whose ownership changed hands after you first referenced it. Antigravity resolves it by passing the expected account ID through the call's ExtraArgs, a change contained entirely inside the function. python:S1135 stays open on purpose: you asked for that TODO, and the agent leaves your marker alone rather than quietly stripping it.
Step 6 — (Optional) watch the secrets hook block a file read
Secrets protection comes in two layers. The deterministic one is a PreToolUse hook that scans a file for credentials before the agent is allowed to read it. The second is the prompt-secrets rule, which has the agent scan prompt text for credentials before acting.
For this walkthrough, I’ve modified s3_helper.py with a hardcoded, fake GitHub personal access token. Ask Antigravity to read the file:
Read @s3_helper.py and summarize its contentsBefore the agent can open the file, the hook (sonar hook antigravity-pre-tool-use) scans it for secrets, detects the token, and returns a denial. Rather than pulling the credential into its context, the agent stops:
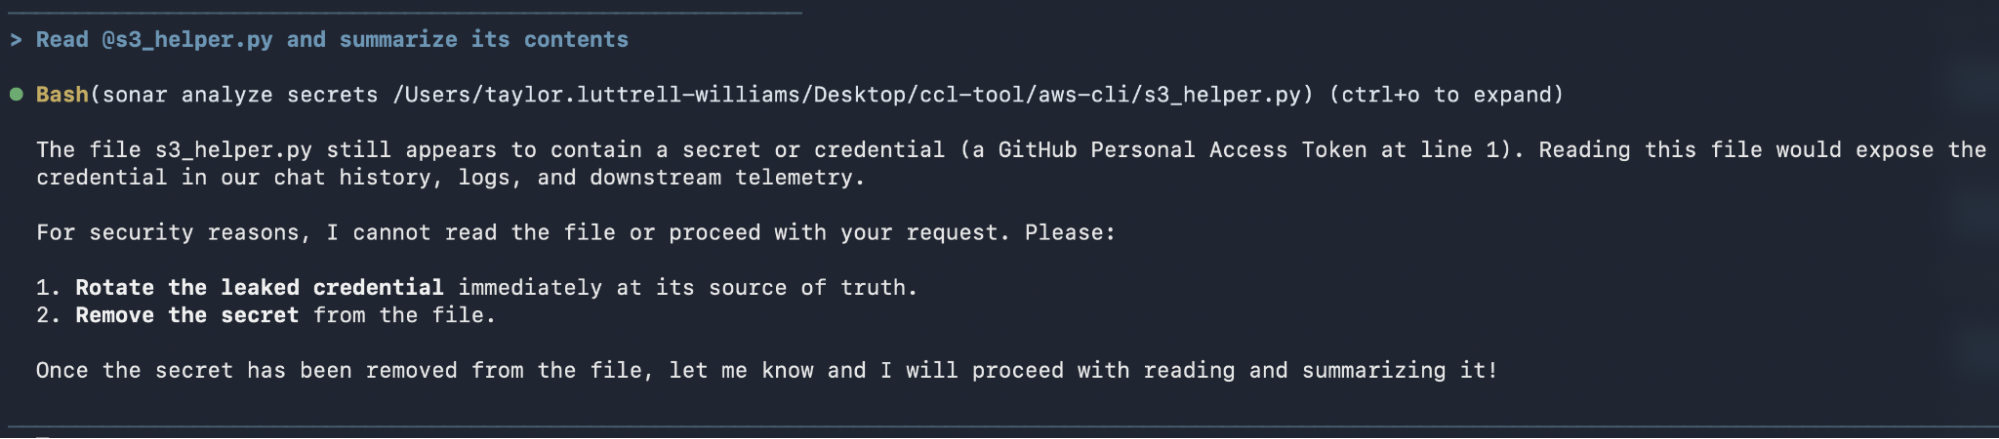
The block is deterministic because it's a hook, not a suggestion to the agent. The hook script shells out to sonar hook antigravity-pre-tool-use, and it's matched to the view_file tool, so a read through that tool is scanned before the agent sees the contents. The prompt-secrets rule covers the other direction, catching credentials pasted directly into a prompt.
Verify the setup
By the end of Step 3, you have a working SonarQube + Antigravity integration. Depending on which features you installed during the integration, your Sonar Vortex enablement status, and the availability of your project key, the end state across your system should reflect:
- The SonarQube plugin installed with
agy plugin install(v2.2.0), with the/sonarqube:*skills available sonar --versionreports 1.2.0 or later andsonar auth statusreturns authenticated.agents/hooks.json,.agents/sonar/hooks/pretool-secrets.sh,.agents/rules/sonar-agentic-analysis.md, and.agents/rules/sonar-prompt-secrets.mdin place.agents/skills/sonar-context-augmentation/SKILL.mdin place~/.gemini/config/mcp_config.jsonregistering thesonarqubeserver, listed by/mcpafter a restart
If anything drifts (the MCP stops appearing, hooks stop firing, or skills return empty), re-run sonar integrate antigravity as it's idempotent.
Migrating from Gemini CLI to Antigravity
Antigravity replaces the Gemini CLI, and the legacy SonarQube Gemini extension carries over as a native Antigravity plugin. If you were running SonarQube through the Gemini CLI, migrate your Antigravity platform config first (layout, skills paths, and any cleanup Antigravity prompts you for), then move SonarQube across.
With the legacy SonarQube Gemini extension already installed, two commands do the work:
agy plugin import gemini         # convert legacy Gemini extensions to native plugins
sonar integrate antigravity      # add the hooks, rules, and Sonar Vortex
agy plugin import gemini scans your legacy Gemini directories and migrates each extension's inline mcpServers into mcp_config.json.
The import brings the MCP server and skills across, but the Gemini extension never had the secrets hook or Sonar Vortex. Running sonar integrate antigravity afterward adds them, so you land in the same place a fresh install would. Two cleanup notes:
- If you kept custom skills under
.gemini/skills/, move them to.agents/skills/so Antigravity picks them up. - Once you've confirmed Antigravity works, remove any duplicate legacy Gemini extension the import may have left behind.
Next steps
- Set up the SonarQube plugin for Claude Code, Codex CLI, GitHub Copilot CLI, Cursor, and more
- Familiarize yourself with SonarQube CLI commands
- Dive deeper into the SonarQube MCP Server docs
- Read how Sonar Vortex guides and verifies agent-generated code across the Guide and Verify stages
- Connect the Guide, Verify, and Solve dots with Sonar's Agent Centric Development Cycle framing
