This blog has been refreshed to reflect the new SonarQube Cloud Team plan, and updated screenshots have been included.
Embarking on a SonarQube Cloud trial is your first step toward ensuring your codebase is of the highest quality. To truly maximize the benefits, it's essential to approach the trial with a clear plan. This blog will guide you on how to make the most of your SonarQube Cloud trial period.
Lucky for you, a SonarQube Cloud Team Plan 14-day trial lets you experience all the rich features that you would get with a paid subscription. If you'd like to test out SonarQube Cloud before committing to purchase, it's important that you make the most of your limited time to get comfortable with the tool and understand the value it brings to your specific projects and teams.
Getting started with SonarQube Cloud is straightforward. You don’t need to speak with a sales representative or request a license key. Simply follow these steps to maximize the usage of your SonarQube Cloud trial:
1. Integrate with your Development Environment
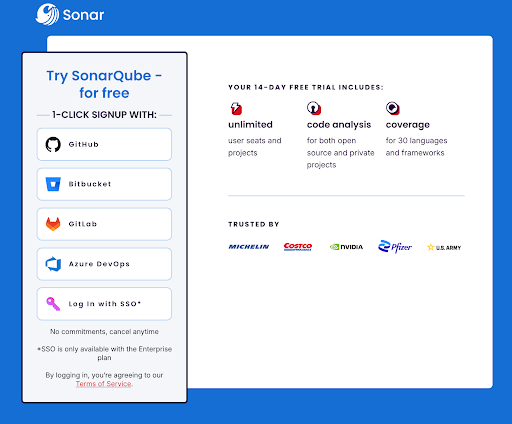
Visit the SonarQube Cloud Sign Up page to create your free SonarQube Cloud account through your preferred DevOps development environment. Connect it with your platform of choice, be it GitHub, Bitbucket, GitLab, or Azure DevOps.
This integration enables real-time feedback, making it easier to catch and rectify code issues as they arise. Your SonarQube Cloud signup account is created and linked to your account on the chosen DevOps platform. In this blog, we'll use GitHub as an example, but you can select a different provider based on your preference. As a new user, SonarQube Cloud will prompt you to connect your GitHub organization with SonarQube Cloud.
2. Set up your organization in SonarQube Cloud
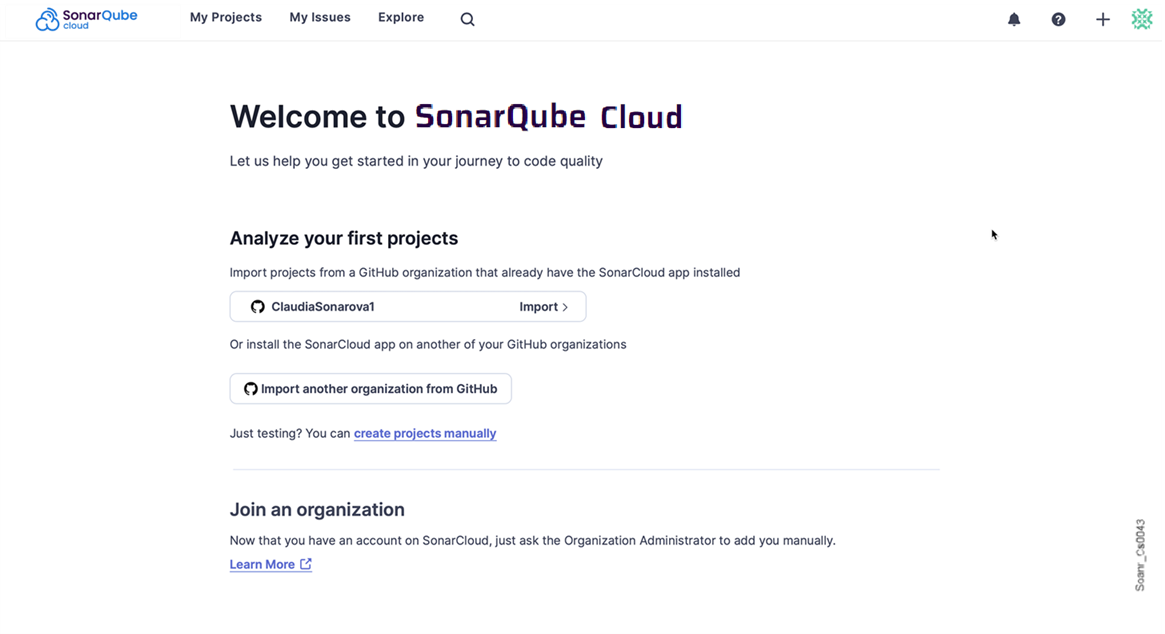
You can choose an existing organization, join an organization, or create a new one. An organization is a space where a team or a whole company can collaborate across many projects. Upon import, a corresponding organization is created in SonarQube Cloud based on the information you provide. All members from your GitHub organization will be added to your SonarQube Cloud organization. As they connect to SonarQube Cloud with their GitHub account, members will automatically have access to your organization.

3. Choose your plan
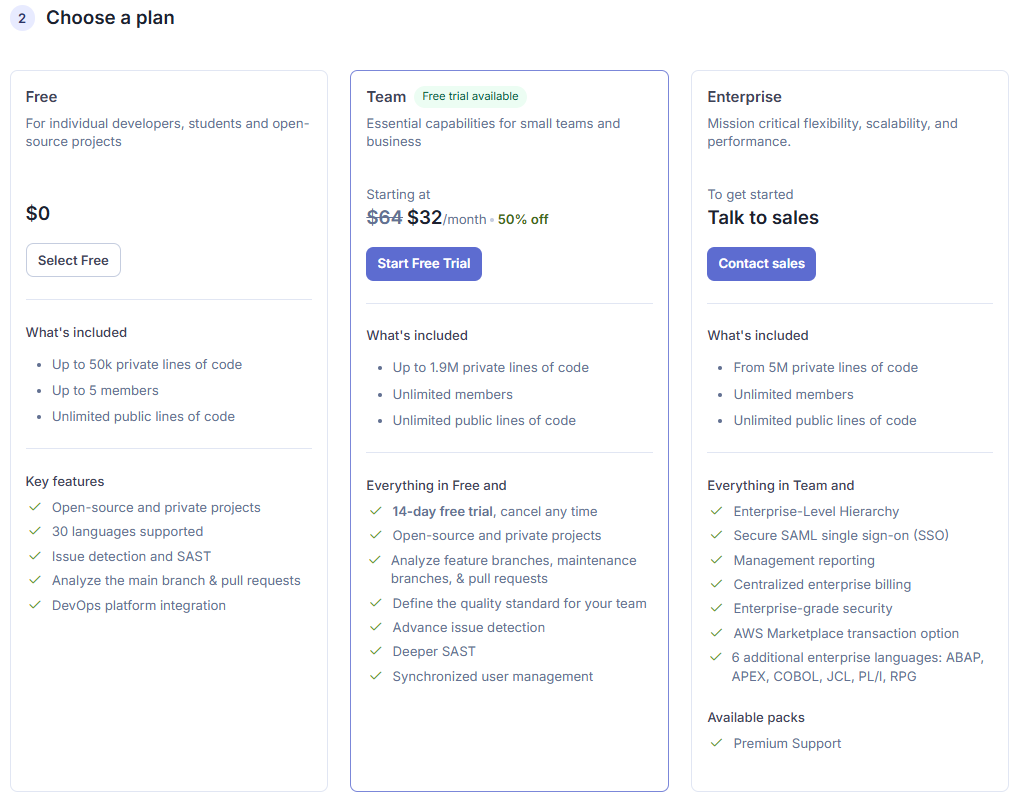
Next, it’s time to choose your SonarQube Cloud plan. You can start a no-commitment, 14-day trial of the SonarQube Cloud Team plan by selecting the Team Plan option. A credit card is required to start your trial, but please remember that your credit card will not be charged until after your trial has ended. You can analyze private projects for free during your trial period. You will receive an email reminder before any charges occur and can cancel your trial at any time. Pricing is based on Lines of Code (LOC) analyzed in private projects.
4. Select the repository you want to analyze
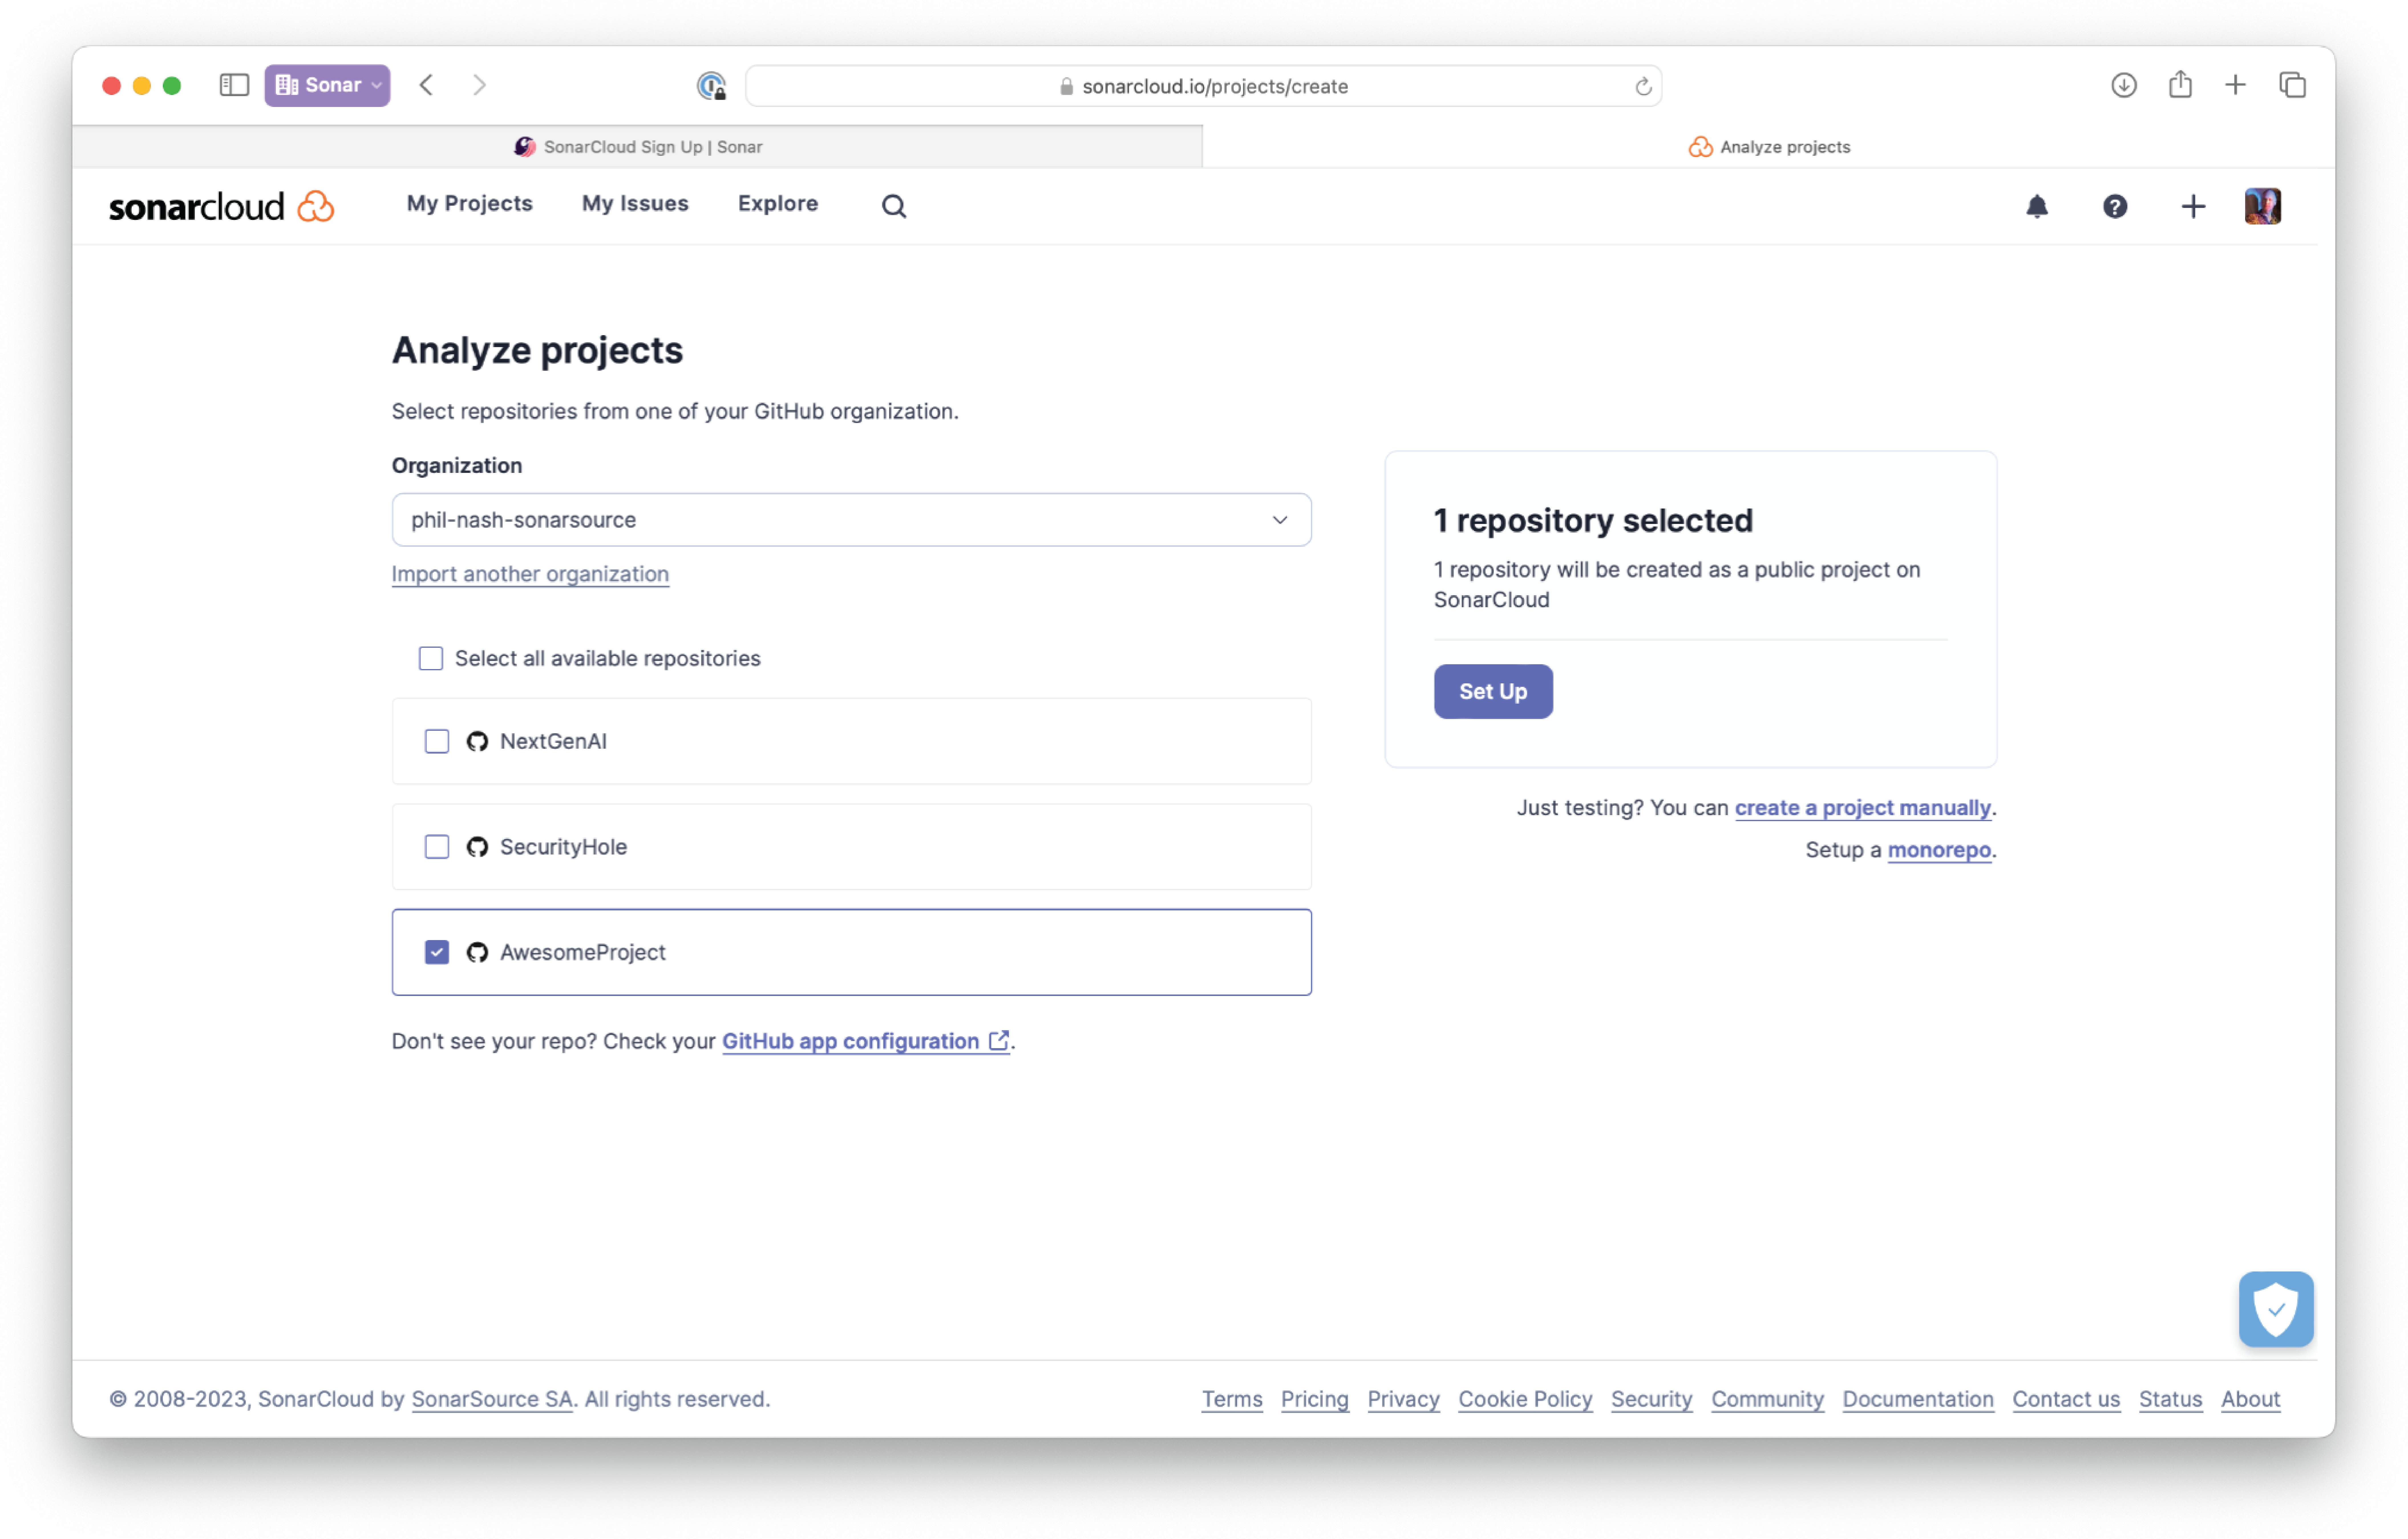
GitHub projects are grouped into GitHub organizations or personal accounts. The next step is to import the projects (individual Git repositories) that you want to analyze from your GitHub organization into your newly created SonarQube Cloud organization. A corresponding, one-to-one SonarQube Cloud project will be created for each imported repository. SonarQube Cloud will present a list of repositories in your GitHub organization; choose the projects you want to import and select “Set Up” to get started. Each imported repository becomes a SonarQube Cloud project. Once you import a project, it appears in your Projects list and is ready to be analyzed.
The next step is to set the New Code Definition (NCD) for your project(s). The NCD is a mandatory step that defines which part of your code is considered “new code.” When you perform an analysis on your main branch (or other long-lived branches), SonarQube Cloud uses the New Code Definition to determine which issues you should focus on fixing and highlights these as issues in new code. This helps you focus your attention on the most recent changes to your code and allows you to follow the Clean as You Code (CaYC) methodology. Guidance on choosing the right NCD is available in the docs.
5. Run your first analysis!
For GitHub repositories, two analysis methods are available: Automatic analysis and CI-based analysis. Automatic analysis will be triggered instantly for most languages. You can also set up analysis on your CI/CD tool in just a few minutes. From then on, all new pull requests and your main branch will be automatically analyzed. It’s that easy! Note that SonarQube Cloud supports all the popular programming languages to ensure your needs are covered.
During the next 14 days, you’ll have access to SonarQube Cloud’s full features and functionalities. We recommend trying the next four steps to learn more and get familiar with SonarQube Cloud.
6. Explore SonarQube Cloud
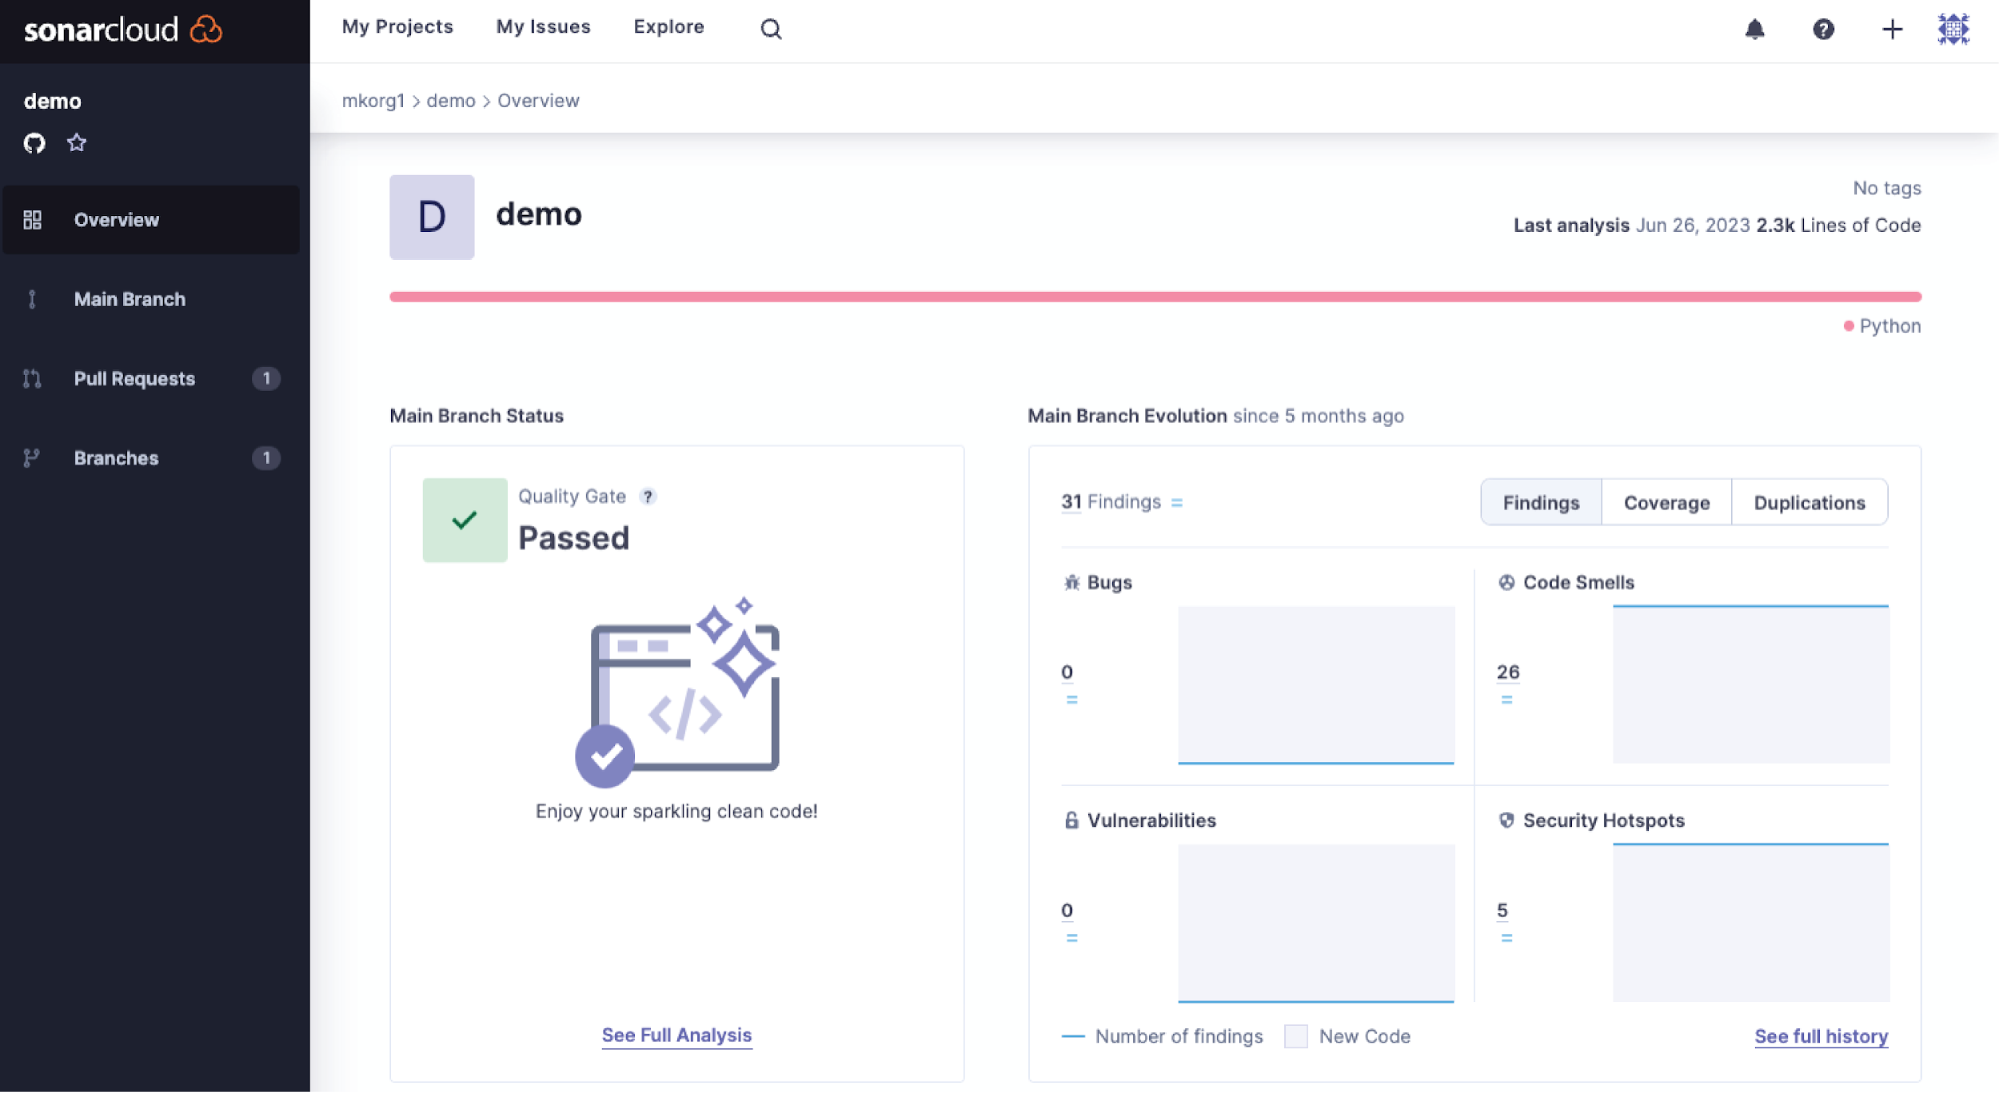
Now that you've completed the first analysis, it's time to explore the SonarQube Cloud user interface and dashboard. The SonarQube Cloud dashboard offers a wealth of information. Spend time understanding metrics like software quality and issue types (such as Bugs, Vulnerabilities, and Code Smells) that may contribute to Technical Debt. By familiarizing yourself with these, you can prioritize the issues that need immediate attention.
For projects that contain AI-generated code, try marking the project to indicate this and explore the SonarWay for AI Code Quality Gate. These AI features and more are only available in our paid plans. Discover what each plan offers here.
7. Explore SonarQube Cloud’s AI Capabilities
While AI significantly enhances developer productivity, it's crucial to maintain rigorous quality checks on code generated by LLMs before deployment. AI features available in SonarQube Cloud empower you to confidently integrate AI solutions into your workflows while ensuring the security, maintainability, and robustness of your code, aligning with the best practices outlined for AI coding.
AI Code Assurance allows for projects that include AI-generated code to be tagged and thoroughly reviewed for quality and security issues through a dedicated AI Code Assurance workflow.
AI CodeFix reduces the time it takes to fix issues by providing instant, AI-generated code fixes that developers can quickly review and apply.
8. Quality Profiles and Quality Gates
Quality profiles in SonarQube Cloud are a crucial part of your configuration, as they specify the rules applied during code analysis. By default, SonarQube Cloud includes a built-in quality profile for each supported language, referred to as the “Sonar Way” profile (indicated with the "BUILT-IN" tag). With the Team Plan, you can also create a custom Quality Gate, allowing you to define criteria that your code must meet before it’s merged or released. During your trial, set up a Quality Gate and adjust its criteria to match your objectives. You can create a new quality gate definition and make it available to projects in the organization or set it as the default for all new projects. To create a new quality gate definition in an organization, you must be an administrator of that organization.
After analysis, the quality gate takes the resulting metrics and compares them to its defined thresholds to determine if the code meets the requirements for release or merge.
9. Analyze Issues and Pull Requests
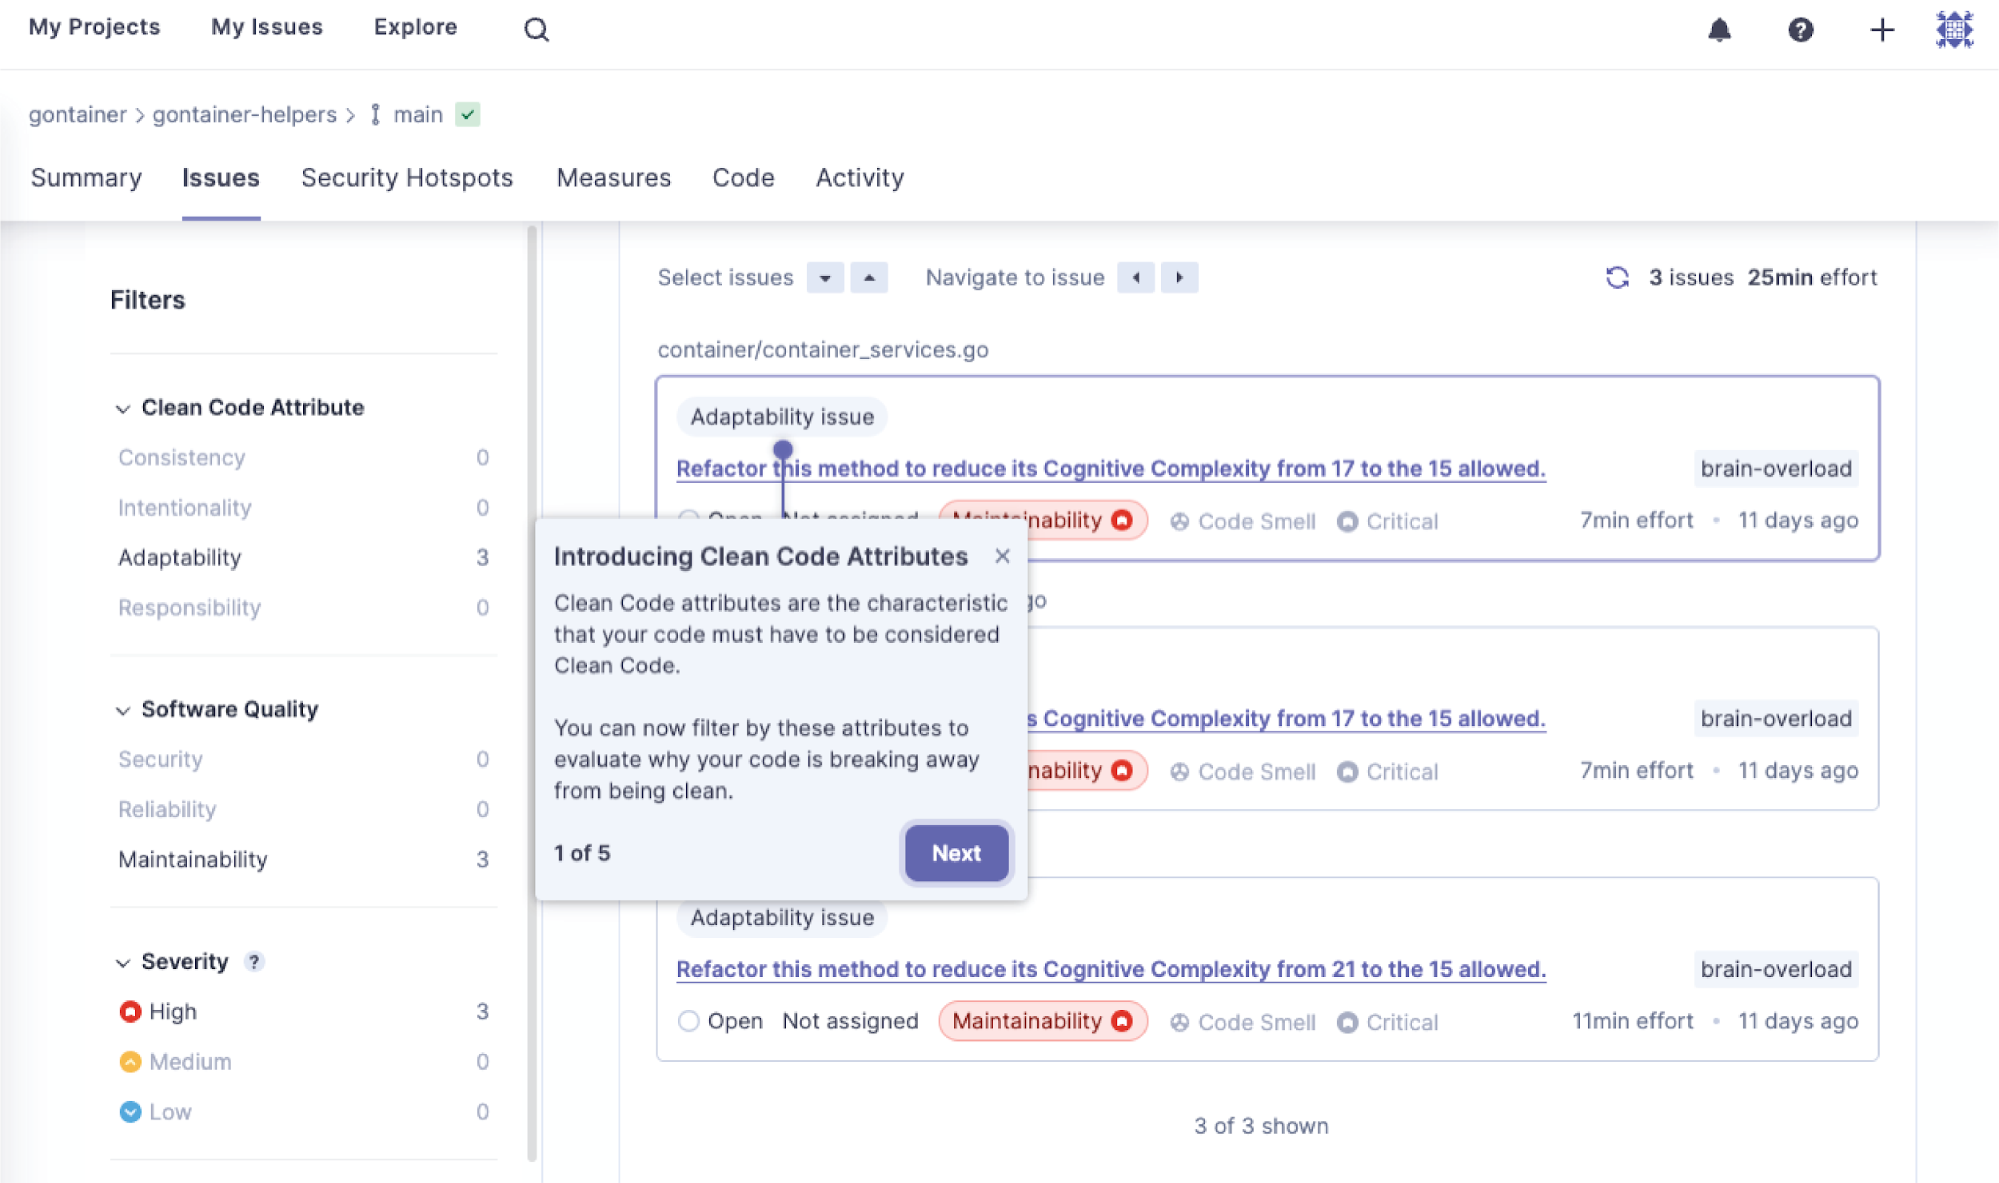
While running an analysis, SonarQube Cloud identifies issues based on coding rules defined in the quality profile. Dive deep into these issues, understand why code is flagged, and apply the recommendations. Additionally, test Pull Request (PR) analysis by creating a PR in your repository. SonarQube Cloud analyzes new code introduced in the PR and provides results directly in the PR interface, ensuring code quality before merging.
Additional Tips for Your SonarQube Cloud Trial Period
Here are some recommendations to ensure you're taking full advantage of what SonarQube Cloud has to offer during these two weeks:
Get your whole team involved!
This trial doesn't have to be a solo endeavor! With SonarQube Cloud, you can add an unlimited number of users to your private organization, even during your trial period. Membership of an organization is managed on the "Members" page. This is an excellent way to test SonarQube Cloud's team collaboration benefits.
Get Familiar with SonarQube Cloud’s Core Concepts
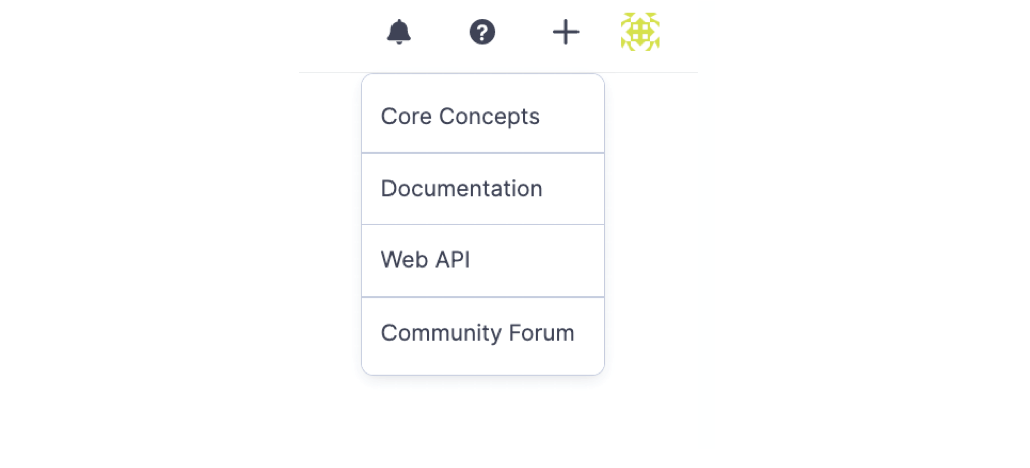
SonarQube Cloud provides tutorials covering many of its core concepts: Clean as You Code, New vs. Overall Code, Quality Gates, and Pull Requests. These lessons will help you understand the fundamental ideas behind SonarQube Cloud, enabling you to get the most value from the product. To start these tutorials, click on the question mark icon in the navigation and then click on "Core Concepts."
SonarQube for IDE integration
Boost your coding efficiency by adding the SonarQube for IDE extension to your favorite Integrated Development Environment (IDE). Experience real-time, advanced static analysis that empowers you to find and fix code issues on the fly. SonarQube Cloud's quality profile and analysis settings synchronize to SonarQube for IDE, aligning teams around a single standard of quality and security.
To recap, at a high level, during your SonarQube Cloud trial, you can expect the following:
- The ability to analyze both public and private projects.
- The ability to add unlimited members to your free or private organizations.
- Access to all SonarQube Cloud Team plan features and functionalities, including Advanced SAST, AI CodeFix, AI Code Assurance, customization of quality standards, and more.
- In-product tutorials and notifications that cover key concepts.
- Coverage for 30+ popular programming languages.
- Email notifications for when your credit card will be charged, so you can cancel at any time.
- SonarQube for IDE integration.
- Community Support.
- And much more!
What are you waiting for?
SonarQube Cloud helps you consistently deliver software with integrated code quality and security that future developers will appreciate and your users will love. Visit the SonarQube Cloud Sign Up page to create your SonarQube Cloud account, through your preferred DevOps platform, and start your 14-day trial. In no time, you'll be writing better, more secure code that's ready for production!

