

TL;DR overview
- Node.js's built-in test runner, introduced in recent Node versions, provides a native alternative to third-party testing frameworks, reducing dependency overhead for JavaScript projects.
- SonarQube supports importing test results and coverage data from the Node.js test runner, enabling teams to track test health and enforce coverage thresholds as part of their quality gate without switching testing tools.
- The built-in runner supports parallel test execution, test filtering, and TAP output, making it a viable option for both small scripts and larger test suites that previously required Jest or Mocha.
- Teams evaluating their JavaScript testing stack should consider the Node.js test runner as a low-overhead starting point that integrates with SonarQube's coverage analysis out of the box.
Node.js released an experimental test runner in version 18 and made that test runner stable in version 20. What does that mean for us as JavaScript developers?
First we should ask why there should be a built-in test runner. The intent behind the Node.js test runner is to provide a limited set of testing functionality that can be used to test projects without requiring a third-party dependency. It will also provide a base set of primitives that testing frameworks can use to standardise upon.
Until now, all test runners in Node.js were built as third-party packages, like Mocha, Jasmine, or Jest. This means that to write and run tests in your project you must start by choosing to add a dependency. Dependencies take maintenance and can add complexity to your configuration both locally and in your CI/CD pipelines. Other languages, like Ruby, Go, and Python, have their own built-in test runner. Both Deno and Bun ship a test runner too. So it seems natural to provide a dependency-free, built-in runner.
Finally, Jest, the most popular JavaScript test framework, sets up the test environment in such a way that it breaks the instanceof operator. Working with a test runner that is built into the platform should be a bit more predictable than that.
Let's have a look at how it works by test driving a piece of code. We won't write anything complicated, it is just to illustrate how the test runner works. I recommend using the latest version of Node.js, which is 20.2.0 as I write this.
Writing tests with the Node.js test runner
To see this in action we'll write unit tests for and implement a straightforward data structure, a stack. Start by creating a directory to write the project in and two files, stack.mjs and stack.test.mjs.
mkdir stack

cd stack

touch stack.mjs stack.test.mjs
Immediately you can run the test command:
node --testAnd you will see a result. Since there is no code, the test file runs successfully and is counted as a pass. This is really powerful already. All we've done is create two files and the test runner has detected that one is a test file and run it. We've not had to install any dependencies, there isn't even a package.json file.
This works because of the test runner execution model. When you run node --test the runner looks for files that could be tests. By default this includes all JavaScript files, that is files with a suffix of .js, .cjs, .mjs, that match any of the following patterns:
- files inside a directory called
test - files called
test.js,test.cjs, ortest.mjs - files that start with
test- - files that end with
.test,-test, or_test
You can also explicitly pass a list of files and directories to the node --test command. So, we could have called stack.test.mjs a variety of things, like test.js, test-stack.js, stack-test.js, or stack_test.js. It all depends on your preference.
Each file that the test runner discovers is then executed in a separate child process. If the process exits with a code of 0 then the test is considered to pass. That's why our empty file shows as a passing test already.
Basic tests
Open the two files you created in your editor. In stack.test.mjs import the test function from node:test.
import { test } from "node:test";node:test is the standard library module that you can import and use to create tests within your test file. Note that you must use node:test and not just test here as you can do with other standard library modules. test refers to the npm package test which is a userland port of node:test that works all the way back to Node version 14.
The test function allows us to name specific tests, as well as create groups of subtests. Pass a name and a function to test and if the function completes without throwing an error then it is deemed a pass. Write the following in your test file:
import { test } from "node:test";
test("will pass", () => {
console.log("hello world");
});
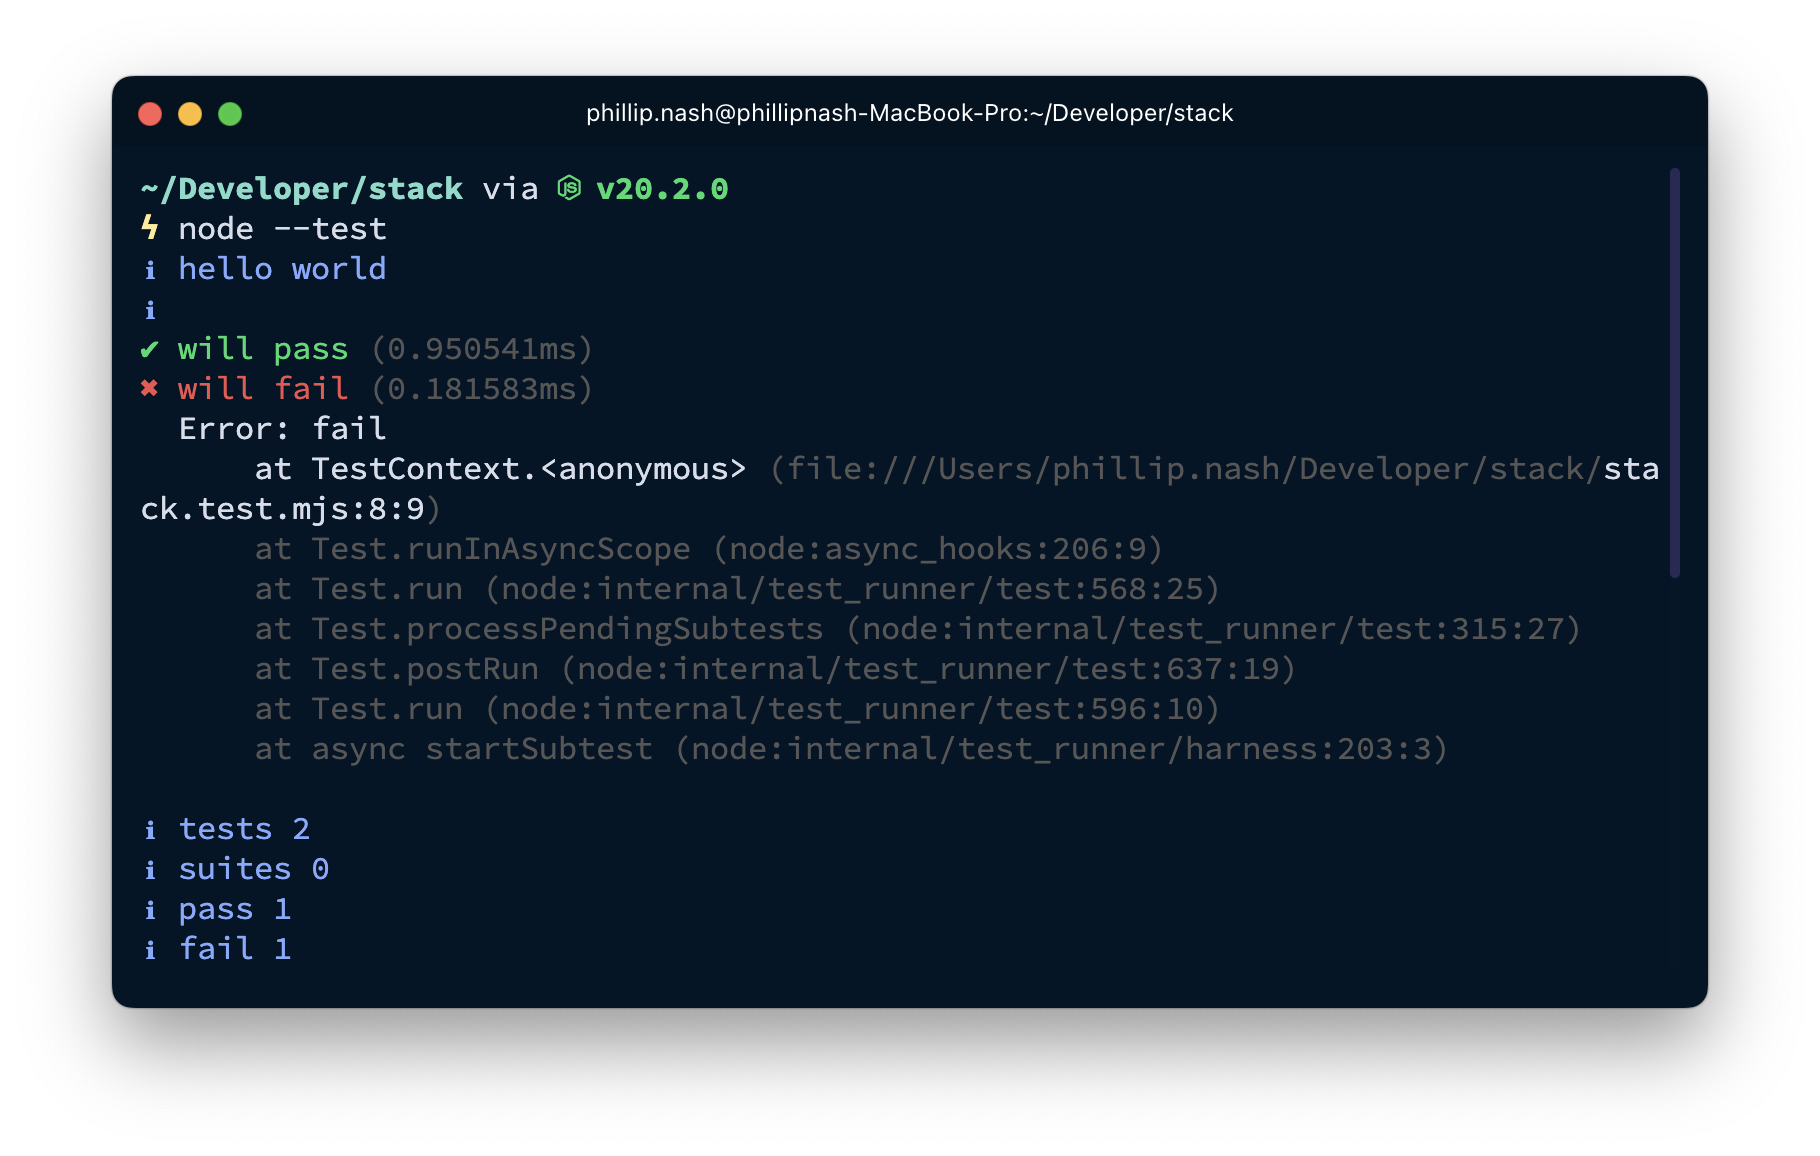
test("will fail", () => {
throw new Error("fail");
});Run the tests with node --test and you will see one pass and one fail.
Manually throwing errors is not the most expressive or efficient way to write tests. Thankfully Node has an assertion module which we can use. When an assertion from node:assert fails it throws an AssertionError which works well with the test runner.
Using assert
The assertion module comes with two modes, strict and legacy. The legacy mode uses the == operator in equality assertions but == is not recommended. I would encourage using strict mode.
We can rewrite the above tests with node:assert like this:
import { test } from "node:test";
import assert from "node:assert/strict";
test("will pass", () => {
assert.ok("hello world");
});
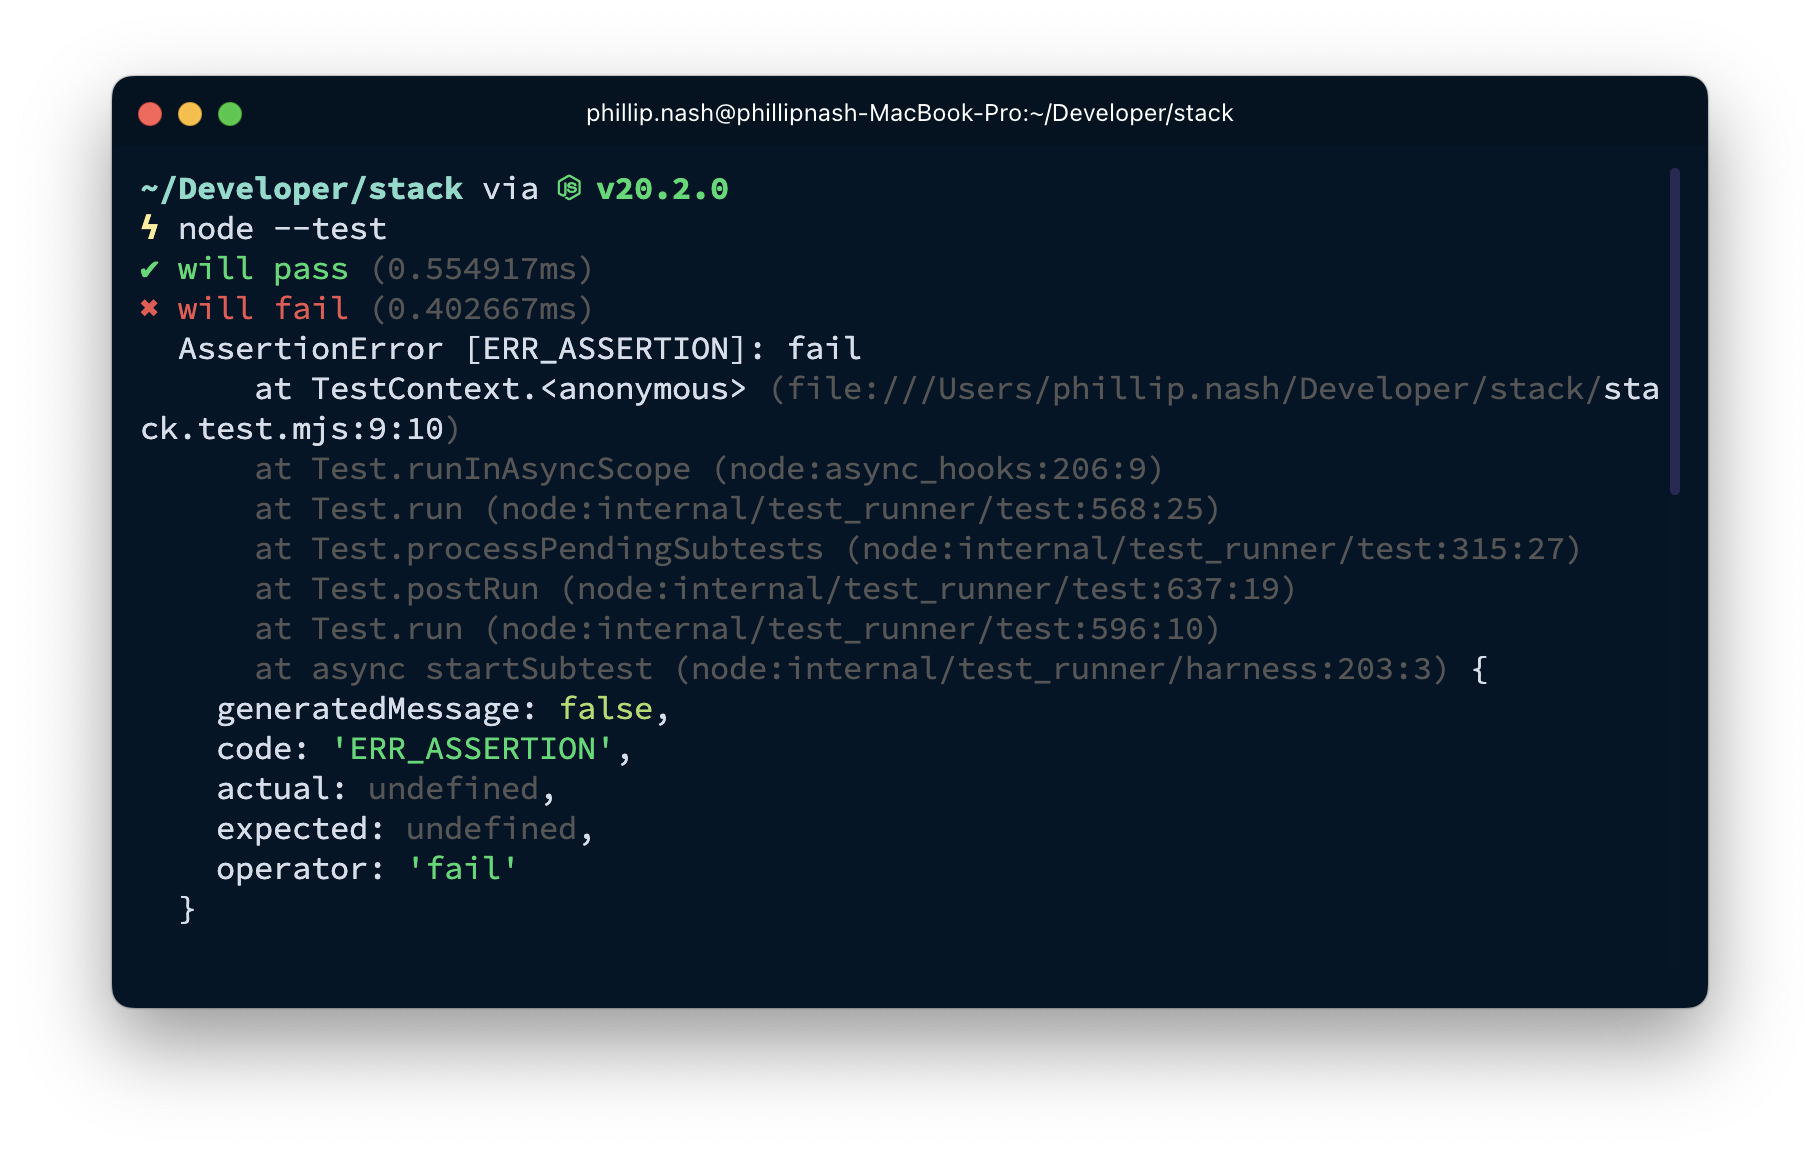
test("will fail", () => {
assert.fail("fail");
});Run node --test now and you will see one failure with more information than the plain Error.
Assert has a bunch of useful assertions, including asserting that:
- objects are equal with
equal - an object is truthy with
ok - a function
throwsor a promiserejects - and my favourite, that non-primitive objects are equal with
deepEqual
Skipping tests
The test function takes an object as an optional parameter. You can use this to skip tests or only run certain tests.
test("will pass", { only: true }, () => {
  assert.ok("hello world");
});

test("will fail", { skip: true }, () => {
  assert.fail("fail");
});
You can always skip a test. However the only option only takes precedence when you run the test suite with the --test-only flag. There is also a todo option, which still runs the test but tags it as a "todo" test to reporters. There is also a shortcut for these options, where you can call test.skip, test.only, or test.todo for the same result.
On the command line, using the --test-name-pattern will let you pass a string to match test names. Only test names that match will be run. So the following command will only run the test called "will pass".
node --test --test-name-pattern "will pass"Other options include:
timeout, which fails the test if it doesn't complete within the time setconcurrency, by default tests are run one at a timesignal, which is anAbortSignalthat you can pass to tests to cancel them mid-process
The last two seem more useful for building a test framework on top of the test runner than for users.
Subtests
With just the test function you can also group tests into subtests. Let's explore this as we actually start to build up tests for our stack implementation. When making subtests, your root test function should receive a test context parameter. You must call test on the context object to add subtests. As the test function returns a promise you will need to await each of the tests. If the root test completes before the subtests it will mark any unfinished tests as failures.
test("a new stack", async (context) => {
  const stack = new Stack();

  await context.test("is empty", () => {
    assert.equal(stack.size(), 0);
  });

  await context.test("is not empty after push", () => {
    stack.push("item");
    assert.equal(stack.size(), 1);
  });
});
These tests will fail because we haven't yet defined a Stack. Let's add the minimum required to make these pass. In stack.mjs add:
export default class Stack {
  constructor() {
    this.items = [];
  }

  size() {
    return this.items.length;
  }

  push(item) {
    this.items.push(item);
  }
}
Then import the class at the top of stack.test.mjs.
import { test } from "node:test";
import assert from "node:assert/strict";
import Stack from "./stack.mjs";
Run the tests and they now pass.
Test hooks
Let's add another test to see what happens when we pop an item off an empty stack.
  await context.test("is not empty after push", () => {
    stack.push("item");
    assert.equal(stack.size(), 1);
  });

  await context.test("pop returns undefined for an empty stack", () => {
    assert.equal(stack.pop(), undefined);
  });
});
Running the tests will fail because we haven't defined a pop method on the stack yet. Add that to the Stack class.
export default class Stack {
  constructor() {
    this.items = [];
  }

  size() {
    return this.items.length;
  }

  push(item) {
    this.items.push(item);
  }

  pop() {
    return this.items.pop();
  }
}
Running the tests now will also fail. The issue is that we are leaking some data between tests. The stack object inside the root test has an item added in push test which is being returned when we call pop in the test we just wrote. Rather than define the stack object once we should redefine it every time to make sure it is in the state we expect. The test runner provides hooks for running behaviour like this before and after tests. In this case, we can use the beforeEach hook to define a fresh stack object for each of our tests.
test("a new stack", async (context) => {
  let stack;

  context.beforeEach(() => {
    stack = new Stack();
  });
Now all the tests pass. There are hooks for before, after and afterEach for all the tests in a group too.
Test syntax
I'm personally not a fan of test as the function name, I like my syntax to be a bit more expressive. The test runner also makes available describe/it syntax. describe sets up a suite of tests and it is an alias for test. When using describe you don't need to await tests and there's no need to use a suite context, you can import hooks like beforeEach and use them within the suite.
We can rewrite out Stack tests with describe/it syntax like so:
import { describe, it, beforeEach } from "node:test";
import assert from "node:assert/strict";
import Stack from "./stack.mjs";

describe("a new stack", () => {
  let stack;

  beforeEach(() => {
    stack = new Stack();
  });

  it("is empty", () => {
    assert.equal(stack.size(), 0);
  });

  it("is not empty after push", () => {
    stack.push("item");
    assert.equal(stack.size(), 1);
  });

  it("pop returns undefined for an empty stack", () => {
    assert.equal(stack.pop(), undefined);
  });
});
You can have multiple suites per test file and nest suites within each other. We can add more tests like this:
import { describe, it, beforeEach } from "node:test";
import assert from "node:assert/strict";
import Stack from "./stack.mjs";

describe("Stack", () => {
  let stack;

  describe("a new stack", () => {
    beforeEach(() => {
      stack = new Stack();
    });

    it("is empty", () => {
      assert.equal(stack.size(), 0);
    });

    it("is not empty after push", () => {
      stack.push("item");
      assert.equal(stack.size(), 1);
    });

    it("pop returns undefined for an empty stack", () => {
      assert.equal(stack.pop(), undefined);
    });
  });

  describe("with existing items", () => {
    beforeEach(() => {
      stack = new Stack();
      stack.push("first");
      stack.push("second");
      stack.push("third");
    });

    it("returns the size of the stack", () => {
      assert.equal(stack.size(), 3);
    });

    it("returns the last item when popping", () => {
      assert.equal(stack.pop(), "third");
    });
  });
});
Test reporters
When you run the above test you'll get output that looks like this by default.
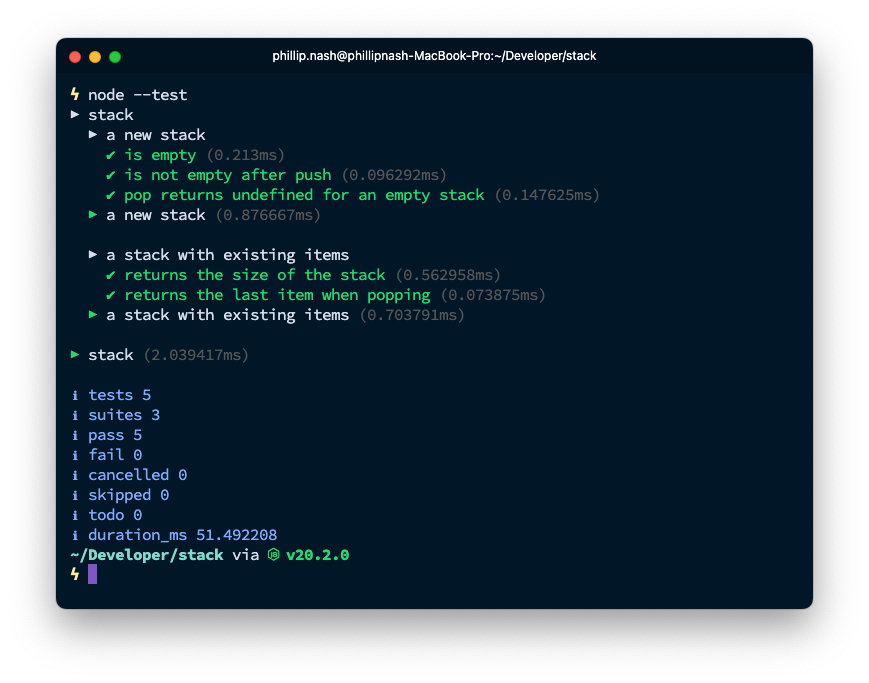
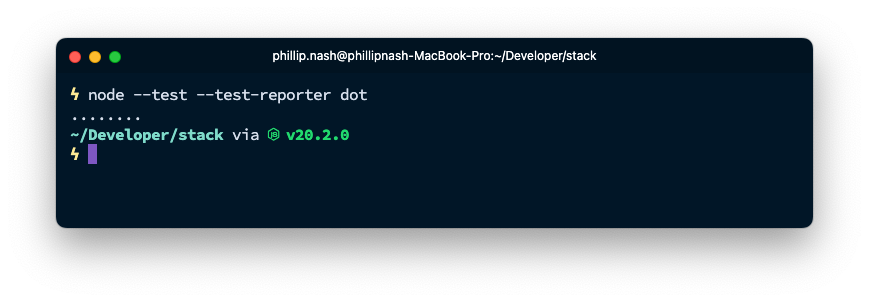
The describe suites indent their subtests and things are very readable. This is the default test reporter spec. There are two other built-in reporters, tap and dot. Tap reports using the Test Anything Protocol, which I find a bit more wordy than spec. The dot reporter is very simple and produces a . for a passing test and a X for each failing test.
You can choose your reporter by passing a --test-reporter flag, you can pass multiple reporters as well as file destinations for them, and you can write your own test reporters too. Rômulo Vitoi at Nearform wrote a great post on writing custom test reporters as well as some examples, like this GitHub reporter which annotates test failures directly in a GitHub pull request.
There's more to come
This has been an overview covering the basics of working with Node's test runner. Everything we wrote above was dependency free testing that you can use in your Node.js applications today, as long as you depend on Node 20.
But that's not all the test runner offers. There is also a built-in mocking functionality and experimental watch mode and test coverage collection.
For small projects, I've found that the test runner and assert modules have provided everything I need to write test suites. Ensuring that your code is well tested is an important part of writing Code Quality and having the tools built into the platform makes it easier to get setup and writing tests from the very start.
I'm excited to see how this develops further. If you're starting a new project soon, I'd suggest giving the test runner a try to see how it works for you. Let me know what you think about it on Twitter.
