
Author: Taylor Luttrell-Williams
TL;DR overview
- Sonar Context Augmentation gives GitHub Copilot in VS Code awareness of your project's architecture, class hierarchies, and coding guidelines through the SonarQube MCP Server.
- Covers the Guide stage of the Agent Centric Development Cycle, equipping Copilot's agent mode in VS Code with SonarQube Cloud analysis data before any code is written.
- Generated code follows your project's actual module structure and standards from the first prompt, instead of plausible-looking code that does not integrate with the framework.
- Implementation adds the SonarQube MCP Server to
.vscode/mcp.json, mounts the workspace into the Docker container, and configures.github/copilot-instructions.mdto trigger Context Augmentation tool calls before code generation.
AI coding agents generate code without a deep understanding of your project's architecture, quality standards, or framework conventions. Sonar Context Augmentation provides the awareness they need. It gives the agent access to your project's module structure, class hierarchies, call flows, and coding guidelines via the SonarQube MCP Server. The agent queries these tools before writing code, so that the output follows your project's patterns from the start.
This blueprint walks through the setup for GitHub Copilot in VS Code. It covers the Guide stage of the Agent Centric Development Cycle, using Microsoft's GCToolKit (a Java library for GC log analysis) as the demo project.
When to use this
- Your codebase has conventions that AI agents can't infer from file contents alone: annotation-based wiring, framework-specific registration patterns, module boundary rules, or architectural constraints.
- You use VS Code and want Copilot to learn these conventions from SonarQube Cloud before it generates anything.
What you'll achieve
- SonarQube MCP Server configured for Context Augmentation in VS Code's
.vscode/mcp.jsonformat - A
.github/copilot-instructions.mddirective that triggers architecture and guideline lookups before code generation - A functioning Context Augmentation flow (query architecture, fetch guidelines, generate context-aware code) running inside Copilot agent mode
Architecture

The SonarQube MCP Server runs as a Docker container with your workspace mounted. When Copilot calls an MCP Context Augmentation tool like get_current_architecture, the server queries SonarQube Cloud's API for architecture and guideline data built from your last CI scan, then reads your local workspace for file-level context. Copilot receives the results and generates code informed by your project's actual structure and standards. Single-tool responses typically complete in seconds.
Prerequisites
- VS Code 1.99 (or later), the minimum version for Copilot agent mode with MCP support
- GitHub Copilot Chat extension installed and active (includes agent mode)
- An active GitHub Copilot subscription
- SonarQube Cloud on a Team or Enterprise plan with Context Augmentation enabled
- A completed CI scan (after you have enabled Context Augmentation)
- Docker up and running
- A SonarQube Cloud user token. Create one under My Account > Security on SonarQube Cloud. If Context Augmentation was recently enabled, generate a fresh token as older tokens may not carry the required permissions.
- Use of a supported language. For full architectural awareness, use Java. Partial support (architecture tools) exists for C#, Python, JavaScript, and TypeScript, but guidelines work with all programming languages supported by SonarQube Cloud.
Demo project: to follow along, fork microsoft/gctoolkit to your GitHub account, import it into SonarQube Cloud with CI-based analysis, and clone it locally. GCToolKit is a multi-module Java project with class hierarchies, call flows, and annotation-based wiring patterns that exercise Context Augmentation's capabilities.
Step 1 — Install the base MCP Server
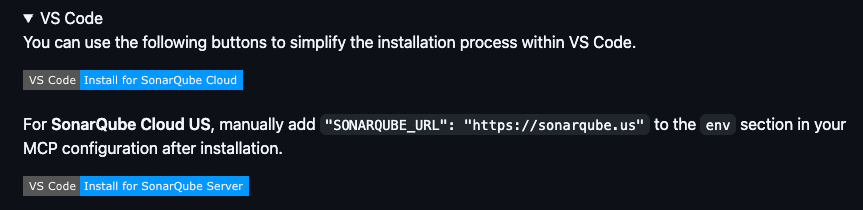
Start by installing the SonarQube MCP Server with its default configuration. The MCP Server README on GitHub includes a one-click "Install for SonarQube Cloud" button under the VS Code section. Click it, confirm the dialog in VS Code, and the extension scaffolds a .vscode/mcp.json file for you. On the first start of the server, VS Code prompts you for a user token and organization key.

The scaffolded config:
{
  "servers": {
    "sonarqube": {
      "command": "docker",
      "args": [
        "run", "--init", "--pull=always", "-i", "--rm",
        "-e", "SONARQUBE_TOKEN",
        "-e", "SONARQUBE_ORG",
        "mcp/sonarqube"
      ],
      "env": {
        "SONARQUBE_TOKEN": "${input:SONARQUBE_TOKEN}",
        "SONARQUBE_ORG": "${input:SONARQUBE_ORG}"
      },
      "type": "stdio"
    }
  },
  "inputs": [
    {
      "id": "SONARQUBE_TOKEN",
      "type": "promptString",
      "description": "SonarQube Cloud Token",
      "password": true
    },
    {
      "id": "SONARQUBE_ORG",
      "type": "promptString",
      "description": "SonarQube Cloud Organization Key",
      "password": false
    }
  ]
}
This enables you to connect to SonarQube Cloud with the standard MCP toolset (issues, rules, quality gates). To enable Context Augmentation, you need two additional pieces which we add in Step 2.
Step 2 — Enable Context Augmentation
Context Augmentation requires two additions to the base config: a volume mount so the server can read your local files, and a project key to identify which SonarQube Cloud project to pull context from. Note that SONARQUBE_TOOLSETS is an optional addition, as the default includes every toolset (including Context Augmentation) and, if explicitly set to “cag”, will restrict which tools appear.
Update your .vscode/mcp.json to match this:
{
  "servers": {
    "sonarqube": {
      "command": "docker",
      "args": [
        "run", "--init", "--pull=always", "-i", "--rm",
        "-e", "SONARQUBE_TOKEN",
        "-e", "SONARQUBE_ORG",
        "-e", "SONARQUBE_PROJECT_KEY",
        "-e", "SONARQUBE_TOOLSETS",
        "-v", "<ABSOLUTE_PATH_TO_YOUR_PROJECT>:/app/mcp-workspace:rw",
        "mcp/sonarqube"
      ],
      "env": {
        "SONARQUBE_TOKEN": "${input:SONARQUBE_TOKEN}",
        "SONARQUBE_ORG": "${input:SONARQUBE_ORG}",
        "SONARQUBE_PROJECT_KEY": "<YOUR_PROJECT_KEY>",
        "SONARQUBE_TOOLSETS": "cag"
      },
      "type": "stdio"
    }
  },
  "inputs": [
    {
      "id": "SONARQUBE_TOKEN",
      "type": "promptString",
      "description": "SonarQube Cloud User Token",
      "password": true
    },
    {
      "id": "SONARQUBE_ORG",
      "type": "promptString",
      "description": "SonarQube Cloud Organization Key",
      "password": false
    }
  ]
}
Make sure to populate these placeholders:
<ABSOLUTE_PATH_TO_YOUR_PROJECT>— the full path to your project on disk (e.g.,/Users/dev/gctoolkit). Docker requires absolute paths; relative paths like./will fail silently. This mount allows the server to correlate SonarQube Cloud data with your local files.<YOUR_PROJECT_KEY>— your SonarQube Cloud project key, found on the Project Information page or insonar-project.properties.
The token and org key use ${input:} variables, so VS Code prompts for them at startup rather than storing them in the file. Alternatively, if you prefer not to use ${input:} prompts, the token and org key can be exported in your shell and referenced with ${env:SONARQUBE_TOKEN} and ${env:SONARQUBE_ORG} in the config.
For SonarQube Cloud in the US region, add -e, "SONARQUBE_URL" to the args and "SONARQUBE_URL": "https://sonarqube.us" to the env block. EU-region users don't need SONARQUBE_URL.
After saving, restart the server via the Command Palette (Cmd+Shift+P → "MCP: List Servers" → restart). Confirm the tool list includes Context Augmentation tools: get_current_architecture, get_guidelines, search_by_signature_patterns, and others.

If the logs indicate that the Workspace was not configured, the volume mount path is incorrect or the directory simply doesn’t exist.
Step 3 — Verify the connection in Copilot agent mode
Switch from Copilot Chat to Agent mode using the dropdown at the bottom of the panel. MCP tools are only accessible in agent mode; Chat mode doesn’t surface them.
Run two quick prompts to confirm Context Augmentation is working:
Architecture query:
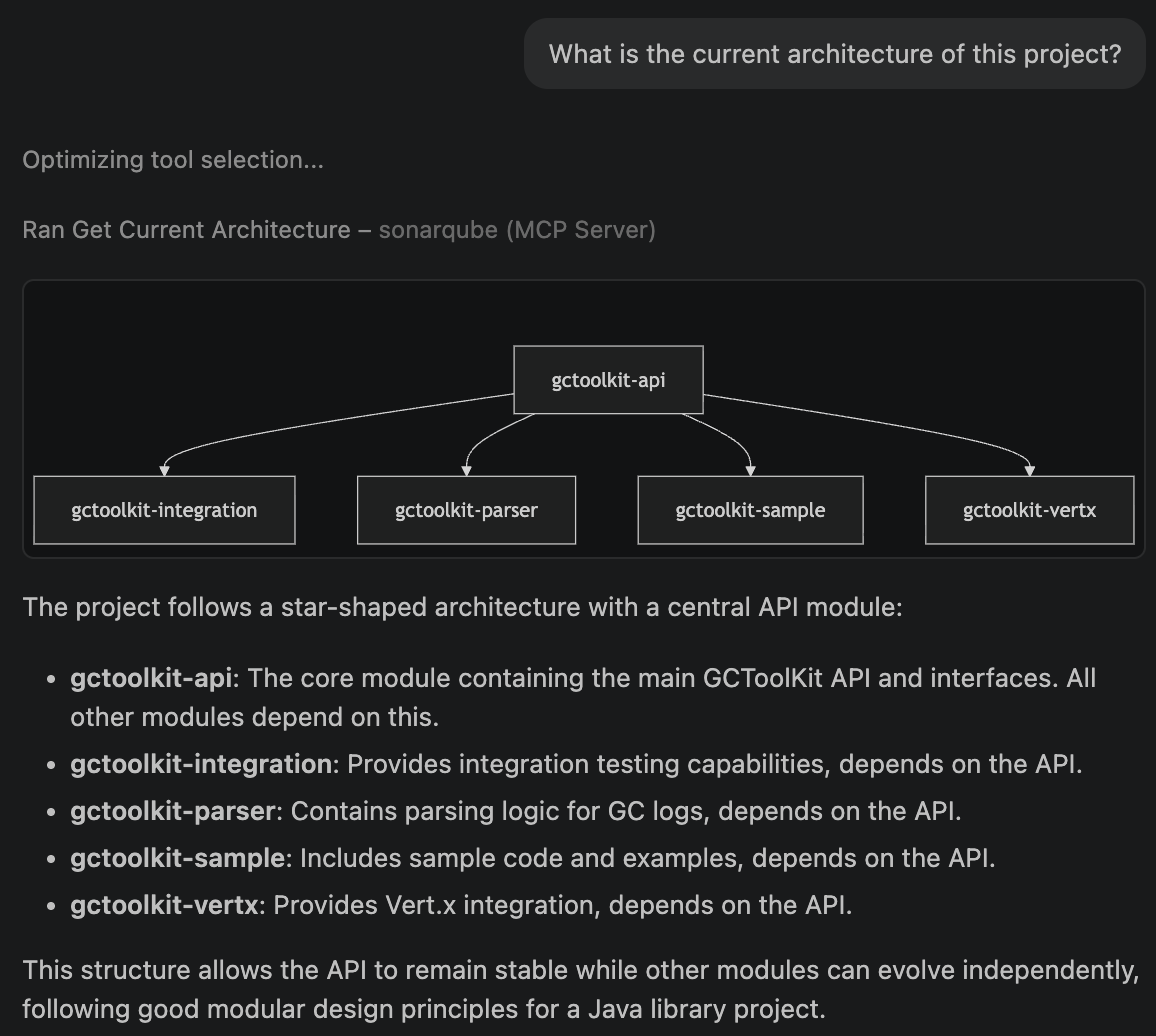
What is the current architecture of this project?You should see a "Ran Get Current Architecture" tool badge in the response, followed by GCToolKit's module hierarchy: api, integration, parser, sample, and vertx.
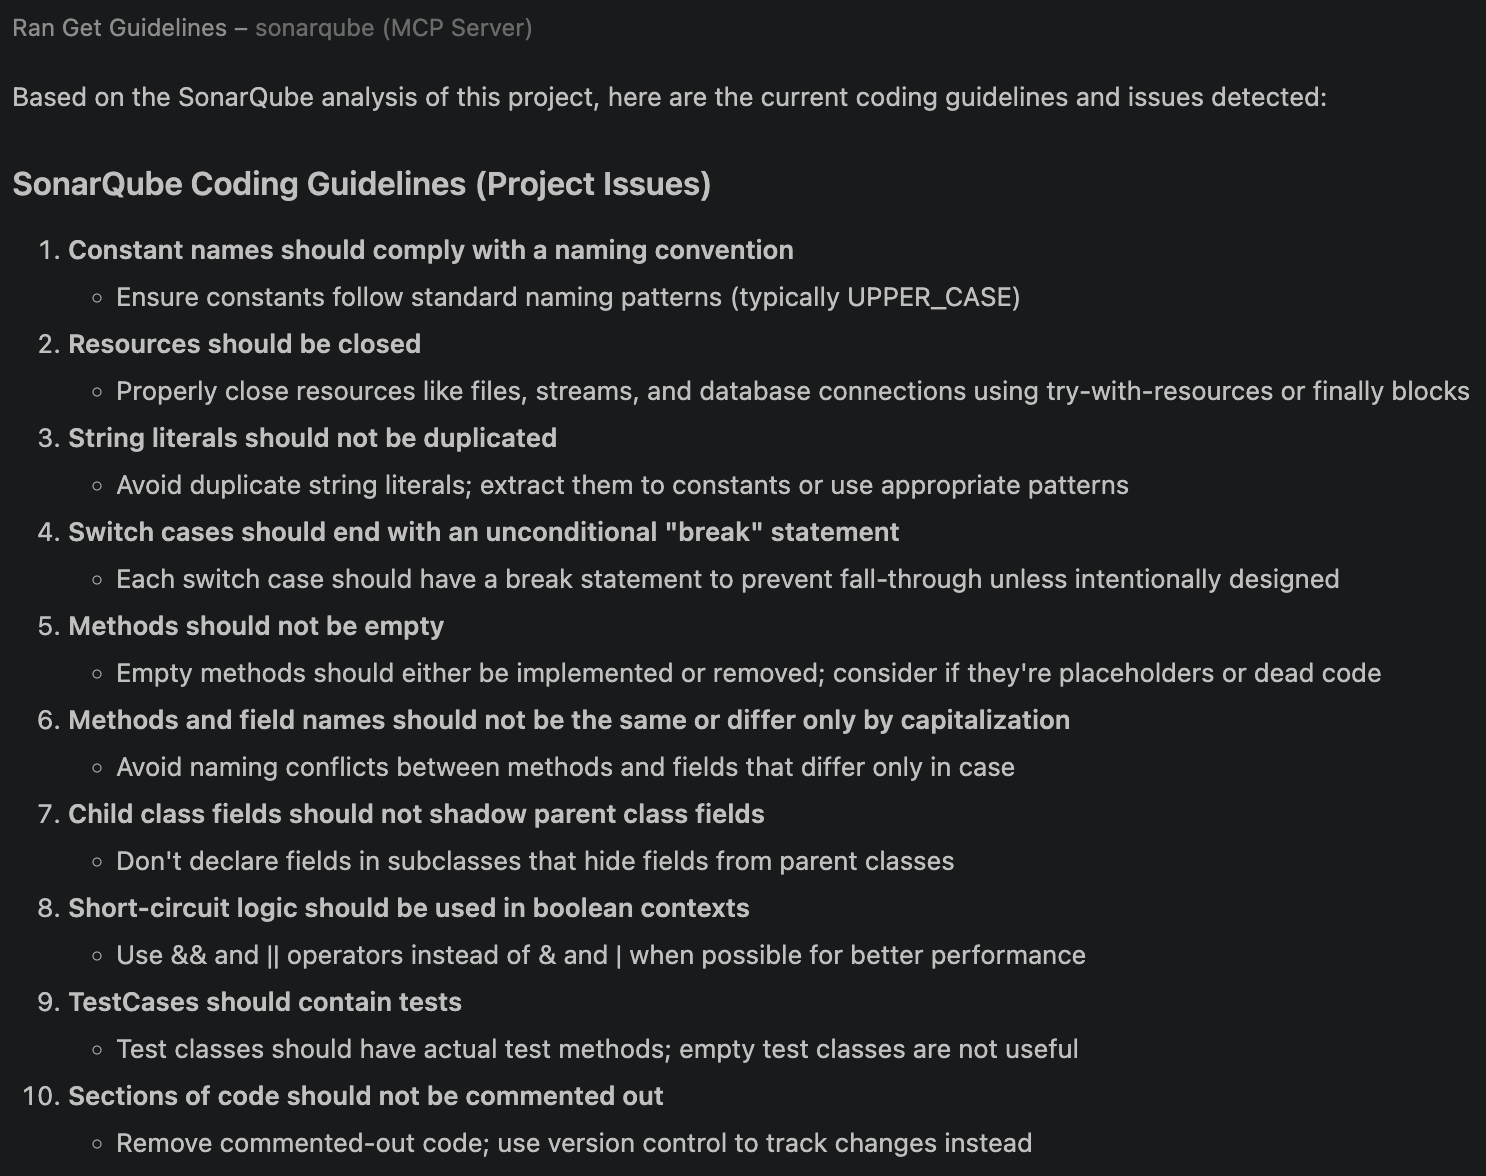
Guidelines query:
What are the coding guidelines for this project?Copilot should invoke get_guidelines and return rules derived from your project's SonarQube Cloud analysis: naming conventions, security policies, maintainability standards, etc.
If you see "UDG not loaded" instead of architecture data, the branch hasn't been analyzed via CI yet; trigger a CI scan and try again.
Step 4 — Add GUIDE directives
Copilot now has access to Context Augmentation tools, but it won't always call them unprompted. A .github/copilot-instructions.md file instructs Copilot when and how to use them. VS Code automatically picks up this file in agent mode.
# SonarQube Context Augmentation — GUIDE Directive

## Before generating or modifying code

- Call `get_guidelines` to retrieve project-specific coding standards and quality rules. Apply these guidelines to all generated code.
- Call `get_current_architecture` to understand the project's module structure and component relationships before making structural changes.
- Use `search_by_signature_patterns` or `search_by_body_patterns` to locate existing implementations before creating new classes or methods. Follow established patterns.

## Before structural changes

- Call `get_intended_architecture` to check for user-defined architectural constraints.
- Use `get_upstream_call_flow` and `get_downstream_call_flow` to trace the impact of changes through the call graph.
- Call `get_references` to identify all inbound and outbound dependencies for any class or module being modified.
- Call `get_type_hierarchy` to understand inheritance relationships before adding new subclasses or implementations.

## Before adding or updating dependencies

- Call `check_dependency` with the Package URL (purl) to verify the dependency is free of known vulnerabilities, malware, and license issues.

## After modifying code

- Use `show_rule` to look up details for any SonarQube rule violations flagged during analysis.
Specificity matters here; a directive like "check code" is too vague to trigger a tool call, but naming the exact tool (get_guidelines, get_type_hierarchy, etc.) produces consistent behavior.
If your repo already has a GEMINI.md or CLAUDE.md from a different agent configuration, Copilot reads those too. The official Context Augmentation docs include a more in-depth, combined Guide-and-Verify directive template that also integrates Agentic Analysis.
Step 5 — Generate code with Context Augmentation
With directives in place, test the full flow. Ask Copilot to generate code that depends on project-specific patterns. You don’t need to mention architecture or guidelines in the prompt; the GUIDE directive should trigger those lookups on its own.
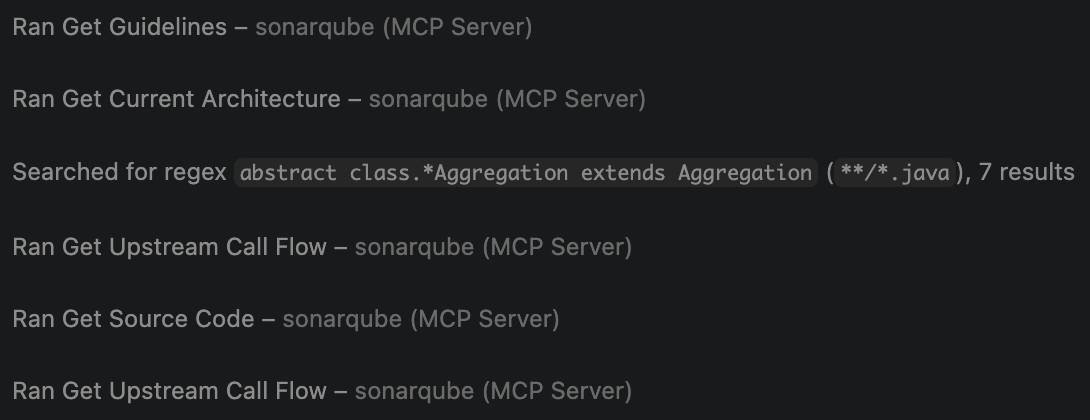
Add a new aggregation to the sample module that categorizes GC pause durations into short, medium, and long buckets across all collector types. Follow the existing aggregation patterns in this project.GCToolKit’s sample module has four aggregation implementations, each following a three-class pattern: an abstract Aggregation (annotated with @Collates), a concrete Summary, and an Aggregator (annotated with @Aggregates). Copilot calls Context Augmentation tools to discover this pattern before writing code:
get_guidelinesretrieves project coding standards from SonarQube Cloud.get_current_architecturemaps the module structure, identifyingsampleas the target.search_by_signature_patternsfinds existingAggregationimplementations and their class hierarchies.get_type_hierarchyreveals the inheritance tree: each aggregation has an abstract class with@Collateslinking to its Aggregator, and a concrete Summary subclass.get_source_coderetrieves an existing Aggregator, showing the constructor-basedregister()pattern and@Aggregatesannotation.get_upstream_call_flowtraces how aggregators receive events via the Vert.x message bus.
Copilot then generates three files following the established pattern:
GCPauseDistributionAggregation.java (abstract aggregation):
package com.microsoft.gctoolkit.sample.aggregation;

import com.microsoft.gctoolkit.aggregator.Aggregation;
import com.microsoft.gctoolkit.aggregator.Collates;

/**
 * API for an Aggregation that categorizes GC pause durations into buckets.
 * GCPauseDistributionAggregation gets its data from GCPauseDistributionAggregator.
 */
@Collates(GCPauseDistributionAggregator.class)
public abstract class GCPauseDistributionAggregation extends Aggregation {
    /**
     * Record the duration of a GC pause event. This method is called from
     * GCPauseDistributionAggregator.
     * @param duration The duration (in decimal seconds) of a GC pause.
     */
    public abstract void recordPause(double duration);
}
GCPauseDistributionSummary.java (concrete implementation):
package com.microsoft.gctoolkit.sample.aggregation;

/**
 * An implementation of GCPauseDistributionAggregation which categorizes GC pause
 * durations into short ({@literal <} 50ms), medium (50–200ms), and long ({@literal >} 200ms) buckets.
 */
public class GCPauseDistributionSummary extends GCPauseDistributionAggregation {

    private int shortPauses;
    private int mediumPauses;
    private int longPauses;

    @Override
    public void recordPause(double duration) {
        double millis = duration * 1000.0;
        if (millis < 50.0) {
            shortPauses++;
        } else if (millis <= 200.0) {
            mediumPauses++;
        } else {
            longPauses++;
        }
    }

    public int getShortPauseCount() {
        return shortPauses;
    }

    public int getMediumPauseCount() {
        return mediumPauses;
    }

    public int getLongPauseCount() {
        return longPauses;
    }

    @Override
    public boolean hasWarning() {
        return longPauses > 0;
    }

    @Override
    public boolean isEmpty() {
        return shortPauses == 0 && mediumPauses == 0 && longPauses == 0;
    }
}
GCPauseDistributionAggregator.java (event handler):
package com.microsoft.gctoolkit.sample.aggregation;

import com.microsoft.gctoolkit.aggregator.Aggregates;
import com.microsoft.gctoolkit.aggregator.Aggregator;
import com.microsoft.gctoolkit.aggregator.EventSource;
import com.microsoft.gctoolkit.event.g1gc.G1GCPauseEvent;
import com.microsoft.gctoolkit.event.generational.GenerationalGCPauseEvent;
import com.microsoft.gctoolkit.event.shenandoah.ShenandoahCycle;
import com.microsoft.gctoolkit.event.zgc.ZGCFullCollection;
import com.microsoft.gctoolkit.event.zgc.ZGCOldCollection;
import com.microsoft.gctoolkit.event.zgc.ZGCYoungCollection;

/**
 * An Aggregator that categorizes GC pause durations into distribution buckets.
 */
@Aggregates({EventSource.G1GC, EventSource.GENERATIONAL, EventSource.ZGC, EventSource.SHENANDOAH})
public class GCPauseDistributionAggregator extends Aggregator<GCPauseDistributionAggregation> {

    public GCPauseDistributionAggregator(GCPauseDistributionAggregation aggregation) {
        super(aggregation);
        register(GenerationalGCPauseEvent.class, this::recordPause);
        register(G1GCPauseEvent.class, this::recordPause);
        register(ZGCFullCollection.class, this::recordPause);
        register(ZGCOldCollection.class, this::recordPause);
        register(ZGCYoungCollection.class, this::recordPause);
        register(ShenandoahCycle.class, this::recordPause);
    }

    private void recordPause(GenerationalGCPauseEvent event) {
        aggregation().recordPause(event.getDuration());
    }

    private void recordPause(G1GCPauseEvent event) {
        aggregation().recordPause(event.getDuration());
    }

    private void recordPause(ZGCFullCollection event) {
        aggregation().recordPause(event.getDuration());
    }

    private void recordPause(ZGCOldCollection event) {
        aggregation().recordPause(event.getDuration());
    }

    private void recordPause(ZGCYoungCollection event) {
        aggregation().recordPause(event.getDuration());
    }

    private void recordPause(ShenandoahCycle event) {
        aggregation().recordPause(event.getDuration());
    }
}
Copilot also updates module-info.java to register the new aggregation with ServiceLoader:
provides com.microsoft.gctoolkit.aggregator.Aggregation with
         com.microsoft.gctoolkit.sample.aggregation.HeapOccupancyAfterCollectionSummary,
         com.microsoft.gctoolkit.sample.aggregation.PauseTimeSummary,
         com.microsoft.gctoolkit.sample.aggregation.CollectionCycleCountsSummary,
         com.microsoft.gctoolkit.sample.aggregation.GCPauseDistributionSummary;
Without Context Augmentation, the same prompt produces code that doesn’t integrate with GCToolKit’s framework: incorrect package structure, a single class instead of the three-class pattern, missing @Collates/@Aggregates annotations, wrong event types, and no ServiceLoader registration. The code might compile, but it likely won’t integrate at runtime.
Verify the setup
You know Context Augmentation is working when you see this sequence in agent mode after prompting Copilot to write code:
- Tool badges appear for
get_guidelinesandget_current_architecturebefore any code is generated - Additional tool calls (
search_by_signature_patterns,get_type_hierarchy) appear for pattern discovery - The generated code lands in the correct package, follows your project's class patterns, and includes framework-specific wiring
The two config files set up during this workflow are .vscode/mcp.json (refer to Step 2) and .github/copilot-instructions.md (refer to Step 4).
What to know
- Context Augmentation is in open beta; consult the product release lifecycle for more information.
- Context Augmentation is available in SonarQube Cloud currently, and not yet available in SonarQube Server.
- Requires a Team or Enterprise plan.
- Full architectural awareness (call flows, type hierarchies, semantic search) is available for Java. Partial support (architecture tools) is available for C#, Python, JavaScript, and TypeScript. Guidelines are available for all programming languages supported by SonarQube Cloud.
- MCP tools only surface in Copilot's Agent mode.
- The embedded Cloud MCP endpoint does not currently support Context Augmentation because it has no filesystem access. The workspace volume mount requires the self-hosted Docker container.
- Docker requires an absolute path for the
-vbind mount. Relative paths (./,../) will fail silently. - If your GitHub organization has Copilot policies configured, an admin may need to enable MCP server access in the org's Copilot settings.
Next steps
- Add the Verify stage with Agentic Analysis so that your agent can analyze generated code against your quality gate before it reaches a PR.
- For alternative Context Augmentation implementations, see our companion blueprints for Codex CLI and Claude Code.
- Consult the official Context Augmentation documentation for the complete reference on tools, supported languages, and configuration options.