
Introduction
Modern software development is being reshaped by the integration of AI-powered coding tools like GitHub Copilot and automated code quality assurance tools such as SonarQube. This powerful combination addresses the “quality-velocity paradox” by enabling developers to accelerate code generation with AI while simultaneously using SonarQube’s real-time static analysis to review, detect, and fix bugs, security vulnerabilities, and maintainability issues. By pairing Copilot’s speed with SonarQube’s rigorous code reviews directly within the Visual Studio Code editor, development teams can create a workflow that is both highly productive and robustly secure, ensuring that faster coding also means high-quality, safer code.
Introducing GitHub Copilot: Your AI pair programmer
GitHub Copilot is an AI assistant in Visual Studio Code that creates code and can generate entire functions from natural language prompts. Its advanced “Agent Mode” elevates it beyond simple autocompletion, turning it into an active collaborator that can independently plan and execute multi-step tasks across your codebase.
Introducing SonarQube for VS Code: Your in-IDE code quality companion
The SonarQube for Visual Studio Code extension is a free advanced linter that identifies bugs and security vulnerabilities in your code as you type. It acts as a crucial first line of defense, providing real-time feedback on code quality, which is especially important when reviewing AI-generated code. While powerful on its own, its “Connected Mode” links to a SonarQube Server or SonarQube Cloud, allowing teams to adopt and enforce a consistent, organization-wide quality standard.
Prerequisites and installation
Preparing your environment
Before proceeding with the integration, it is essential to ensure that the development environment meets these key prerequisites. A failure to address these foundational requirements is a common source of configuration issues.
- Visual Studio Code: A recent and stable version of Visual Studio Code is required. The features discussed, particularly those related to Copilot Agent Mode, are available in the latest releases.
- GitHub Copilot subscription: Access to GitHub Copilot is governed by a subscription plan. While a free tier exists, its limitations are significant for the workflows described in this guide. Developers must have an active GitHub account with a Copilot subscription.
- SonarQube instance: For the most powerful features, particularly those leveraged by the Copilot integration like security hotspot detection, the SonarQube for Visual Studio Code extension must be connected to a central SonarQube Server (for self-managed deployments) or SonarQube Cloud (SaaS offering). Teams can get started with a free SonarQube Cloud account to explore these capabilities. For this guide, we will be using SonarQube Cloud Team or Enterprise plan.
Installing the extensions
With the prerequisites in place, the next step is to install the necessary extensions from the Visual Studio Code Marketplace.
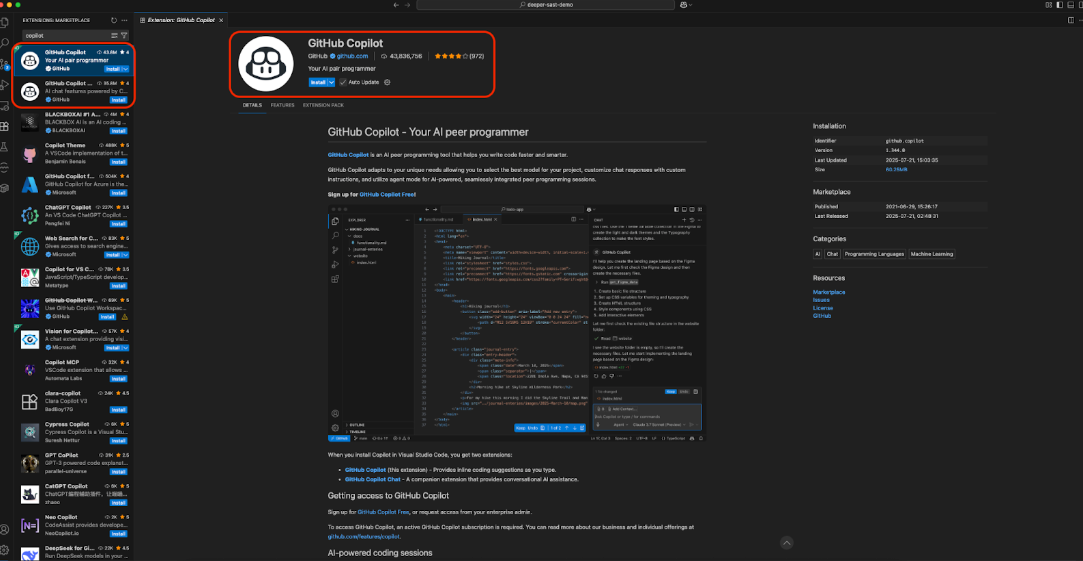
Installing GitHub Copilot
- Open Visual Studio Code.
- Navigate to the Extensions view by clicking the icon in the Activity Bar on the left-hand side or by pressing Ctrl+Shift+X (Command+Shift+X on Mac).
- In the search bar, type GitHub Copilot.
- Locate the primary GitHub Copilot extension and click Install.
- You also need to install the GitHub Copilot Chat extension, which provides the chat interface and Agent Mode capabilities. By default GitHub Copilot extension will also install the chat extension.

- After installation, a Copilot icon will appear in the bottom status bar, indicating its status.
Installing SonarQube for Visual Studio Code
- In the same Extensions view, search for SonarQube for IDE.
- Select the extension published by SonarSource and click Install.
- After the installation is complete, VS Code will likely display a “Reload Required” button. Click it to restart the editor and finalize the installation.
- Once reloaded, a new SonarQube icon will be visible in the Activity Bar on the left, providing access to its dedicated view container.
Mastering the tools individually
A successful integration depends on the correct configuration of each component. While Copilot’s setup is designed for immediate use, SonarQube’s power is unlocked through a more deliberate configuration process that connects it to a central analysis server. This section details the essential setup steps for each tool.
Configuring GitHub Copilot: Authentication and modes
Authentication
Upon installation, GitHub Copilot must be authenticated with a GitHub account that has an active subscription.
- Click the Copilot status icon in the bottom status bar of VS Code.
- If prompted, select Sign in to use Copilot.
- Visual Studio Code will open a browser window asking for authorization. Follow the prompts to sign in to your GitHub account and authorize the extension.
- Alternatively, authentication can be initiated from the Accounts menu in the Activity Bar or by running the GitHub Copilot: Sign in command from the Command Palette (Ctrl+Shift+P).
Core feature navigation
A brief familiarity with Copilot's interfaces is necessary:
- Inline suggestions: As a developer types, Copilot provides “ghost text” suggestions. These can be accepted with the Tab key. Multiple suggestions can be cycled through using Alt+] (next) and Alt+[ (previous).
- Inline chat: Pressing Ctrl+I (Command+Control+I on Mac) opens a chat box directly within the editor. This is ideal for asking context-specific questions about a selected block of code or requesting targeted coding/refactoring.
Enabling Agent Mode
GitHub Copilot Agent Mode is the cornerstone of the SonarQube for IDE tools support for Copilot. It must be explicitly enabled.
- Open the Chat view (Ctrl+Alt+I).
- At the top of the chat input box, there is a mode selector, which defaults to Ask.
- Click the selector and choose Agent from the dropdown menu.

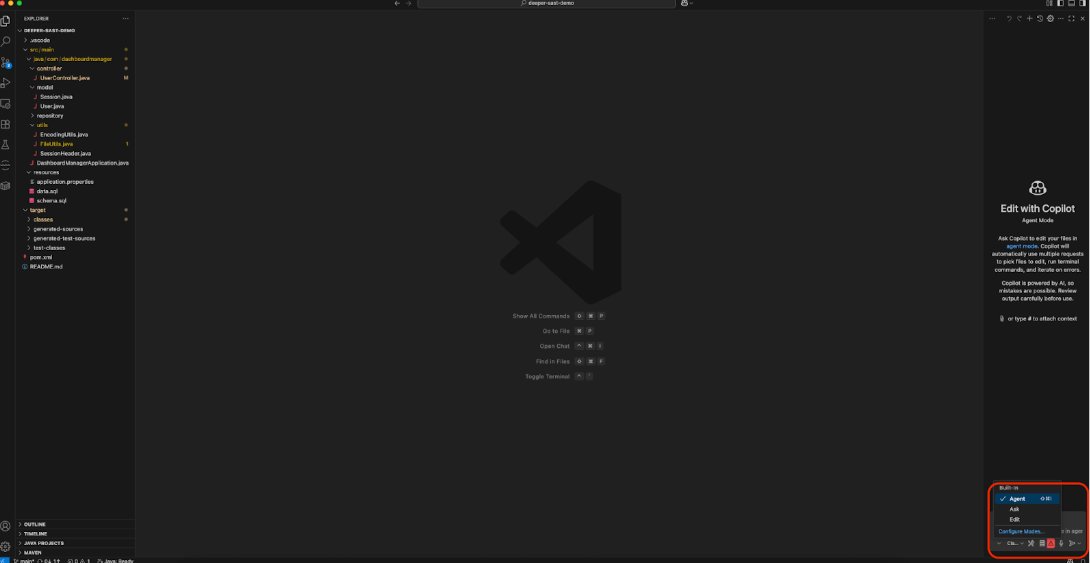
This seemingly small change is significant. Ask mode is for single-shot questions and answers. Agent Mode is for autonomous, multi-step task execution. When a prompt is given in Agent Mode, Copilot can analyze the request, create a plan, and invoke available tools, such as those provided by the SonarQube extension to achieve the goal.
Configuring SonarQube IDE extension for Visual Studio Code
While the SonarQube extension provides some value in its default, standalone mode, its true power is only available in Connected Mode. This mode is therefore a non-negotiable step for this guide's workflow.
Connected Mode synchronizes the local IDE analysis with a central SonarQube Server or SonarQube Cloud instance. This ensures that every developer on the team is using the same analysis rules, quality profiles, and issue suppressions, leading to consistent code quality across the entire project. Critically, advanced features like the detection of security hotspots, advanced bug detection, and taint vulnerabilities rely on the more powerful analysis engines running on the server, and these are the very features that the Copilot integration exposes.
Step-by-step connection wizard
SonarQube IDE for Visual Studio Code provides a user-friendly wizard to establish this connection.
- Click the SonarQube icon in the Visual Studio Code Activity Bar to open its dedicated view.
- In the SonarQube Setup panel, select Connect to SonarQube Cloud.
- Click on Generate token.

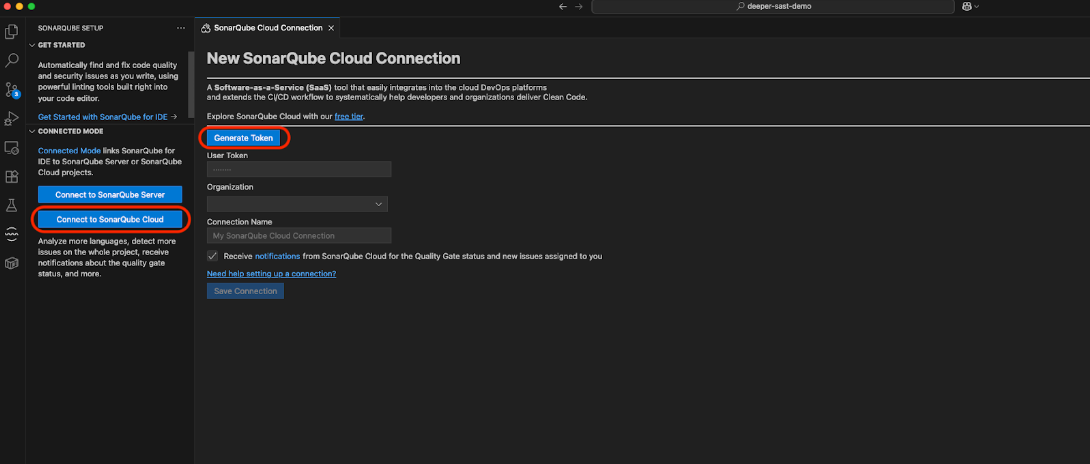
- It will take you to the login page of SonarQube Cloud. Login there and click on Allow connection.


- Click on Save Connection.
Once the connection to the server is established, the final step is to “bind” your local project folder to a specific project on the SonarQube Cloud. This tells the extension which project's rules and quality profile to apply to your local code.
- Your Visual Studio Code automatically pops up the binding screen, click on the Configure Binding button.
- Once bound, the extension will automatically begin using the SonarQube Cloud’s configuration for its real-time analysis.
The integration in action: Conversational code quality
With both GitHub Copilot and SonarQube IDE for VS Code properly installed and configured, the stage is set to leverage their combined power. The integration transforms static analysis from a passive reporting mechanism into an active, conversational partner in the development process.
AI agent integration with SonarQube for IDE tools
The magic of this integration lies in the extensible architecture of GitHub Copilot's Agent Mode. The agent is designed to be aware of and utilize “tools” that are made available by other Visual Studio Code extensions. The SonarQube for Visual Studio Code extension registers a specific set of its functionalities as tools that the Copilot agent can invoke.
This enables a flexible interaction model. A developer can either:
- Use natural language: Phrase a request in plain English, such as “check this file for security issues using SonarQube.” Copilot's underlying language model is trained to recognize this intent and map it to the appropriate SonarQube tool.
- Invoke tools directly: For more precise control, a developer can call a tool by its specific name, prefixed with a hash (#) symbol, such as #sonarqube_getSecurityHotspots.
In either case, the agent acts as an intermediary, executing the command and presenting the results from SonarQube within the conversational context of the chat window.
SonarQube for IDE tools for Copilot
The following table serves as a quick-reference guide to the specific tools that the SonarQube extension makes available to the GitHub Copilot agent. Understanding these capabilities is key to unlocking the full potential of the integration.
| Tool Name | Function | Example Natural Language Prompt | Direct Invocation |
| Security hotspots | Checks the specified file for security hotspots, which are potential security-sensitive pieces of code that require manual review. Requires Connected Mode. | “Using SonarQube, find any security hotspots in the current file.” | #sonarqube_getSecurityHotspots |
| Exclude file or folder | Updates the local SonarQube analysis settings to exclude specified files or folders from analysis, using standard wildcard patterns. | “Copilot, tell SonarQube to ignore the dist folder.” | #sonarqube_excludeFiles |
| Set up Connected Mode | Initiates and guides the user through the process of connecting the IDE to a SonarQube Server or SonarCloud instance. | “Help me set up SonarQube Connected Mode.” | #sonarqube_setUpConnectedMode |
| Analyze file | Triggers a SonarQube analysis on a specific file, even if that file was previously excluded from analysis. | “Re-analyze config.js with SonarQube.” | #sonarqube_analyzeFile |
Workflow: Proactive security analysis
This workflow demonstrates how to use the integration to perform a security check on AI-generated code immediately after its creation.
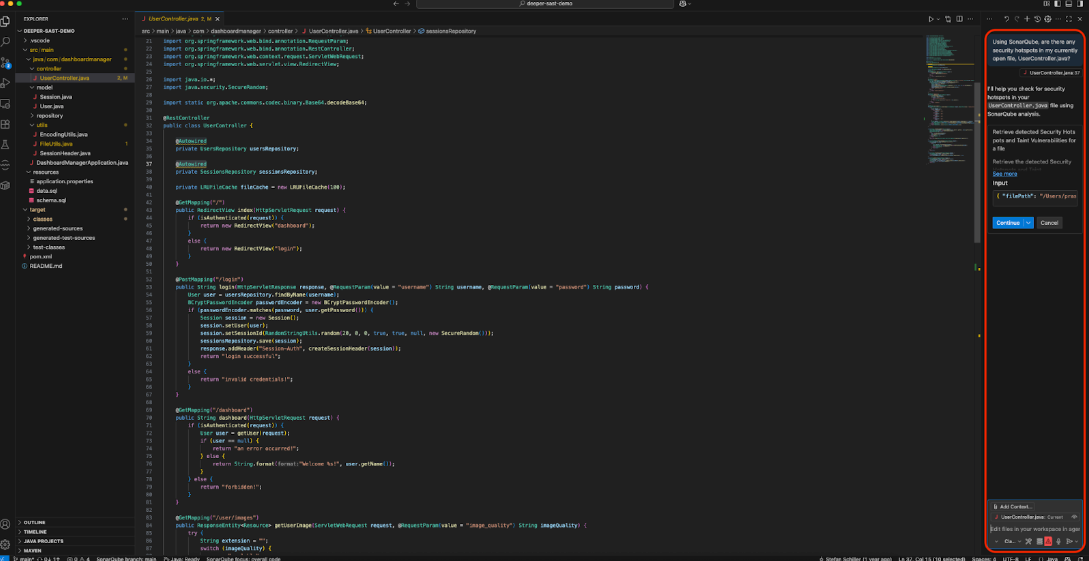
- Scenario: A developer has just used Copilot to generate a new controller action in a web application that processes user input from a form. Before committing this code, they want to ensure it doesn't introduce any common security vulnerabilities.
- Step 1: The prompt. After Copilot has generated the code, the developer opens the Copilot Chat view and ensures it is in Agent Mode. They then type a prompt that explicitly invokes the SonarQube “Using SonarQube, are there any security hotspots in my currently open file, UserController.java?”
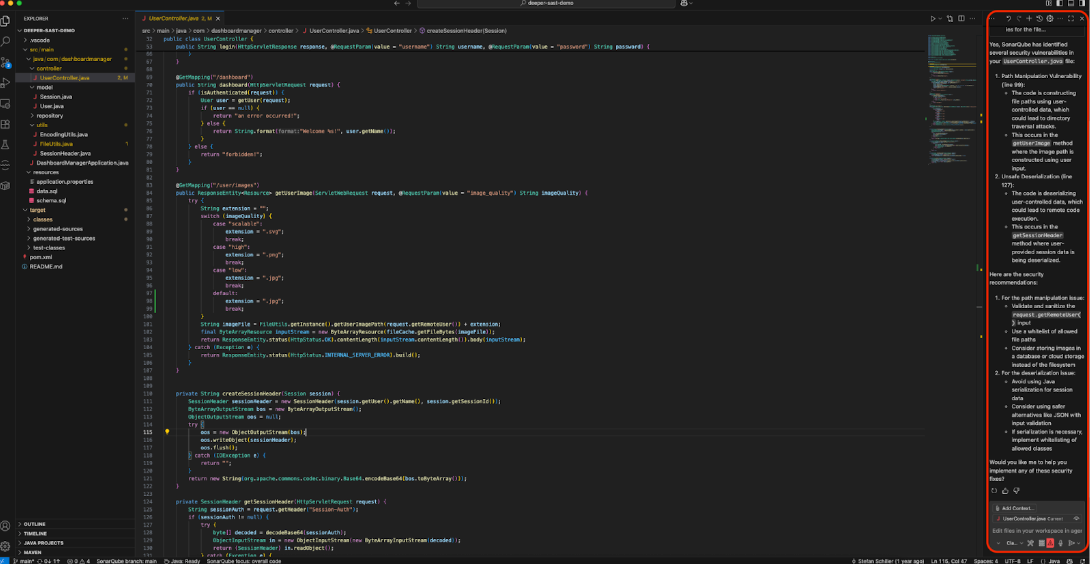
- Step 2: The agent's action. The Copilot agent processes the prompt. It recognizes the keywords “SonarQube” and “security hotspots” and determines that the #sonarqube_getSecurityHotspots tool is the correct one to use. The chat UI will transparently show that it is invoking this tool. Click on Continue.

- Step 3: The result. The SonarQube Cloud via Connected Mode, scans the file. Any identified security hotspots are returned to the Copilot agent, which then formats and displays them in the chat window. The response might look something like this:

Ready to enhance your AI-assisted development workflow?
Download the SonarQube for Visual Studio Code extension today from the Visual Studio Code Marketplace and sign up for a free SonarQube Cloud account to experience the powerful integration of AI-driven coding and real-time code quality assurance.