

Start your free trial
Verify all code. Find and fix issues faster with SonarQube.
EmpezarTL;DR overview
- SonarQube Agentic Analysis provides CI-grade code verification for AI agents by using a remote engine to return findings in seconds.
- Developers can integrate this workflow with Codex CLI by configuring an MCP server and an AGENTS.md directive for automated loops.
- The system utilizes full project context from SonarQube Cloud to perform deep cross-file data flow and taint analysis beyond simple linting.
- This setup enables a "read, analyze, fix, and re-verify" cycle that identifies and resolves regressions within a single AI agent session.
Overview
SonarQube Agentic Analysis sends code to SonarQube Cloud's remote analysis engine, which draws on full project context cached from your last CI scan. The engine returns findings in seconds, not the minutes a full pipeline takes. By the end of this blueprint, Codex CLI runs a complete analyze, fix, and re-verify loop before any code reaches a pull request.
The setup covers the Verify stage of the Agent Centric Development Cycle. If you use Claude Code instead of Codex, see the companion blueprint.
When to use this
You use Codex CLI, your project is on SonarQube Cloud (Team or Enterprise plan), and you want CI-grade code verification inside the agent's workflow. The agent gets the same rules and quality profile your CI pipeline enforces.
What you'll achieve
- SonarQube MCP Server configured for Agentic Analysis in Codex's TOML format
- An AGENTS.md directive that tells Codex to verify code after generation
- A working analyze, fix, and re-verify loop running inside a single Codex session
Architecture

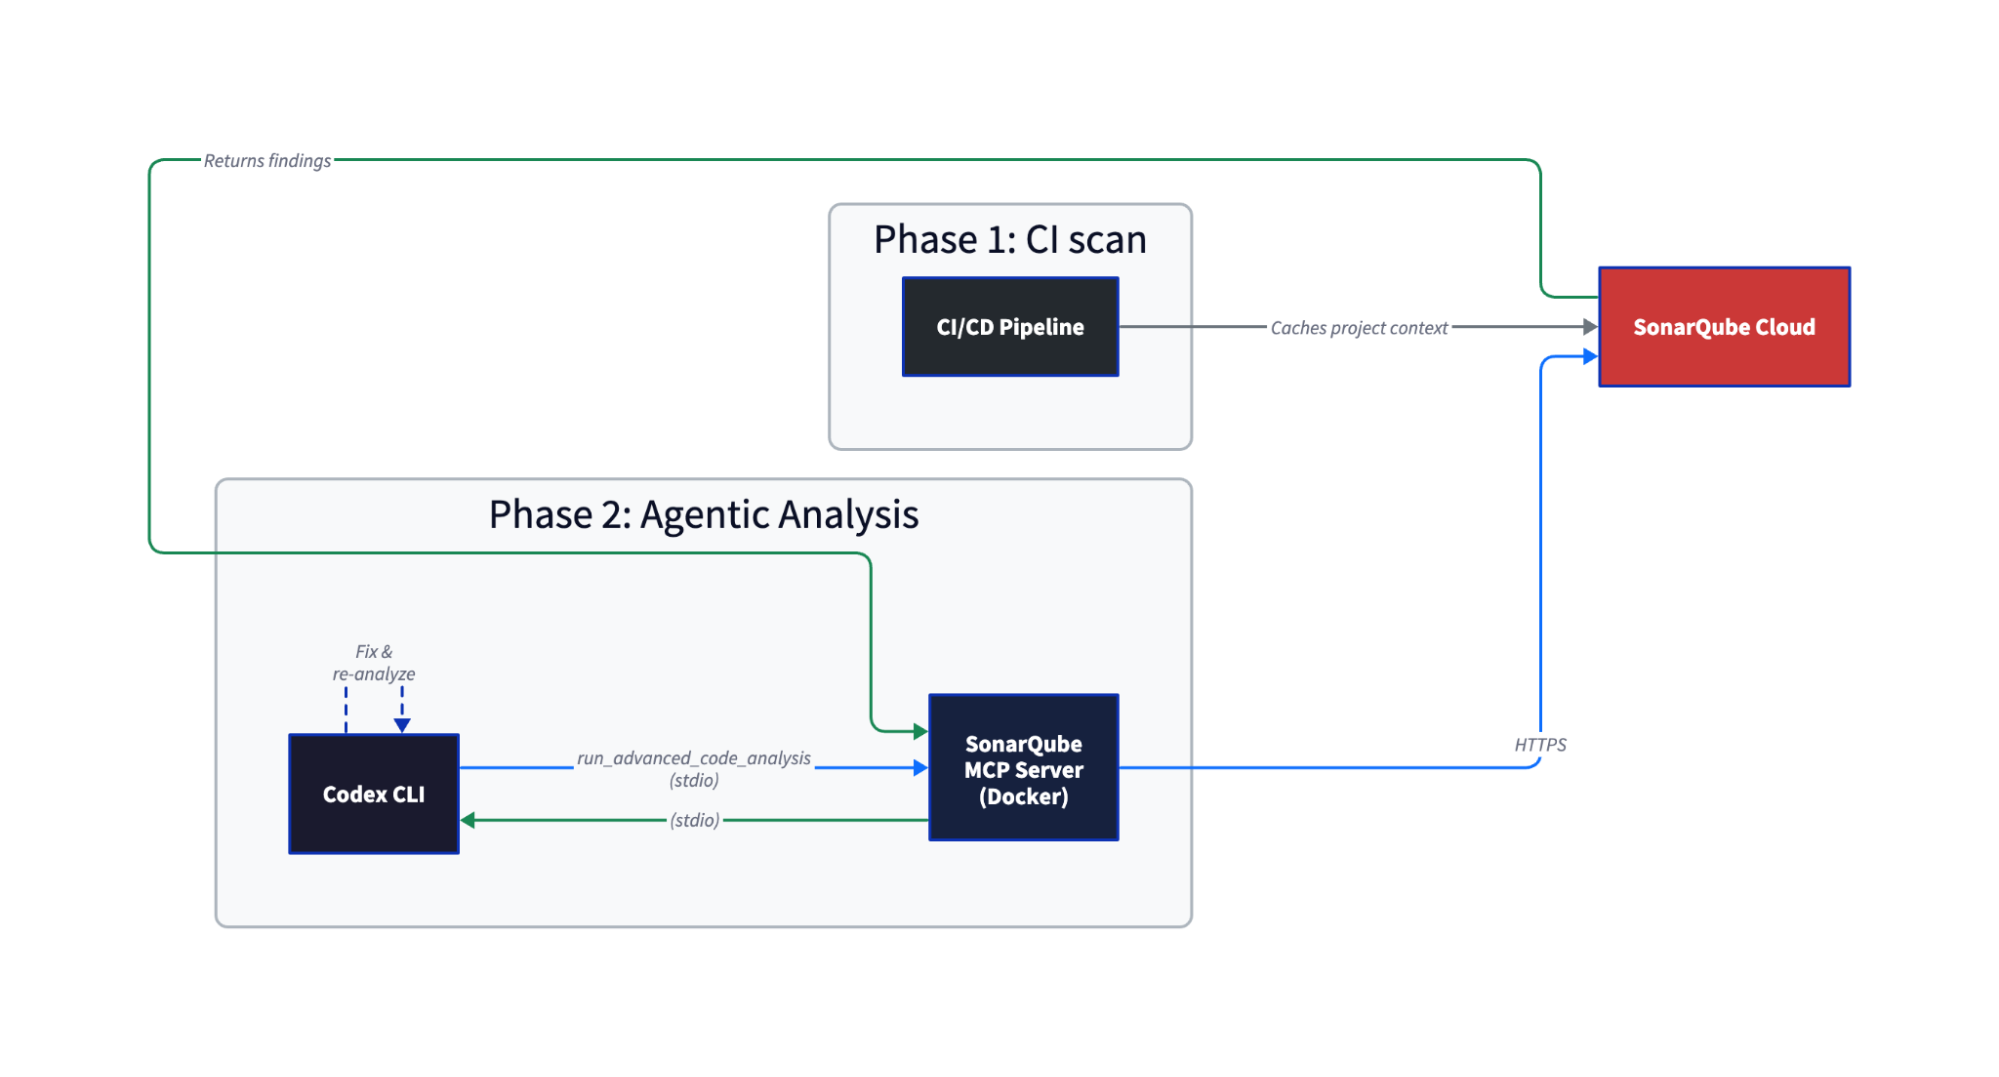
Your CI scan caches everything the analysis engine needs in SonarQube Cloud, such as how types resolve, what your quality profile enforces, which dependencies are in play. When Codex calls run_advanced_code_analysis, SonarQube Cloud restores that cache and runs the same engine your CIpipeline uses. Single-file analysis completes in seconds.
The difference from local linting is that Agentic Analysis has cross-file data flow analysis and taint analysis because it has your full project context. For more information about why linting is not enough, see this article.
Prerequisites
- SonarQube Cloud Team or Enterprise plan with Agentic Analysis (open beta) enabled on your project
- A completed CI scan on your project's main branch, run after Agentic Analysis was enabled. The order matters: enable first, then scan.
- Codex CLI installed
- Docker running
- A SonarQube Cloud user token (not a project, organization, or global token). Generate one at My Account > Security in SonarQube Cloud.
- Supported languages: Java, JavaScript/TypeScript, Python, C#, VB.NET, CSS, HTML, XML, plus secrets detection and IaC (Docker, Kubernetes, Terraform). Check the official docs for the latest list.
Step 1 — SonarQube MCP Server configured for Agentic Analysis
Agentic Analysis requires project-specific configuration. Do not use your global ~/.codex/config.toml. Create .codex/config.toml in your project root:
[mcp_servers.sonarqube]
command = "docker"
args = [
"run", "-i", "--rm", "--init", "--pull=always",
"-e", "SONARQUBE_URL",
"-e", "SONARQUBE_TOKEN",
"-e", "SONARQUBE_ORG",
"-e", "SONARQUBE_PROJECT_KEY",
"-e", "SONARQUBE_TOOLSETS",
"-v", "<ABSOLUTE_PATH_TO_YOUR_PROJECT>:/app/mcp-workspace:rw",
"mcp/sonarqube"
]
[mcp_servers.sonarqube.env]
SONARQUBE_URL = "https://sonarcloud.io"
SONARQUBE_ORG = "<YOUR_ORG_KEY>"
SONARQUBE_PROJECT_KEY = "<YOUR_PROJECT_KEY>"
SONARQUBE_TOOLSETS = "projects,analysis"Replace the placeholders:
<ABSOLUTE_PATH_TO_YOUR_PROJECT>— the full path to your project root (e.g.,/home/dev/my-project). No relative paths.<YOUR_ORG_KEY>— your SonarQube Cloud organization key (visible in the URL when you open your org)<YOUR_PROJECT_KEY>— the project key from SonarQube Cloud (Project Information page orsonar-project.properties)
Export your token as a shell environment variable before launching Codex:
export SONARQUBE_TOKEN="<your-user-token>"Do not put the token in the [mcp_servers.sonarqube.env] block for project-scoped configs. Docker picks it up from the shell via the -e SONARQUBE_TOKEN arg, keeping the token out of any file that might get committed.
SONARQUBE_TOOLSETS controls which MCP tools load. "projects,analysis" enables project browsing and Agentic Analysis. If you also want Sonar Context Augmentation (the Guide stage), use "cag,projects,analysis". See this guide for more information on setting up Context Augmentation with Codex.
Step 2 — VERIFY directive in AGENTS.md
Create an AGENTS.md file in your project root. This is Codex's equivalent of Claude Code's CLAUDE.md. The directive tells Codex to verify code after every modification:
# SonarQube Agentic Analysis — VERIFY Directive

## After generating or modifying code

You must strictly follow this analyze-then-commit workflow for every code
modification. No code is considered complete until it has passed the following
SonarQube validation loop:

1. **Read Phase:** After any modification or before commit, use the `Read` tool
   to load the current state of all relevant source files.
2. **Analysis Phase:** For every new or modified file, call
   `run_advanced_code_analysis` with:
   - `filePath`: Project-relative path (e.g., `src/main/java/MyClass.java`)
   - `branchName`: The active development branch
   - `fileScope`: `MAIN` or `TEST` depending on the code type
3. **Evaluation & Remediation:**
   - Review every issue returned by the analysis
   - Fix CRITICAL or HIGH severity issues immediately
4. **Verification:** Re-run analysis after fixes to confirm resolution and
   no regressions
Adapted from the official Agentic Analysis docs, Step 3 (agent operational constraints), simplified for the Verify-only toolset.
AGENTS.md directives depend on the LLM choosing to follow them, so results can vary between sessions. Including verification instructions directly in your prompt (see Step 4) is a good habit as a backstop. Keep the AGENTS.md file in place either way as it provides the structured workflow the agent needs when it does pick it up.
Step 3 — Working MCP connection
Launch Codex from your project root:
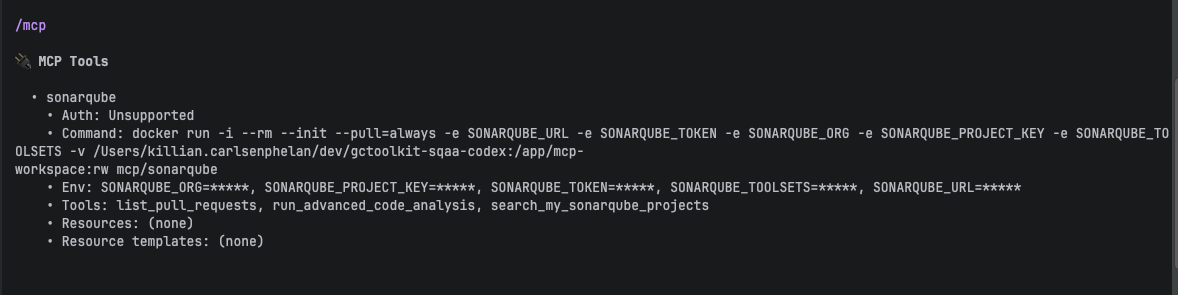
codexCodex loads MCP tools eagerly. No extra configuration needed (unlike Claude Code, where tools lazy-load by default). Run /mcp in Codex to confirm the SonarQube server connected:
🔌  MCP Tools

  • sonarqube
    • Tools: list_pull_requests, run_advanced_code_analysis, search_my_sonarqube_projects
run_advanced_code_analysis should appear in the tool list. If it doesn't, check that SONARQUBE_TOOLSETS includes analysis and that you're running the latest Docker image (--pull=always handles this).
Test the connection by asking Codex:
What SonarQube projects are available?Your project should appear in the response.

Step 4 — Analysis findings on generated code
Ask Codex to generate or modify code. Appending a verification instruction to the prompt is a good habit as a backstop for the AGENTS.md directive:
Add a GC log summary cache to the parser module. Use run_advanced_code_analysis when you are done to verify.Substitute your own task for the first sentence.
Codex generates the code, runs tests, then calls run_advanced_code_analysis on each changed file. Codex analyzes all five modified files in parallel. The MCP tool accepts one file per call, but Codex dispatches multiple calls concurrently.

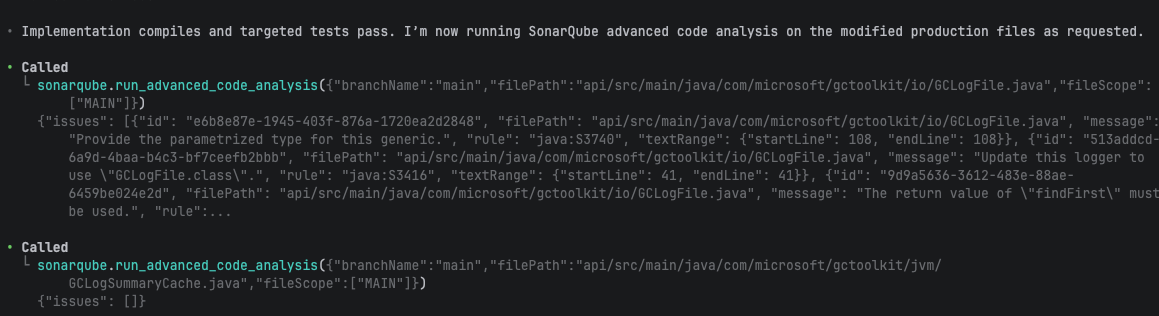
The first analysis round returned findings on the new code:
| File | Rule | Issue |
| GCLogFile.java | java:S3740 | Raw generic type (missing parameterized type) |
| GCLogFile.java | java:S3416 | Logger uses wrong class reference |
| InMemoryGCLogSummaryCache.java | java:S2388 | Should call super.size() instead of size() |
Two other files came back clean. A pre-existing java:S1135 (TODO comment) appeared in module-info.java but Codex correctly left it alone.
Step 5 — All new findings resolved
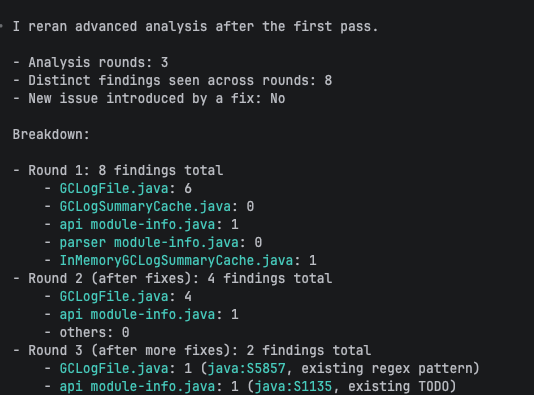
After the first round of findings, Codex proceeded without additional prompts. Over three analysis rounds, Codex resolved all new findings across five files.

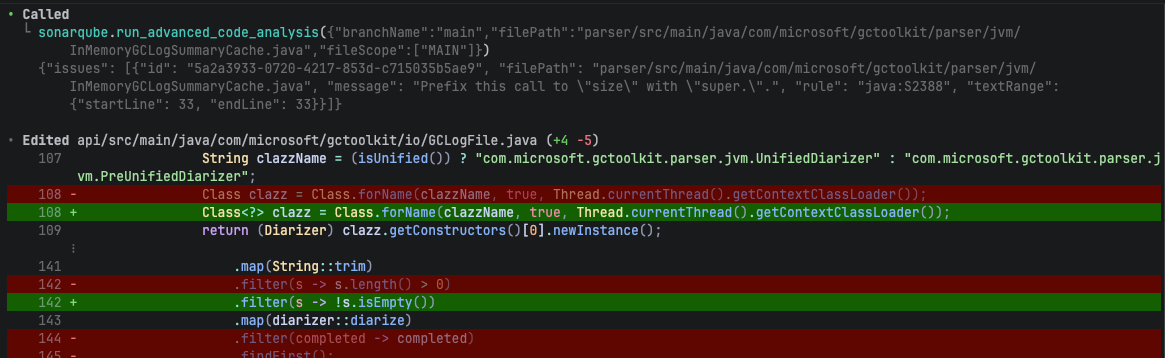
Round 2 fixed the raw generic type (java:S3740) and the ambiguous size() call (java:S2388). But the S3740 fix introduced a new issue: java:S2201, an unused return value from anyMatch. This is the kind of regression a single-pass linter misses. Codex caught it in the next round because Agentic Analysis re-scanned the file after the fix.
Round 3 fixed the unused return value and the wrong logger class (java:S3416). The final analysis confirmed only two pre-existing issues remained: a regex optimization suggestion (java:S5857) and the TODO comment, neither related to the new code.
Codex's summary:
All changed MAIN files are fixed and I confirmed the new-cache-related findings were cleared.

I found only 2 remaining issues, both pre-existing/non-cache logic:

GCLogFile.java: java:S5857 on the existing unified-decorator regex.
module-info.java: java:S1135 for an existing TODO comment.
The full loop, from code generation through three analysis rounds, resolving every new finding, ran in a single Codex session with no user intervention after the initial prompt.

What to know
- Including verification instructions in your prompt is a reliable backstop (see Step 2) for AGENTS.md compliance. Claude Code's PostToolUse hook (available via the SonarQube CLI) is deterministic by comparison.
- Fixes can introduce new issues. Fixing a raw generic type (
java:S3740) introduced an unused return value (java:S2201). Re-verification caught it. A single analysis pass isn't enough. - If your analyses return empty results, the most common cause is a missing CI scan. Agentic Analysis needs context from a scan that ran after the feature was enabled on the project. Enable first, then scan.
- SonarQube Agentic Analysis is in open beta as of April 2026. GA is expected soon but not yet dated.
- The SonarQube CLI's
integratesubcommand supportsclaudeandgit, notcodex,currently. All Codex setup is manual. - User tokens only. Generate a personal user token under My Account > Security.
- Docker requires an absolute path for the
-vbind mount. Relative paths (./) fail silently.
How this compares to the Claude Code setup
The underlying feature is identical. Both agents call the same run_advanced_code_analysis MCP tool. The setup differs:
| Claude Code | Codex CLI | |
| Config format | JSON (.mcp.json) | TOML (.codex/config.toml) |
| Directive file | CLAUDE.md | AGENTS.md |
| Auto-analysis trigger | CLAUDE.md directive or PostToolUse hook (via SonarQube CLI) | AGENTS.md directive only |
| Tool loading | Lazy (eager requires ENABLE_TOOL_SEARCH=false) | Eager by default |
| sonar integrate CLI | Available (sonar integrate claude) | Not available |
| Hooks (auto-analysis on edit) | Available via SonarQube CLI | Not available |
| Secrets scanning | Available via CLI hooks | Not available |
| Token setup | Shell export or CLI-managed (~/.claude.json) | Shell export |
Claude Code's SonarQube CLI integration (sonar integrate claude) handles all of this: MCP configuration, analysis and secrets-scanning hooks, token management. Codex setup is manual. If you're choosing between agents for SonarQube integration, the Claude Code path has more automation. If you're already using Codex, this blueprint gives you the same analysis capability through the MCP tool.
Next steps
- Get started with Sonar Context Augmentation and Codex CLI — adds the Guide stage (context before code generation). Use
SONARQUBE_TOOLSETS = "cag,projects,analysis"for both Guide and Verify. - Get started with SonarQube Agentic Analysis in Claude Code — the Claude Code companion blueprint
- Official Agentic Analysis docs — latest language support, enablement instructions, and directive templates
SonarQube MCP Server quickstart for Codex CLI — basic MCP setup (without Agentic Analysis-specific config)