
TL;DR overview
- The SonarQube Agent App for GitHub brings SonarQube Cloud quality gate, analysis, coverage, duplication, dependency risk, and remediation workflows into agent apps for GitHub as a SonarQube agent.
- The SonarQube Agent App ships with dedicated
/sonar*skills (backed by the SonarQube MCP Server) to enable code review on pull requests, branch-level quality gate checks, and natural-language SonarQube queries. - The SonarQube Agent App fits engineering organizations using agent apps for GitHub as their managed agent runtime without having to install a local CLI or manage static tokens.
- Once configured, the agent can be invoked from Mission Control (GitHub's agent dashboard), on PRs, and within the same cloud Agent sessions that write your code, compressing the development cycle down to generation, analysis, remediation, and verification in one agentic environment.
GitHub’s agentic platform exposes external applications like the SonarQube Agent App, which bundles dedicated SonarQube skills and an MCP server configuration as a GitHub Agentic App, thereby embedding SonarQube code analysis and verification capabilities into the same environment where developers already generate code and review PRs. With the SonarQube Agent App, there’s no MCP configuration to set up, no static tokens to rotate, and no IDE-side configuration. This blueprint walks through installing the SonarQube Agent App, configuring its environment variables, and running a real PR review end-to-end with the SonarQube agent.
When to use the SonarQube Agent App for GitHub
- Your organization has ‘Agent Apps’ for GitHub enabled and you want SonarQube Cloud reachable inside Agent sessions.
- You review PRs inside GitHub and want quality gate status, new-code issues, and concrete fixes accessible from a single agent prompt instead of context-switching to a separate UI or waiting for the next CI run.
What you'll achieve
- The SonarQube Agent App installed on your GitHub organization, exposing
/sonar*skills in every Agent session for the configured repos. - Two Copilot variables set at your chosen scope (
COPILOT_MCP_SONARQUBE_ORGandCOPILOT_MCP_SONARQUBE_PROJECT_KEY) wiring the SonarQube MCP Server to your SonarQube Cloud organization and project(s). - A working end-to-end PR-review flow inside GitHub: after SonarQube analysis completes in your CI, new-code issues for the PR are surfaced on demand and a concrete fix is applied to the working branch, courtesy of the agent app skills.
Architecture
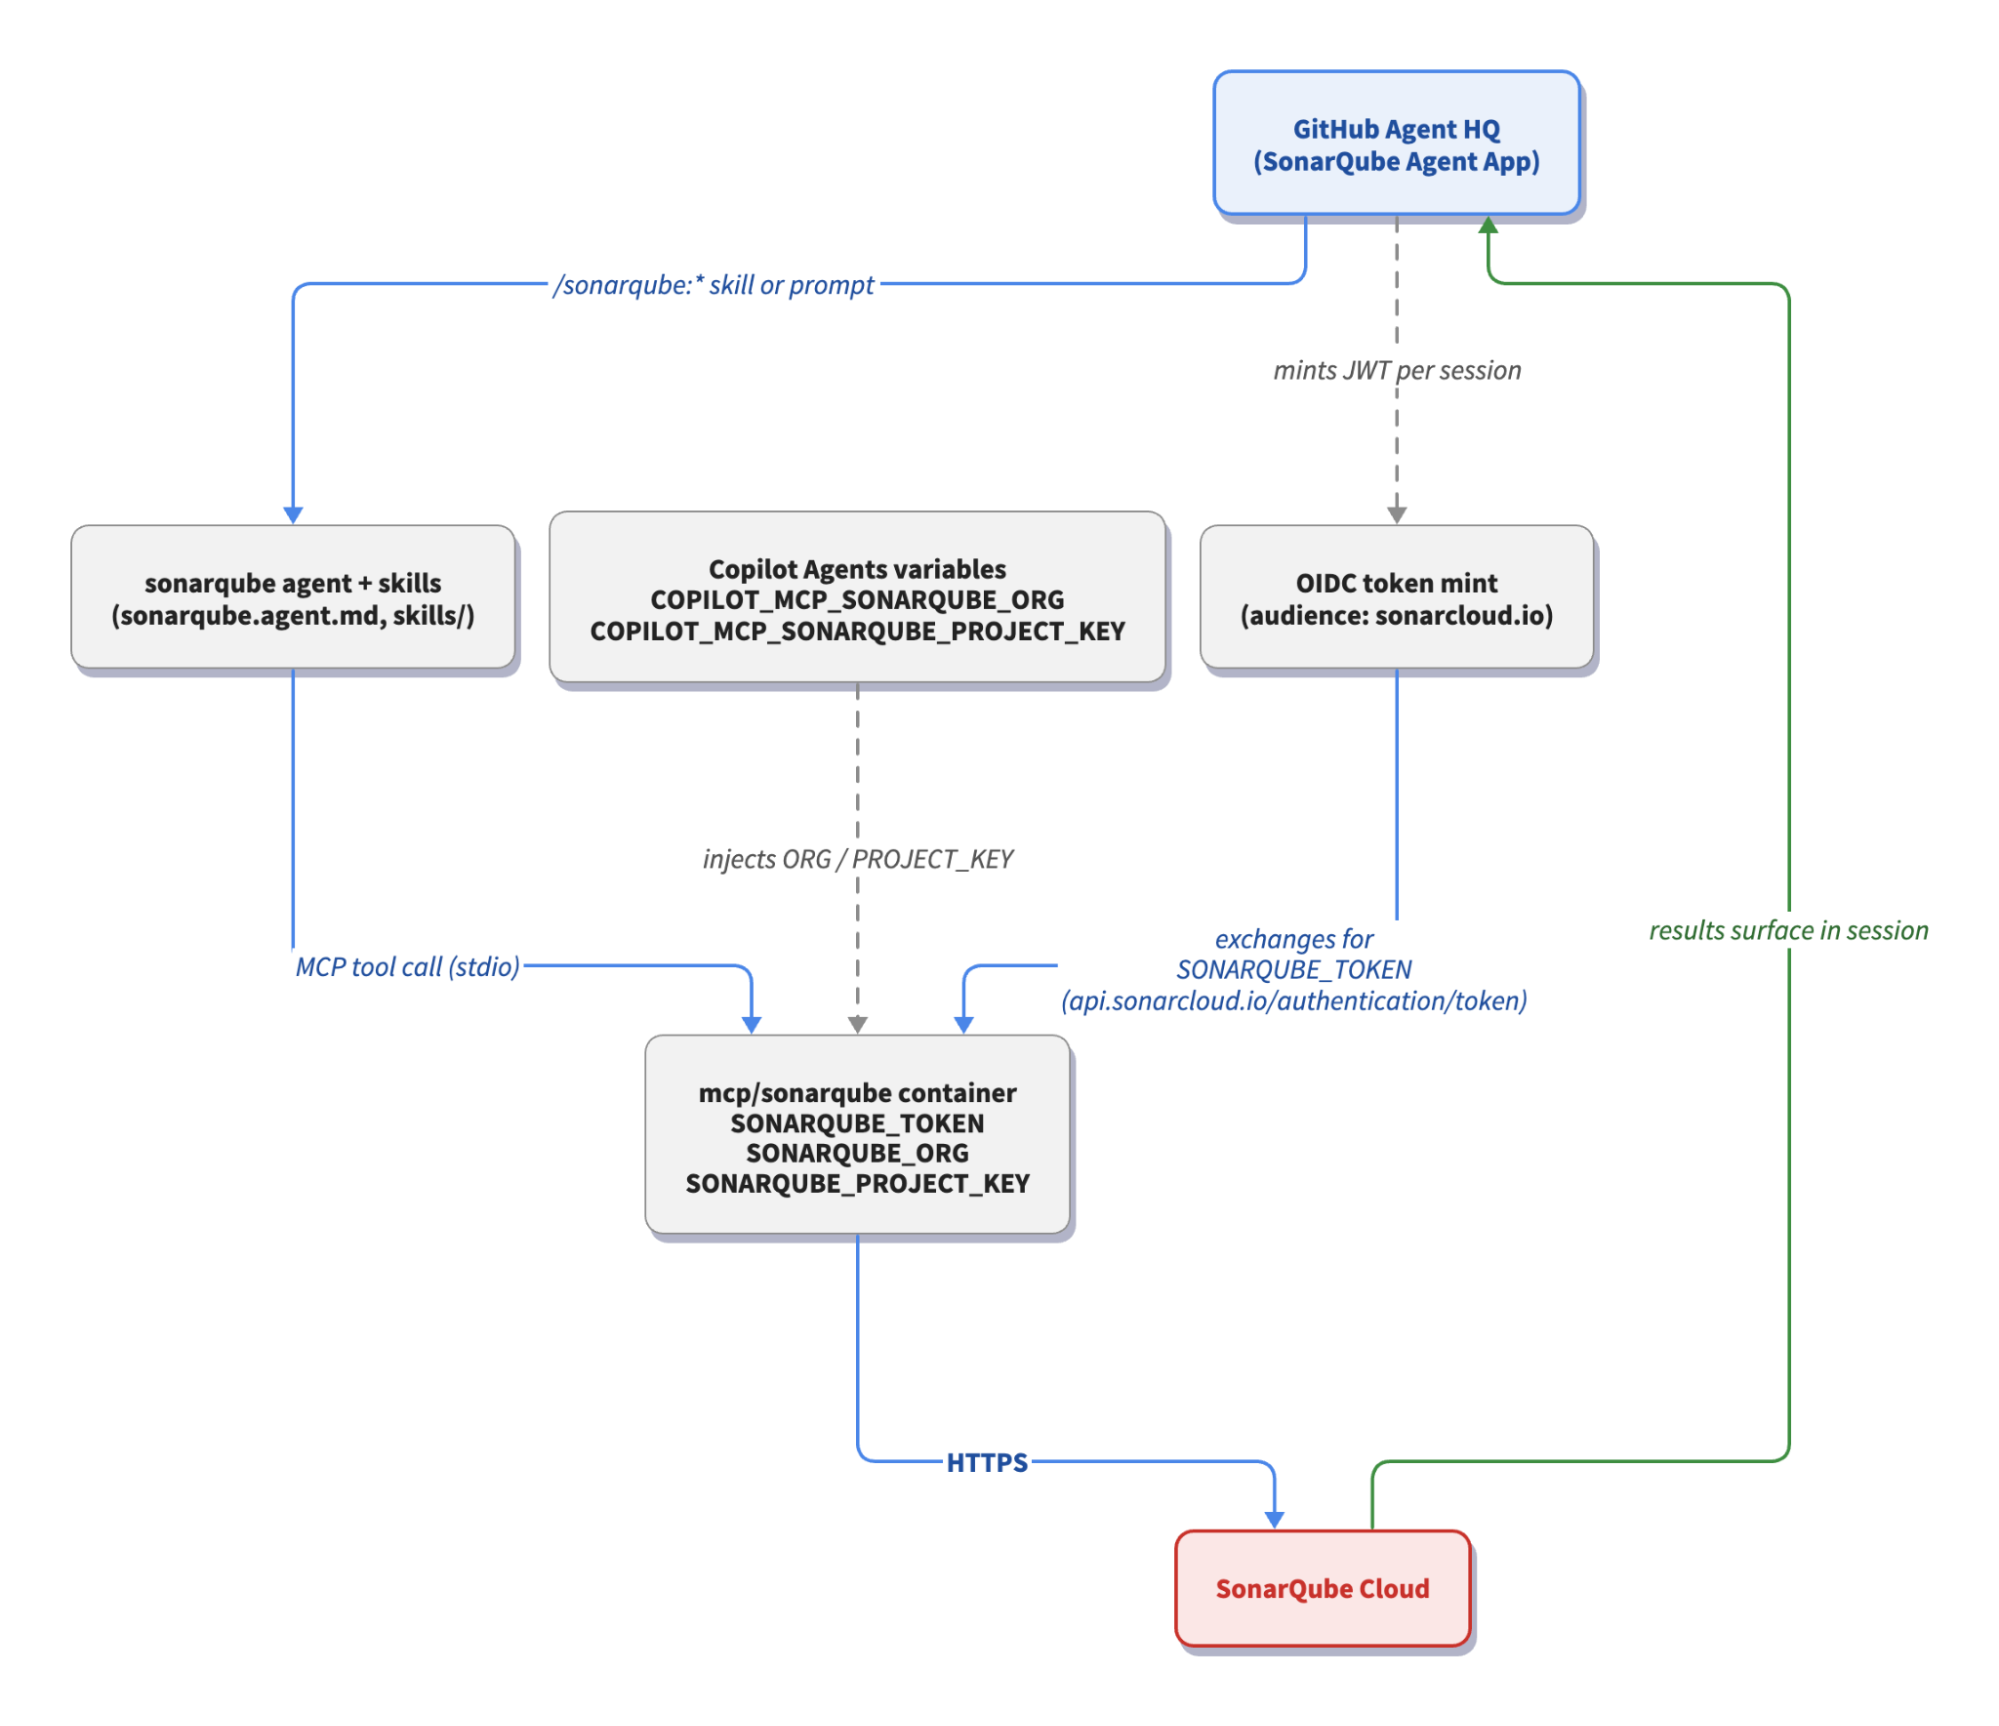
The integration has three layers. The SonarQube Agent App is what you install once at the organization level and bundles the agent definition, /sonar* skills, and SonarQube MCP Server wiring, so there's nothing for individual developers to configure on their machines. The Agent HQ runtime is what actually executes the agent inside a session. It resolves the two user-configurable COPILOT_MCP_SONARQUBE_* variables, mints a fresh OIDC JWT per session against the audience that matches your SonarQube Cloud region, exchanges that JWT for a SonarQube API bearer token, and starts the MCP server container with SONARQUBE_TOKEN, SONARQUBE_ORG, and SONARQUBE_PROJECT_KEY injected as environment variables. SonarQube Cloud is the backend that answers every call.
Prerequisites
- A GitHub organization on a Copilot plan that supports Agent HQ ("Third-party Agents" in GitHub's plan tables).
- Admin permission to install GitHub Apps on that organization, plus permission to add Copilot Agents variables on the same org (Settings → Security → Secrets and variables → Agents).
- A SonarQube Cloud account on either
sonarcloud.io(standard region) orsonarqube.us(US region), with at least one analyzed project and GitHub set as the DevOps platform. For initial Cloud setup, see Getting started with GitHub. - Every developer who plans to use the agent must sign into SonarQube Cloud via their GitHub identity. The OIDC exchange links the GitHub user in the Agent HQ session to a SonarQube Cloud account, so accounts created with email/password or another SSO won't authenticate.
- (Optional) SonarQube Advanced Security enabled on the connected organization (requires a Cloud Enterprise plan), required only if you plan to use the
/sonar-dependency-risksskill. - (Optional) a
sonar-project.propertiesfile at the repo root if you want the project key to come from repo config rather than theCOPILOT_MCP_SONARQUBE_PROJECT_KEYvariable.
Step 1 — Install the SonarQube Agent App
The SonarQube Agent App is published in the GitHub App directory. Install the variant that matches the region your SonarQube Cloud organization runs in:
- Standard region: SonarQube Agent — for organizations on
sonarcloud.io. - US region: SonarQube Agent US — for organizations on
sonarqube.us.
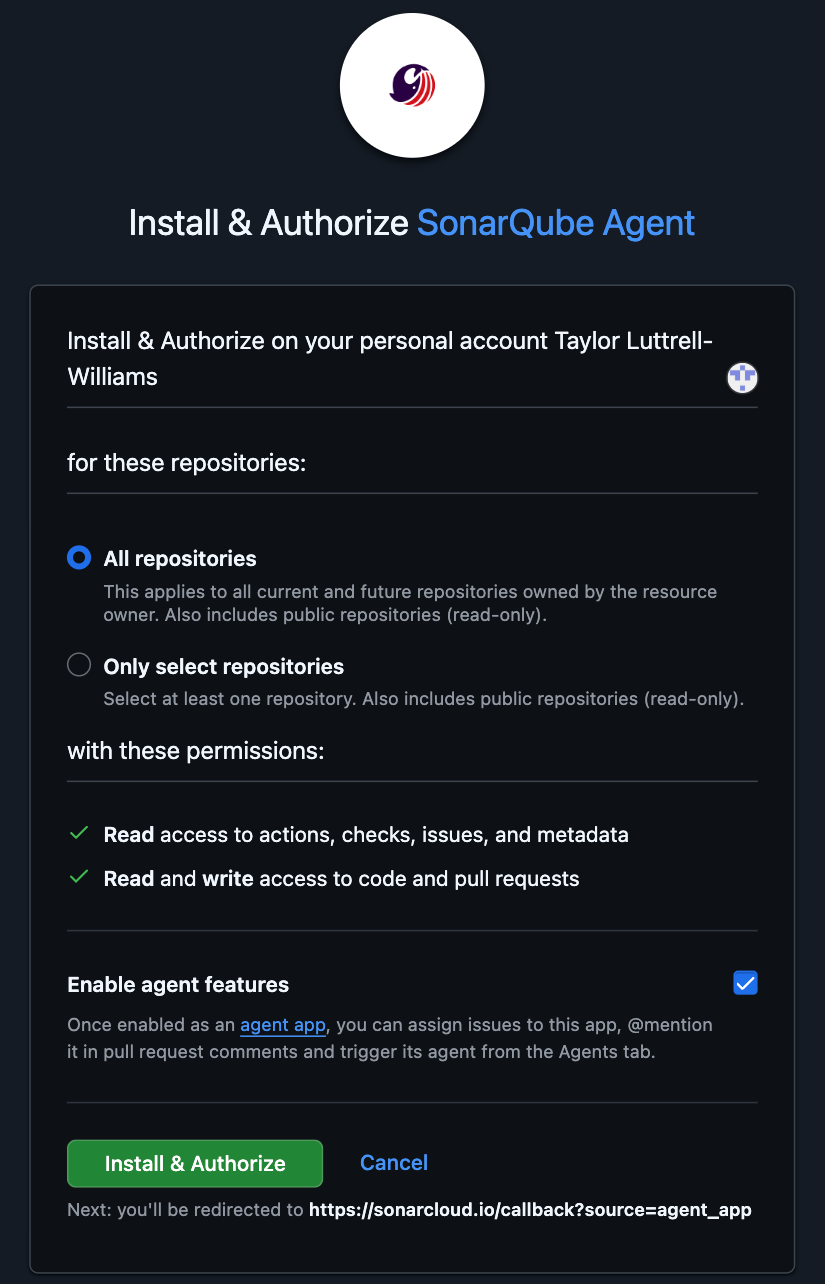
On the install page, check Enable agent features before you click Install & Authorize.
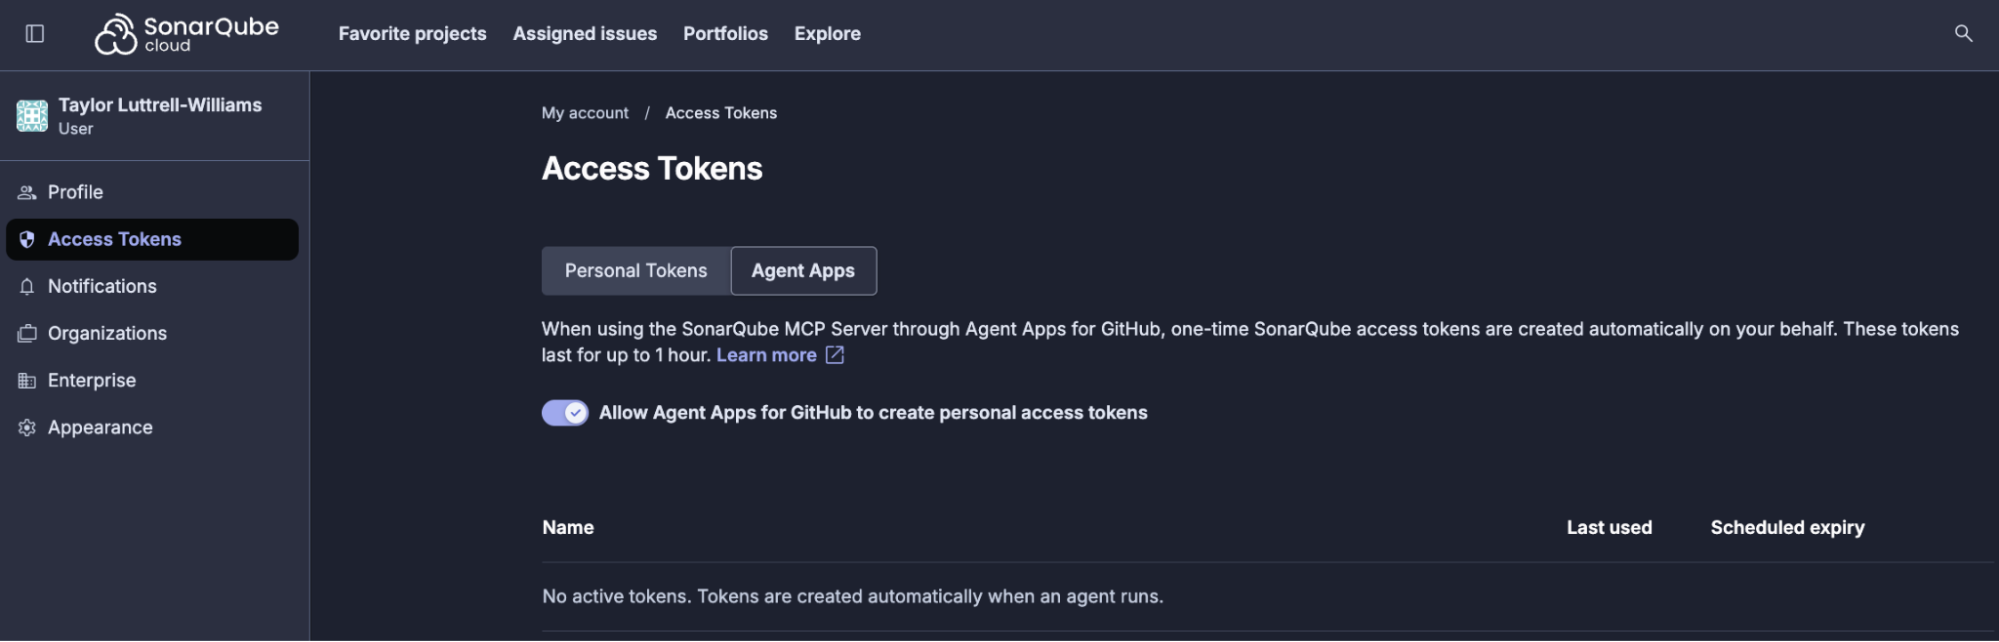
Each software developer who plans to invoke the agent then has to grant it permission to mint SonarQube Cloud access tokens on their behalf. If you complete the consent flow as part of the initial install, GitHub redirects you to the SonarQube Cloud consent page automatically. To do it later, sign into SonarQube Cloud, open My account → Access tokens, switch to the Agent Apps tab, and toggle on Allow Agent Apps for GitHub to create personal access tokens.
If the SonarQube Agent App was already installed before Agent HQ support landed, you'll need to enable it retroactively. Open the organization or repository where the app lives, go to the app's settings page, scroll to Agent features, and click Enable agent features. The agent will appear in any new Agent HQ session opened against that scope.

Once the install and consent are done, the SonarQube agent shows up in the agents dropdown of every Agent HQ session for the configured org or repos and is also reachable from the Agents tab at https://github.com/copilot/agents.
Step 2 — Set the Copilot variables
The SonarQube Agent App reads its SonarQube Cloud organization key and default project key from two Agents variables. Both variable names must start with COPILOT_MCP_ as without that prefix, GitHub won't expose them to the MCP server configuration.
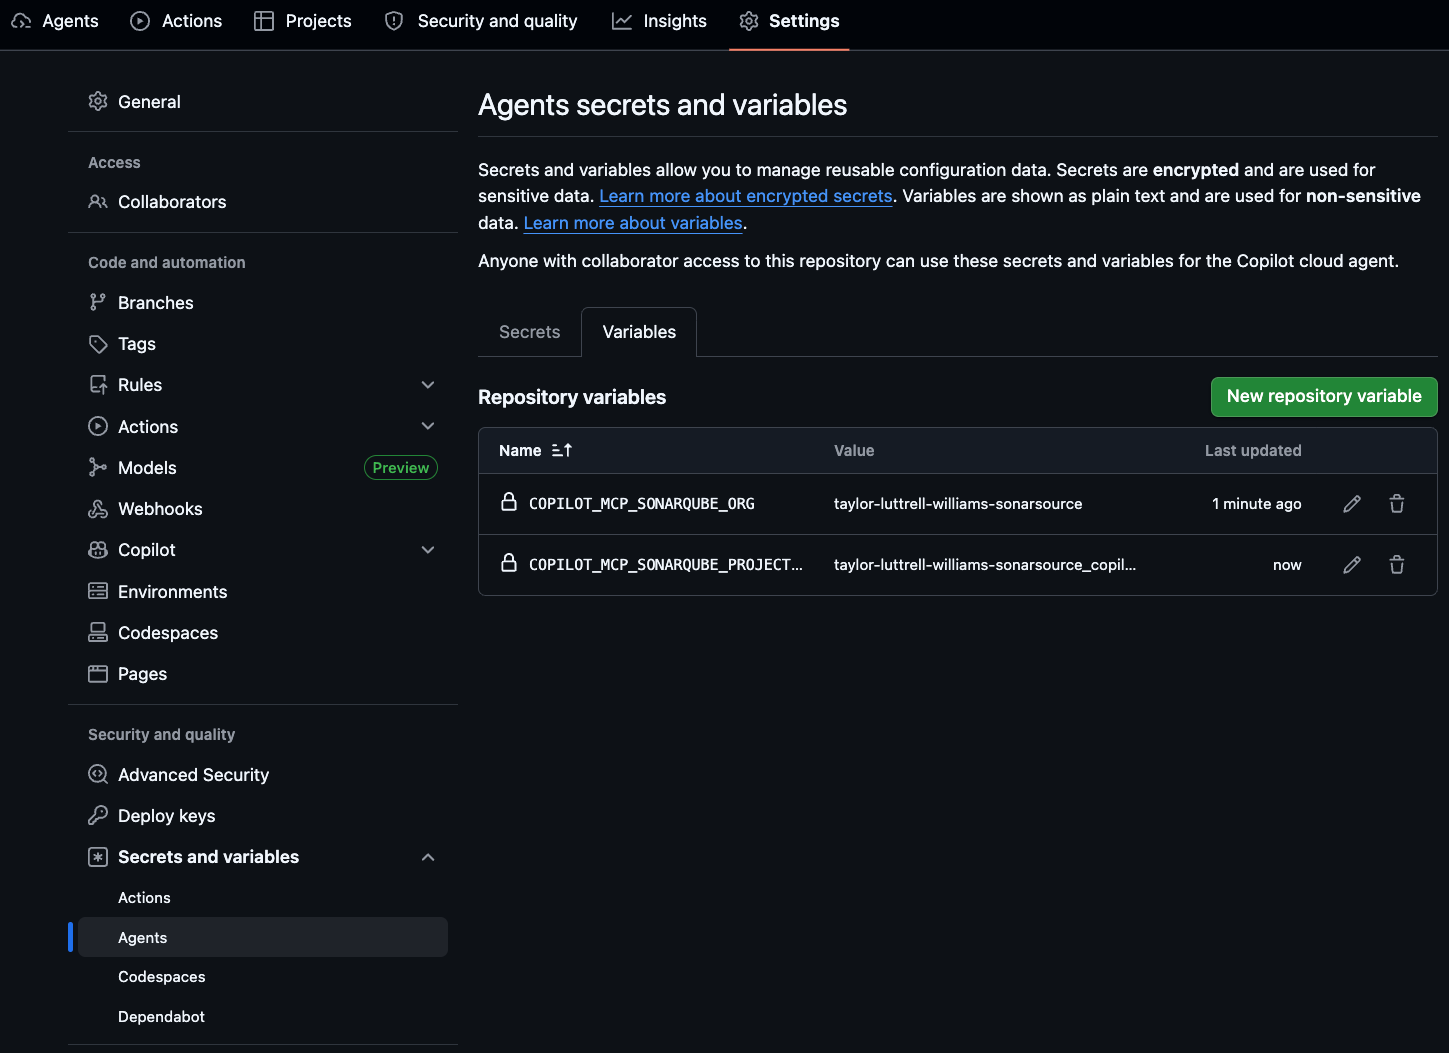
On GitHub, navigate to Settings → Security → Secrets and variables → Agents → Variables at the scope you want to set each variable, then add the two below:
You can locate your org key when you log into SonarQube Cloud at Projects → Project Information → Organization key.
Set COPILOT_MCP_SONARQUBE_ORG at the organization scope when every repo in your GitHub org points at the same SonarQube Cloud org (the lowest-friction rollout). Drop down to the repository scope only when individual repos point at different SonarQube Cloud orgs. Set COPILOT_MCP_SONARQUBE_PROJECT_KEY at the repository scope so each repo gets its own default project key, or omit it entirely if you'd rather have the agent resolve the key from a sonar-project.properties file or pass the project key explicitly on each prompt. Agents variables live under their own tab and are separate from Actions, Codespaces, and Dependabot secrets; nothing you set on those other tabs reaches the SonarQube Agent App.
Step 3 — Open an Agent session and invoke the SonarQube Agent
Open an Agent session in any repo where the SonarQube Agent App is installed and select SonarQube from the agent dropdown.
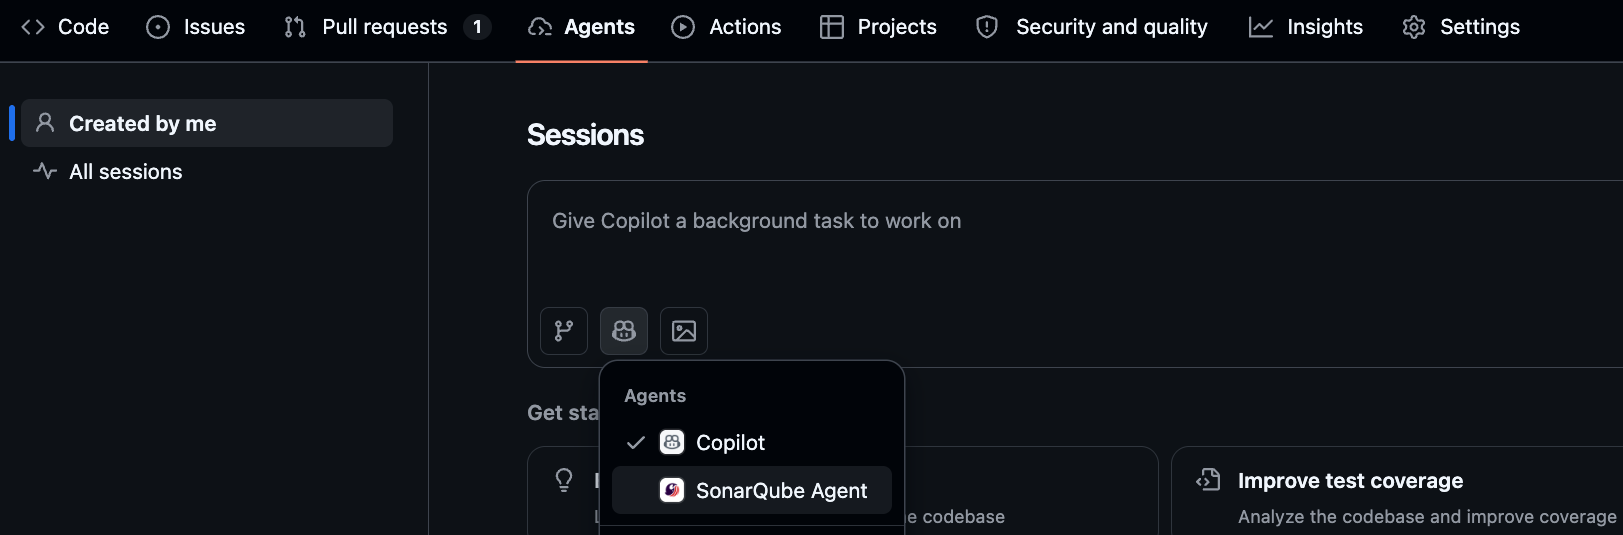
The SonarQube Agent App sets disable-model-invocation: true, so GitHub won't auto-route to this agent based on task context; you have to pick it. Start by asking the SonarQube agent which skills are available in your current session.
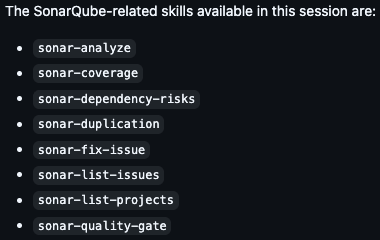
Smoke-test the wiring by triggering a basic skill. In your prompt you can trigger skills explicitly by using their slash form or instead phrase your prompt clearly and the agent will pick up the skill(s) automatically:
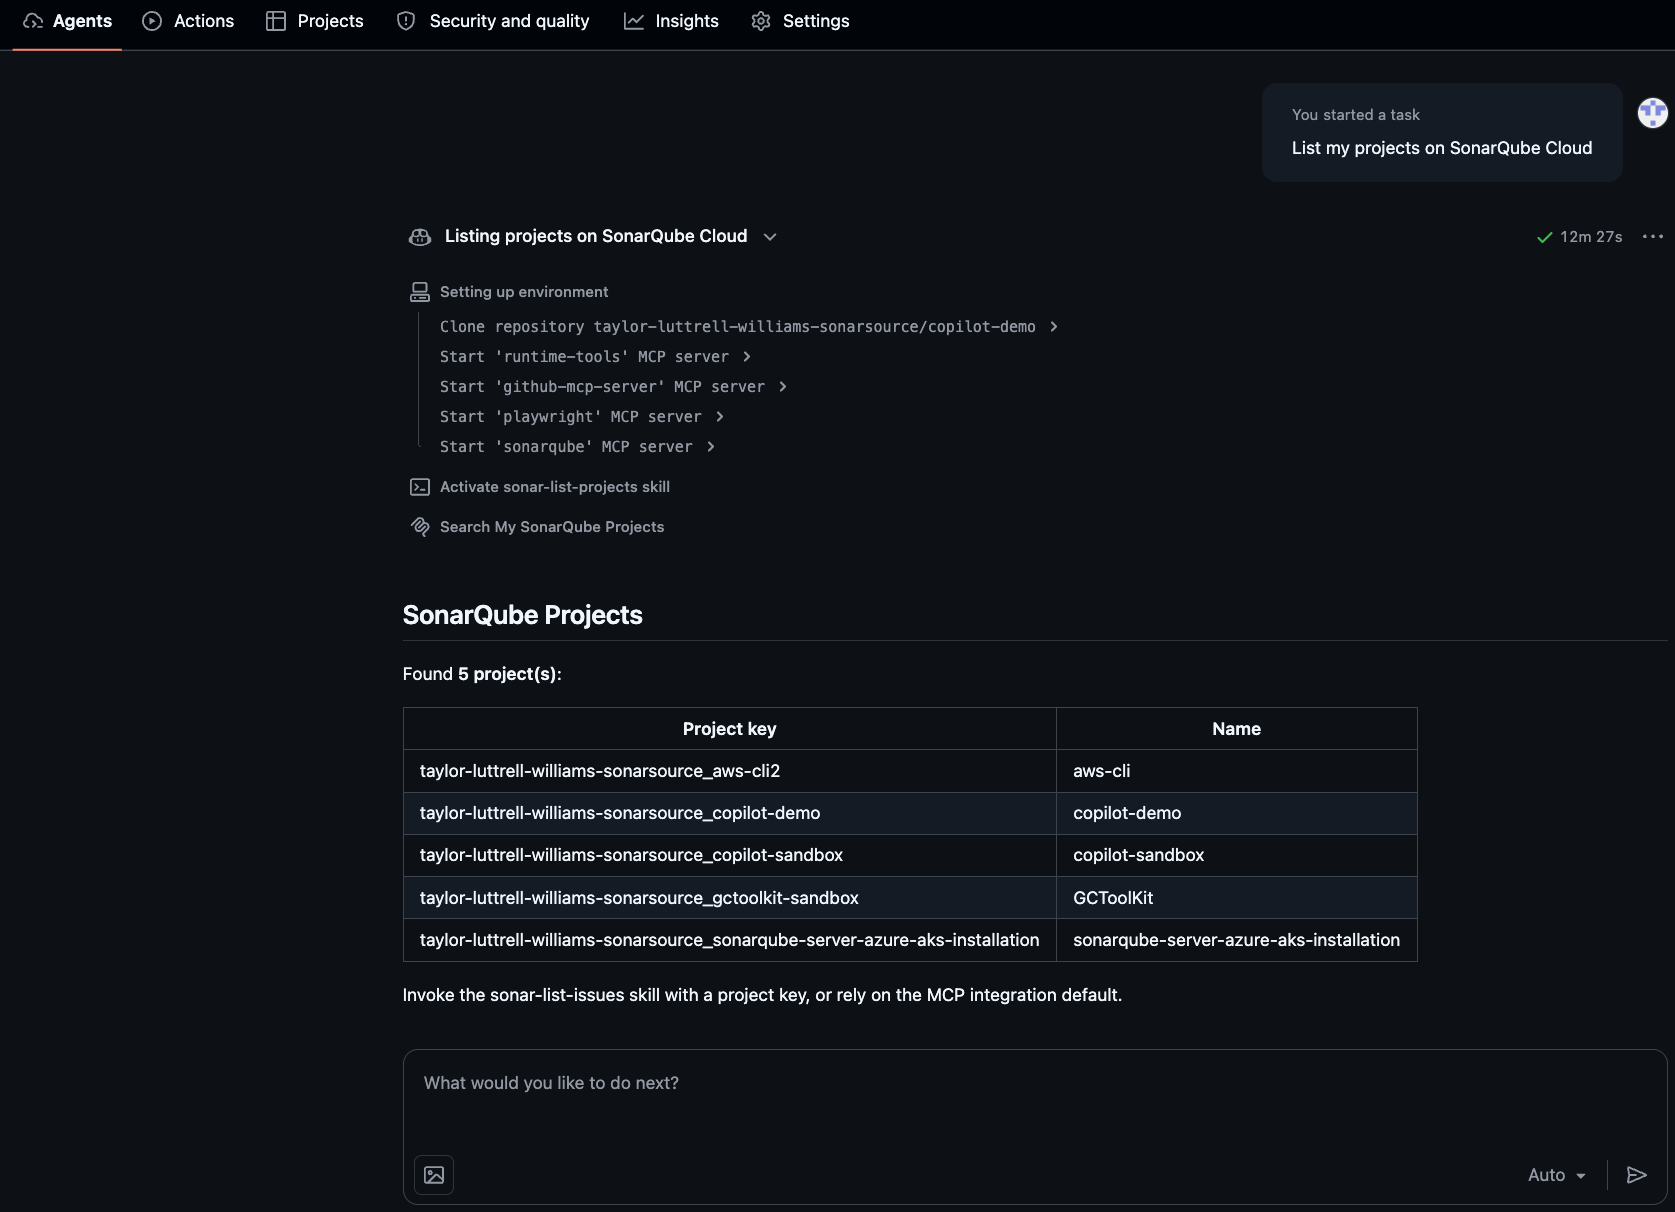
List my projects on SonarQube CloudThe SonarQube agent reads this prompt and triggers the sonar-list-projects skill. You should get back a list of the SonarQube Cloud projects accessible to the OIDC-derived token. If you see your project(s), auth and configuration are working. If you hit an MCP-server or auth error, check (in order): COPILOT_MCP_SONARQUBE_ORG is set correctly, Enable agent features is toggled on for the GitHub App, your SonarQube Cloud account has Allow Agent Apps for GitHub to create personal access tokens toggled on, and the installed GitHub App matches your SonarQube Cloud region.
Step 4 — Walk a PR review end-to-end
This section serves as a practical walkthrough of the SonarQube Agent App’s capabilities rather than copy/paste setup. The output below originates from a sample Python project connected to SonarQube Cloud, where location_lookup.py is merged from a feature branch into main. To follow along, pick any project that you’ve analyzed in SonarQube Cloud, select the SonarQube agent from Mission Control (or invoke it directly in a PR comment), and prompt away. The content of the response will differ from project to project but the structure (headline, markdown table, severity icons, sorted worst-first, citations, etc.) is consistent because it's baked into the agent's response conventions.
1. Invoke the SonarQube agent in a PR
In an open PR, @-mention the SonarQube agent to invoke a given skill:
@sonarqube-agent[agent] can you list sonar issues associated with the new location_lookup.py code?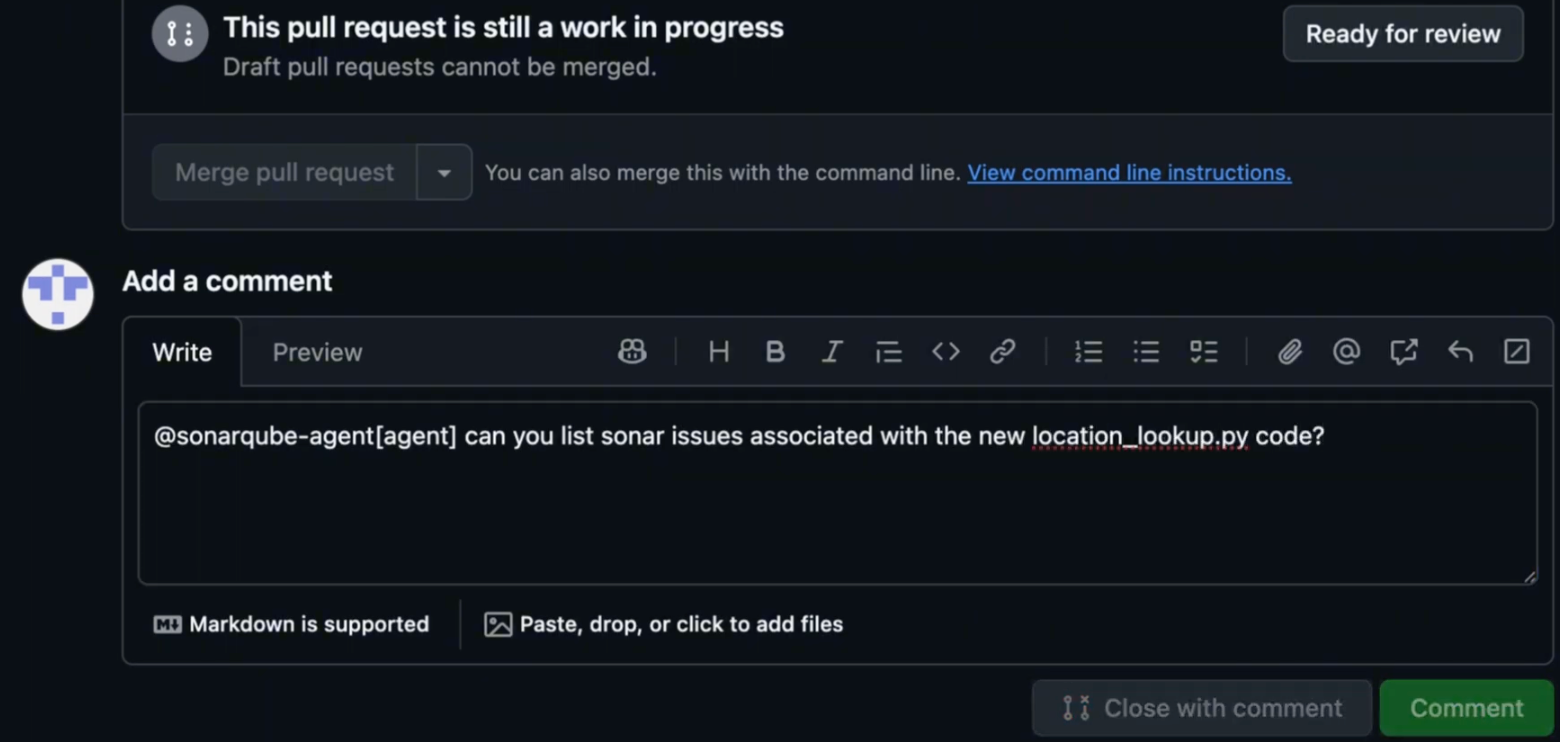
2. List the new issues on the PR
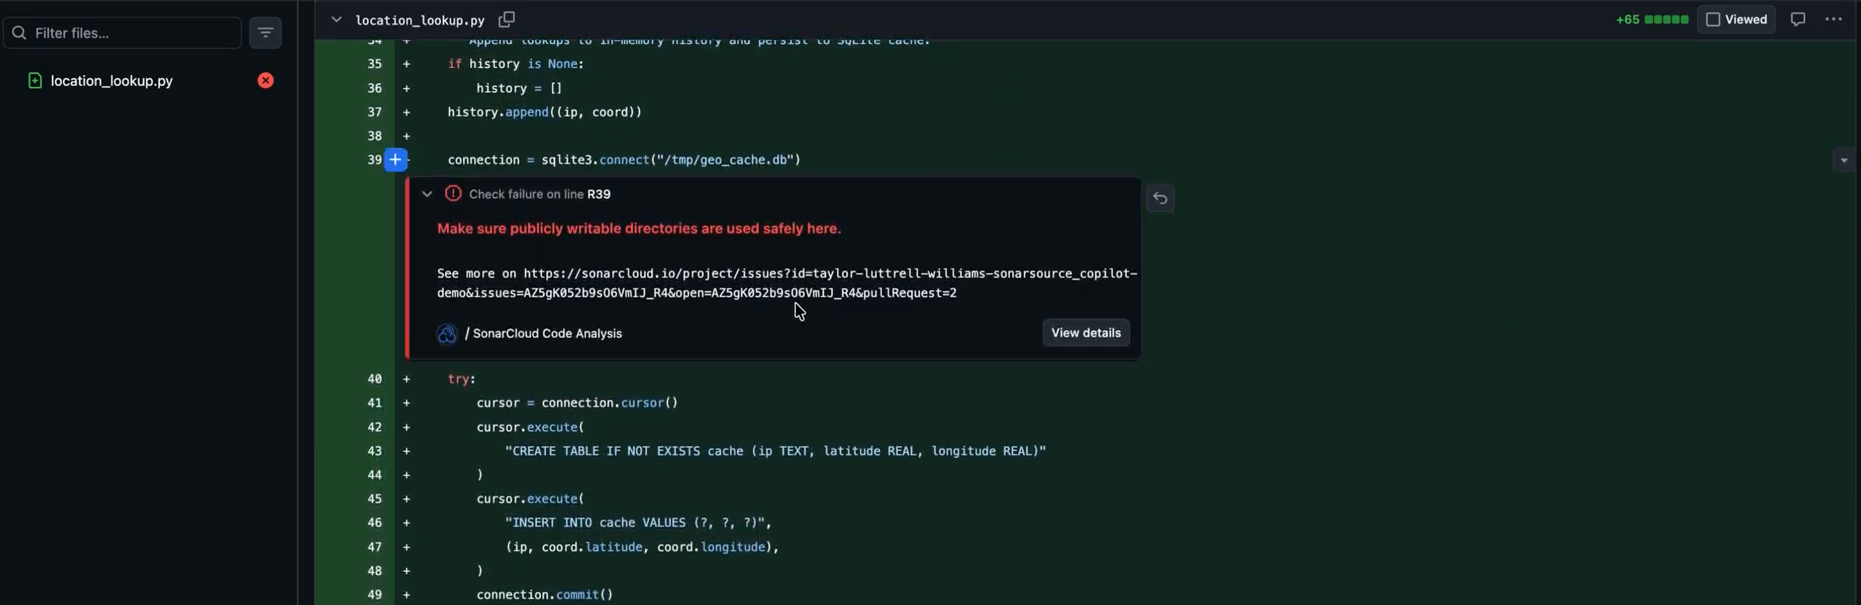
In this example, adding the comment kicks off an agent session. On the comment, click View session to open the agent session. Alternatively, open the Agents tab, select the SonarQube agent directly, and prompt from there. From within the session, the SonarQube agent triggers the sonar-list-issues skill, which surfaces two issues in location_lookup.py: one of high severity, the other of little concern.
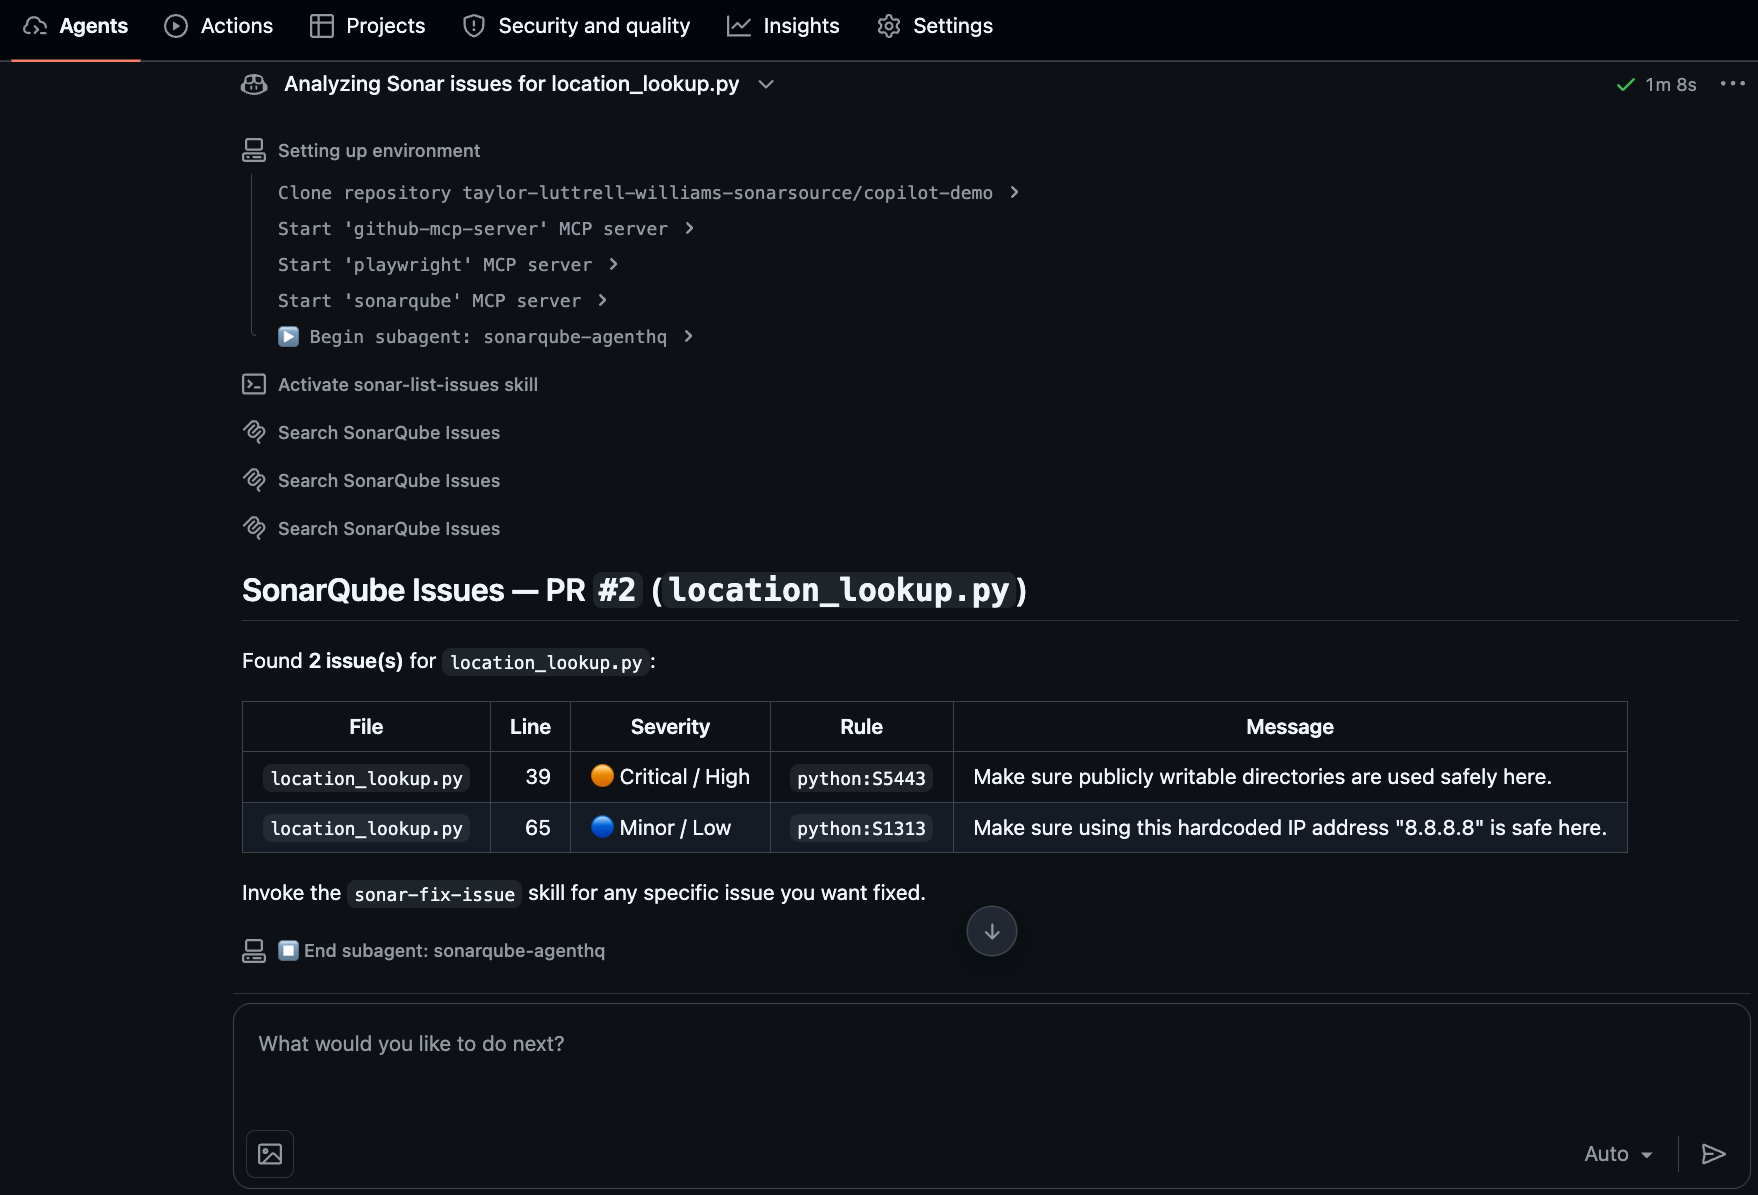
The high-severity finding points to Python rule S5443 on line 39. The new code writes to a hard-coded publicly writable directory, which exposes it to TOCTOU races, symlink attacks, and other adversarial file manipulation by any other user on the system.
3. Fix one of the surfaced issues
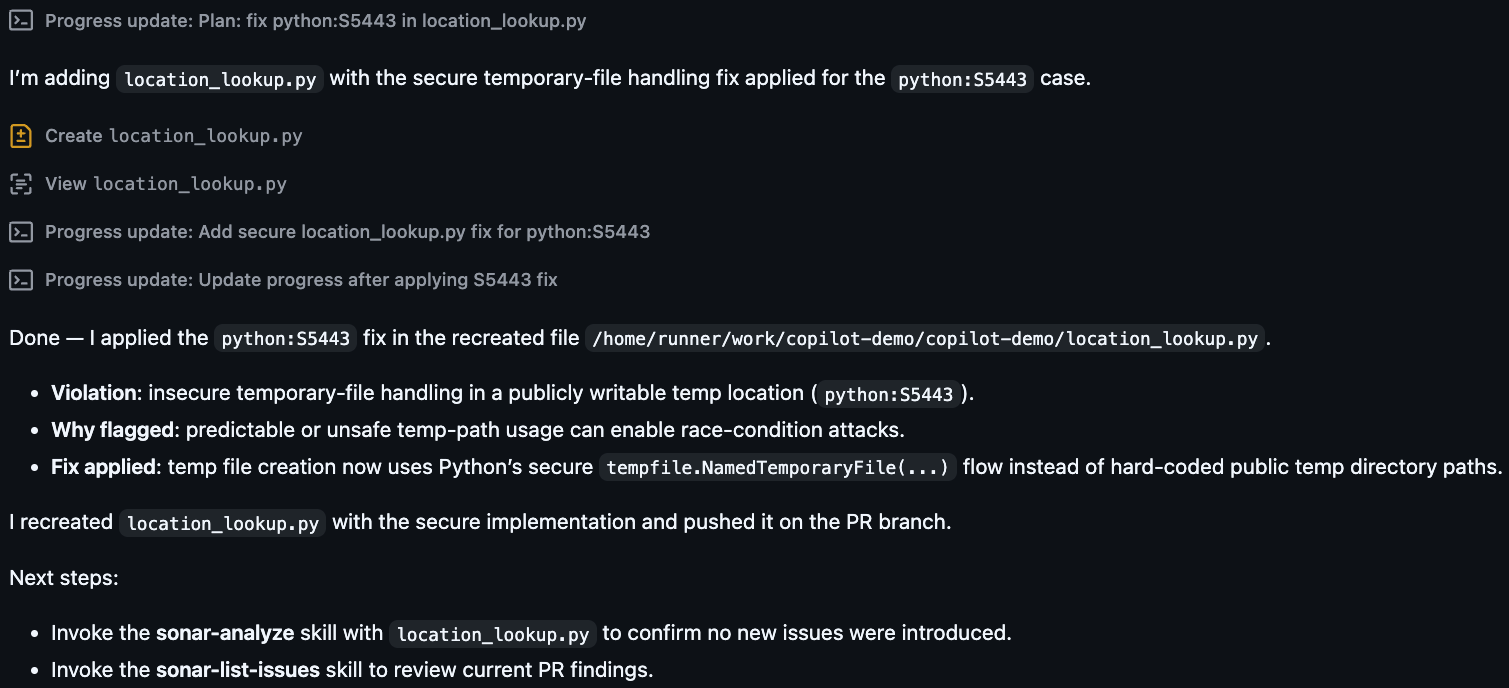
Now instruct the SonarQube agent to fix the high-severity issue with the following prompt:
Fix the high-severity issue present on line 39 of location_lookup.pyThe agent reads the prompt, fetches the rule description to determine the best fix, and triggers the sonar-fix-issue skill, remediating the issue and committing the code fix. In doing so, the agent utilizes Python’s secure tempfile.NamedTemporaryFile(...) flow instead of a hard-coded public temp directory path and pushes the secure implementation on the PR branch.
With the fix applied and committed, we can inspect the correction at the code level:
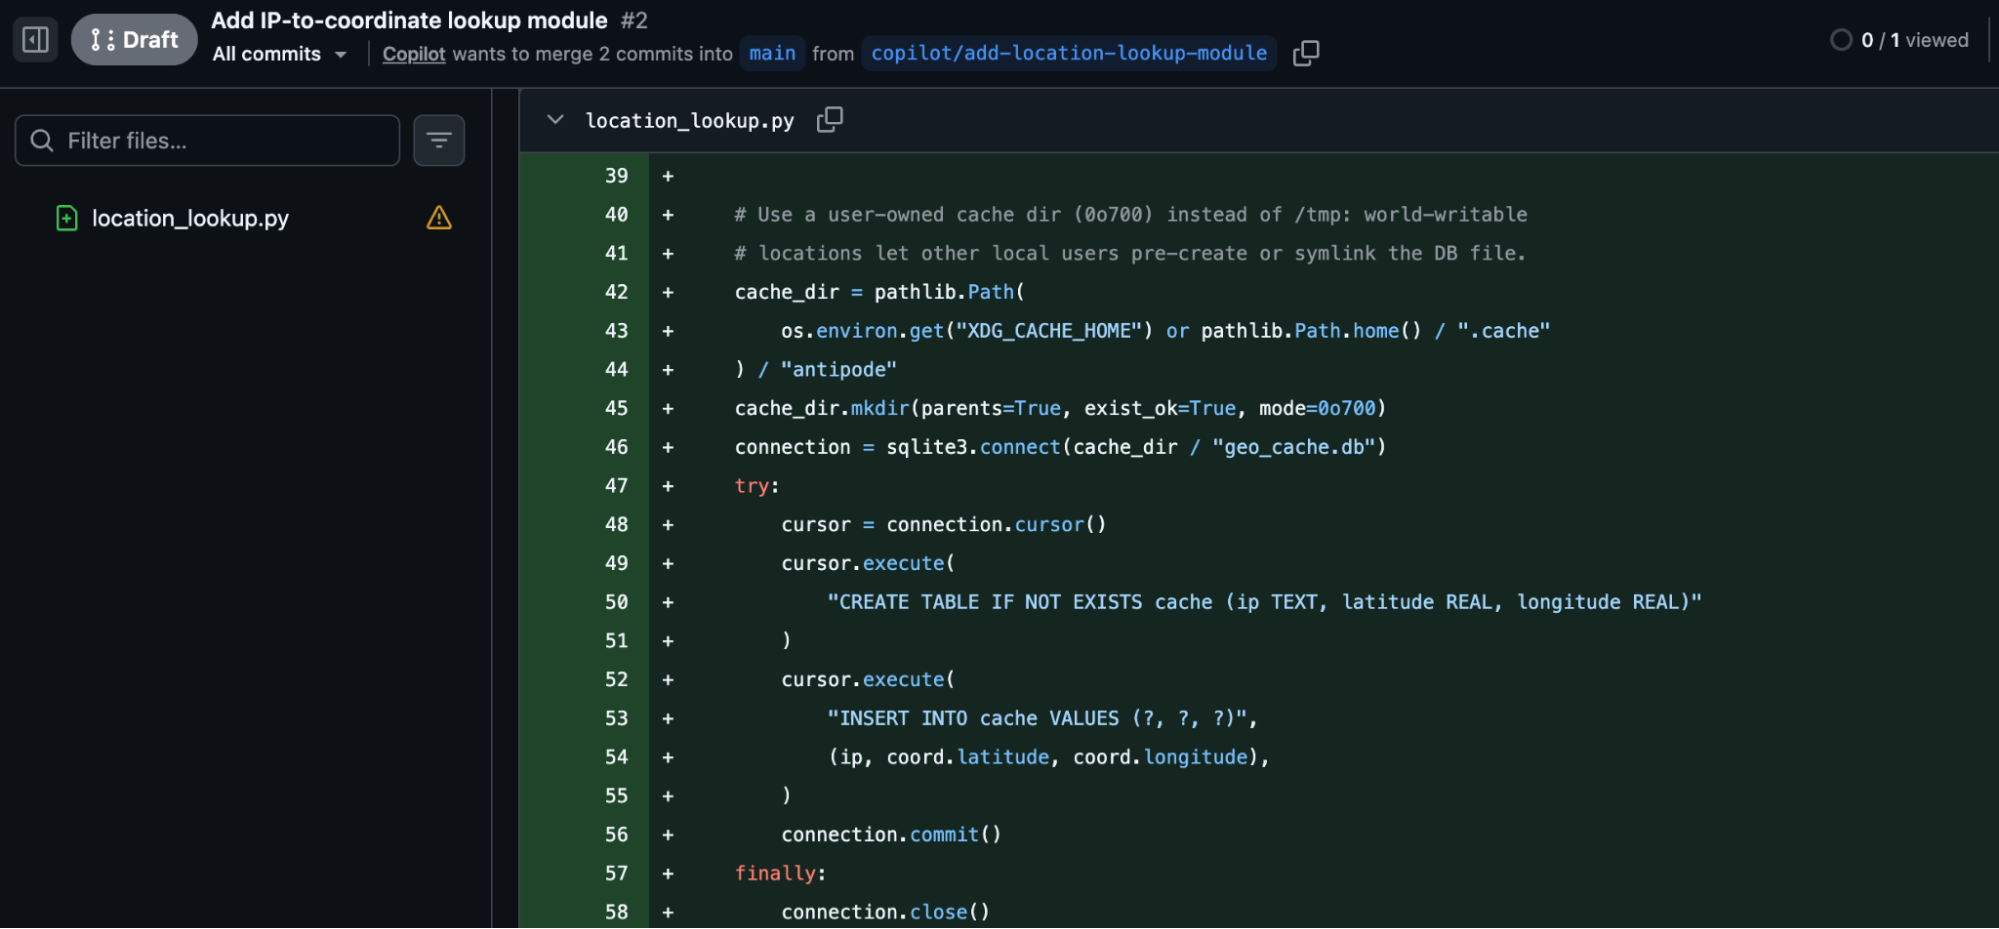
Now you’re up and running with the SonarQube Agent App for GitHub. Consider running the sonar-analyze skill on all code fixes supplied by the SonarQube or Copilot agent to verify the results.
Verify the setup
Confirm that the SonarQube Agent App for GitHub is properly set up when all of the following hold true:
- The SonarQube agent shows up in the Agents dropdown for the configured repository and can be @-mentioned in a PR comment.
- The
COPILOT_MCP_SONARQUBE_ORGand (optional)COPILOT_MCP_SONARQUBE_PROJECT_KEYare listed under Settings → Security → Secrets and variables → Agents → Variables at your chosen scope. Alternatively, asonar-project.propertiesfile exists at the project root. - A natural-language prompt like "show me the new SonarQube issues on this PR" triggers
/sonar-list-issues --pr <n>behind the scenes and returns real data. Alternatively, explicit invocation of the slash skill returns the same.
Next steps for the SonarQube Agent App for GitHub
- Browse the SonarQube Agent App (plugin) source for the authoritative skill list, usage examples, and updates
- Get up and running with other SonarQube agent plugins on GitHub
- Familiarize yourself with SonarQube CLI commands
- Dive deeper into the SonarQube MCP Server docs
- Review GitHub's custom agents configuration reference
- Connect the dots with Sonar's Agent Centric Development Cycle framing