
TL;DR overview
- SonarQube Agentic Analysis (open beta) provides CI-grade code verification within AI agent workflows, allowing real-time analysis, fixing, and re-verification before code reaches a pull request.
- The system uses an MCP Server to connect Claude Code with SonarQube Cloud’s remote engine, restoring cached CI context for high-accuracy results.
- Developers can automate the analyze, fix, and re-verify loop by configuring a .mcp.json file and adding directives to a CLAUDE.md file.
- This integration supports major languages like Java, Python, and JavaScript, significantly reducing feedback loops by completing single-file analysis in seconds.
The SonarQube MCP Server gives you tools that query existing code quality and code security analysis data in SonarQube Cloud (issues, quality gates, coverage, security hotspots). SonarQube Agentic Analysis goes further: it sends code to SonarQube Cloud's remote analysis engine, which has CI-derived project context and your team's quality profile, and returns new findings in real time. SonarQube Agentic Analysis applies the same rules and configuration your CI pipeline uses.
This guide configures Claude Code to run that analysis in real time. By the end, your agent can run a complete analyze, fix, and re-verify loop before any code reaches a pull request.
SonarQube Agentic Analysis maps to the Verify stage of the Agentic Centric Development Cycle (AC/DC).
When to use this
You're on SonarQube Cloud, you use Claude Code (or another MCP-compatible agent), and you want CI-grade code verification inside the agent's workflow instead of waiting for the PR to fail the quality gate.
What you'll achieve
- SonarQube MCP Server configured with Agentic Analysis enabled
- Claude Code verifying code against your team's quality profile in real time
- A working analyze, fix, and re-verify loop before commit
- (Optional) A CLAUDE.md directive for automatic verification after code generation
Architecture

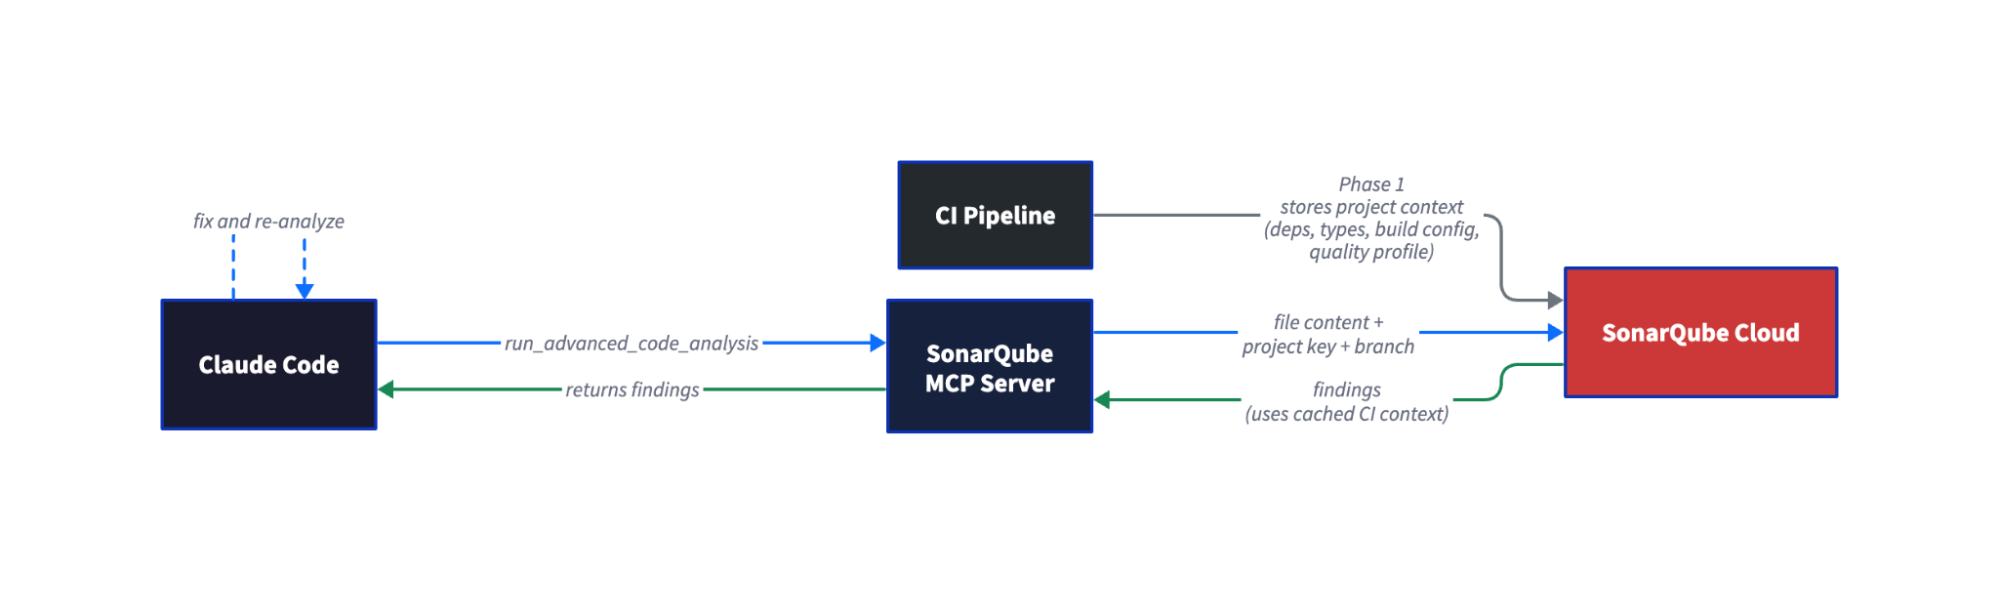
The two-phase architecture gives Agentic Analysis full project context that local linting doesn’t have. Phase 1 happens during your regular CI scan. SonarQube Cloud stores the project context (resolved dependencies, type information, build configuration) from that scan. Phase 2 happens on demand, inside Claude Code. When the agent calls run_advanced_code_analysis, SonarQube Cloud restores the cached CI context and runs the same analysis engine your pipeline uses. Single-file analysis completes in seconds, not minutes.
Prerequisites
- SonarQube Cloud Team or Enterprise plan account with SonarQube Agentic Analysis enabled on your project (however, open beta works with all cloud plans).
- A completed CI scan on the branch you'll use for analysis, run after Agentic Analysis was enabled on the project. The order matters: enable first, then scan.
- Claude Code installed & configured.
- Docker running
- SonarQube Cloud user token — Generate one at My Account > Security in SonarQube Cloud.
- Supported languages: Java, JavaScript/TypeScript, Python, HTML, XML, plus Secrets detection and IaC (Docker, Kubernetes, Terraform)
Step 1 — SonarQube MCP Server with Agentic Analysis enabled
Agentic Analysis requires a project-specific configuration. The official docs explicitly warn against using your global MCP configuration. Create a .mcp.json file in your project root:
{

  "mcpServers": {

    "sonarqube-agentic-analysis": {

      "command": "docker",

      "args": [

        "run", "-i", "--rm", "--pull=always",

        "-e", "SONARQUBE_URL",

        "-e", "SONARQUBE_TOKEN",

        "-e", "SONARQUBE_ORG",

        "-e", "SONARQUBE_PROJECT_KEY",

        "-e", "SONARQUBE_TOOLSETS",

        "-v", "<ABSOLUTE_PATH_TO_YOUR_PROJECT>:/app/mcp-workspace:rw",

        "mcp/sonarqube"

      ],

      "env": {

        "SONARQUBE_URL": "https://sonarcloud.io",

        "SONARQUBE_ORG": "<YOUR_ORG_KEY>",

        "SONARQUBE_PROJECT_KEY": "<YOUR_PROJECT_KEY>",

        "SONARQUBE_TOOLSETS": "projects,analysis"

      }

    }

  }

}
Before launching Claude Code, export your token in the shell:
export SONARQUBE_TOKEN="<YOUR_TOKEN>"The token is passed through to Docker via -e SONARQUBE_TOKEN but should not be stored in the .mcp.json file. This keeps credentials out of version control.
<YOUR_ORG_KEY>: Your SonarQube Cloud organization key (visible in your project URL)<YOUR_PROJECT_KEY>: The SonarQube Cloud project key for the project you'll analyze. Setting this viaSONARQUBE_PROJECT_KEYauto-fills theprojectKeyparameter on every analysis call, so the agent doesn't need to look it up.<ABSOLUTE_PATH_TO_YOUR_PROJECT>: The absolute path to your project directory. Relative paths (./,../) are not accepted. The workspace mount lets the MCP server read files from disk.SONARQUBE_TOOLSETS: Controls which tool groups are exposed.projects,analysisenables project browsing and Agentic Analysis. To also enable Sonar Context Augmentation, usecag,projects,analysis. See the full toolset list for all options.
For US-region SonarQube Cloud, change SONARQUBE_URL to https://sonarqube.us.
This approach lets every software developer on the team share the same MCP configuration by committing .mcp.json to the repo (with the token excluded via shell export).
Alternative: claude mcp add (user-level config). If you prefer not to use .mcp.json, you can register the server via the CLI:
claude mcp add sonarqube-agentic-analysis \
--env SONARQUBE_URL=https://sonarcloud.io \
--env SONARQUBE_TOKEN=$SONARQUBE_TOKEN \
--env SONARQUBE_ORG=<YOUR_ORG_KEY> \
--env SONARQUBE_PROJECT_KEY=<YOUR_PROJECT_KEY> \
--env SONARQUBE_TOOLSETS=projects,analysis \
-- \
docker run -i --rm --pull=always \
-e SONARQUBE_URL \
-e SONARQUBE_TOKEN \
-e SONARQUBE_ORG \
-e SONARQUBE_PROJECT_KEY \
-e SONARQUBE_TOOLSETS \
-v /absolute/path/to/your/project:/app/mcp-workspace:rw \
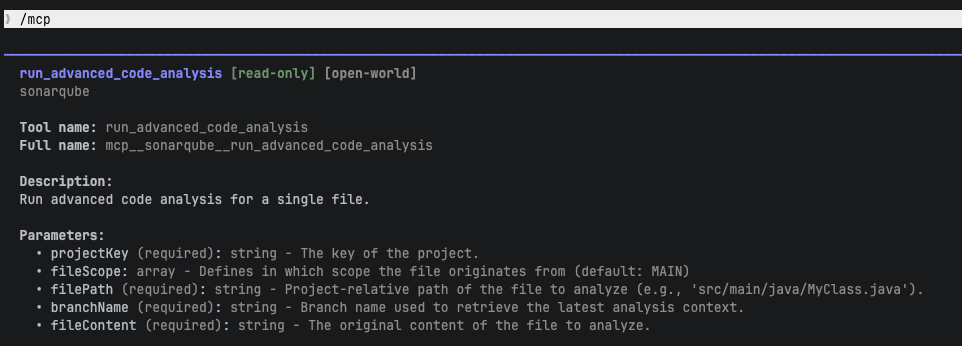
mcp/sonarqubeVerify the tool is available by typing /mcp in Claude Code. You should see run_advanced_code_analysis in the tool list with parameters: projectKey, branchName, filePath, fileContent, and fileScope.

Step 2 — Verified connection to SonarQube Cloud
Confirm Claude Code can reach your project. Ask Claude:
What SonarQube projects are available?Claude calls search_my_sonarqube_projects and returns your project list. Confirm your target project appears. If it doesn't, check that your token has access to the organization and that the project key is correct.
Step 3 — First analysis run
Ask Claude to analyze a file after generating or modifying code. In our example, we asked Claude to extend a Java parser module and then prompted:
"Analyze the code you just wrote for issues using run_advanced_code_analysis"
Claude calls run_advanced_code_analysis with the project key, branch name, file path (project-relative), file content, and file scope. Your prompt and findings will differ depending on your project and quality profile. The workflow is the same.
In our example, SonarQube Agentic Analysis returned one new finding on the file Claude had just created:
Issue: Override the "equals" method in this class

- Rule: java:S2160

- Location: Line 7 (class declaration)

- Explanation: The class extends a parent that overrides equals and adds

  new fields (youngPhase, oldPhase), but does not override equals or

  hashCode. Two instances with different field values could be considered

  equal if only the parent's equals is used.
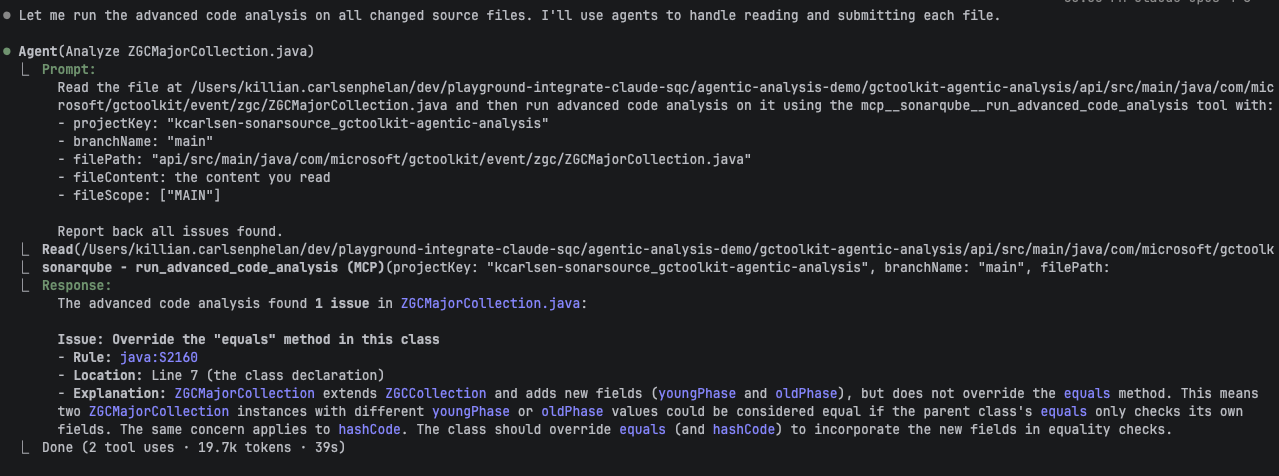
Agentic Analysis returns all findings in the analyzed file, not just issues introduced by recent changes. In our example, it also flagged 59 pre-existing issues across other files. Claude correctly distinguished the one new issue from pre-existing ones and prioritized the code it had just written. Claude also analyzed four other changed files in parallel. Analyzing a single file took approximately 39 seconds; response time depends on file size and the project's analysis configuration.
Step 4 — Issue detected and fixed
Claude interpreted the S2160 finding: the new class adds youngPhase and oldPhase fields but inherits equals and hashCode from the parent class. Two instances with different sub-phase values would be considered equal.
Claude fixed it by adding equals() and hashCode() methods that incorporate the new fields:
@Override
public boolean equals(Object o) {
if (this == o) return true;
if (!super.equals(o)) return false;
if (getClass() != o.getClass()) return false;
ZGCMajorCollection that = (ZGCMajorCollection) o;
return Objects.equals(youngPhase, that.youngPhase)
&& Objects.equals(oldPhase, that.oldPhase);
}
@Override
public int hashCode() {
return Objects.hash(super.hashCode(), youngPhase, oldPhase);
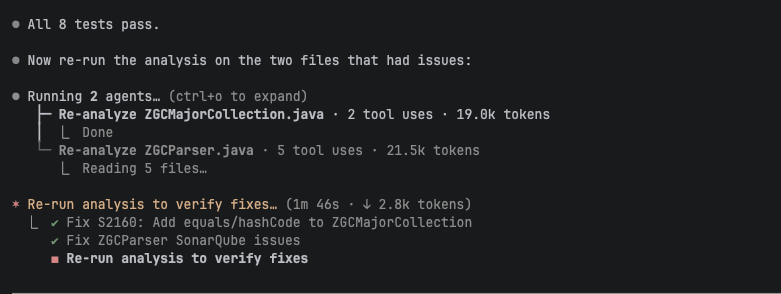
}Claude then ran the project's test suite to confirm the fix didn't break anything. All tests passed.

Step 5 — Clean verification after fix
Claude re-ran run_advanced_code_analysis on the fixed file.
Result: 0 issues — the file is clean.The analyze, fix, and re-verify loop is complete. Claude caught and resolved the issue before the code left the developer's terminal. In our session, Claude also addressed 11 pre-existing issues across other changed files.
Step 6 — (Optional) Automatic verification with CLAUDE.md
You can add a directive to your project's CLAUDE.md file that tells Claude to verify code after generating or modifying it, without needing a manual prompt.
## Code verification

After generating or modifying code, verify it by calling

`run_advanced_code_analysis` before committing.
This is a minimal version. The official docs provide a more complete "Guide-and-Verify" directive that also integrates Sonar Context Augmentation (calling get_guidelines and search_by_signature_patterns before writing code). Use the full docs directive for production setups.
With this directive in place, Claude can verify code automatically as part of its generation workflow. You can refine the directive to scope it to specific directories, file types, or triggers.
Verify the setup
Ask Claude to write or modify code in your project. If you added the CLAUDE.md directive, Claude should analyze the code automatically. Otherwise, prompt Claude to run the analysis.
A successful setup produces this sequence:
- Claude generates or modifies code
- Claude calls
run_advanced_code_analysison the changed files - SonarQube Cloud returns findings (or confirms the file is clean)
- If findings exist, Claude interprets them, applies fixes, and re-analyzes
- The file comes back clean
Limitations and known issues
- SonarQube Cloud only. Agentic Analysis is not available on SonarQube Server.
- Requires a CI scan after enablement. The project must have at least one completed CI analysis run after the SonarQube Agentic Analysis was enabled. Without this, no cached context exists for the static code analysis engine.
- File paths must be project-relative. Pass
src/main/java/com/example/Foo.java, not/Users/you/project/src/main/java/com/example/Foo.java. - Branch must have a completed CI analysis. The
branchNameparameter must match a branch that SonarQube Cloud has analyzed.
Next steps
- Sonar Context Augmentation: Give your agent project context before it writes code. Sonar Context Augmentation maps to the Guide stage of AC/DC and complements SonarQube Agentic Analysis (Verify stage). Learn more
- Standard SonarQube MCP tools: Use
search_sonar_issues_in_projects,get_project_quality_gate_status, andget_component_measuresto review quality gates, issues, and coverage after writing code. These tools are available alongside Agentic Analysis. - Official Agentic Analysis documentation: https://docs.sonarsource.com/sonarqube-cloud/analyzing-source-code/agentic-analysis
- Direct API method: For agents without MCP support, SonarQube Cloud exposes a direct REST API for Agentic Analysis. See the official documentation for the API endpoint and parameters.