The context menu contains all the model manipulation commands (other than moving by drag and drop) that you can apply to the LSM, as well as context-sensitive commands such as filtering, tagging, etc.
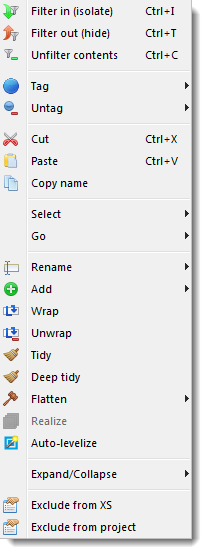
- Filter in (isolate). Hides all but the selected items.
- Filter out (hide). Hides the selected items.
- Unfilter contents. Unhides any children/descendents of the selected item(s).
- Tag/Untag commands.
- Cut. Deletes the selected items.
- Paste. Pastes a previously cut item into the selected item. You cannot perform other actions between a cut and a paste - the cut will be lost (this is because it would make the action list very complex).
- Copy name. Copies the selected item's fully qualified name to the system clipboard.
- Select > Uses closure/Used by closure. Causes all the items that the selected item uses, or is used by, in the selected scope, to be selected. You are often interested in dependency closures during restructuring and this command lets you easily treat them as a group for example to move or wrap them.
- Go. Lets you navigate to the selected item in other views.
- Rename >. Prompts you to rename the selected item. Also offers prefixing options useful prior to unwrapping or flattening a structure.
- Add >. Sub-menu allows the addition of items, dependencies and comments inside/relative to the selected item on the LSM. To add a dependency, select 2 items in the LSM. Comments are entered into the action list and can be used as guidance or reminders. For example you can delete a dependency between 2 folders, which might mean many code-level references, without being prescriptive exactly how it should be implemented. You could indicate your intent using a comment, for example "reverse this dependency using interfaces".
- Wrap. Creates a new item and places the selected items into it. This is e.g. a quick way to move a set of filesinto a new sub-folder.
- Unwrap selected item moves the contents of the selected item to the selected item's scope, and deletes the selected item.
- Tidy all items (e.g. class, file) in a mixed design into a new container. The new design will be given the same name as the parent container, which you may rename if you decide to keep it.
- Deep Tidy recursively performs a Tidy on the selected items and their decedents. Acts on the entire model if nothing is selected.
- Flatten > To files. Removes the containment structure within the selected containers so that they contain just files.
- Flatten > To leaf designs (e.g. namespaces, packages) any containment structure except leaf containers, so that the selected items contain just leaf containers.
- Realize. Converts all the selected groups (as created by the group orphans, tangles, cohesive clusters, etc. viewing options) into actual model entities. The kind of entities created depends on the kind of items contained in the groups. (Note that this will trigger the automatic grouping options to be re-applied and so the resulting new physical items may be inside new logical items and so not immediately visible.)
- Auto-levelize. Replaces the current containment structure with a new one that recursively organizes the files into a containment hierarchy based on cohesive clusters. The resulting containers are given automatically generated names in the form of <#child items>/<total size of code contained> which is useful to quickly see where the bulk of your code ended up. The result is a fully levelized (no containment tangles) structure that is very easy to explore and adjust into a well-structured model. You will certainly want to give the containers new names that reflect their contents and the role they play with their siblings. You will also want to merge small containers together, and move filesand sub-containers to more suitable locations based on your architectural needs and judgment. This is often the quickest route to a well-structured containment model, rather than either working top-down from the existing actual codebase structure, or manually bottom-up from the files.
- Expand/Collapse commands let you expose and elide the child items contained by the selected item on the LSM. You can perform these actions without the context menu by simply double-clicking on an item - if it is collapsed it will expand; if it is expanded it will collapse. The alternative alt-dbl-click also performs an "auto-collapse" which collapses any expanded items other than the one being expanded/collapsed. This is very useful for "rummaging" through the structure while preventing the LSM from becoming excessively large.
- Exclude from XS excludes this items from XS calculations. Note that you can get a list of any excluded items from the status bar.
- Exclude from project adds the selected item's pattern to the excludes list in Project Properties, and forces a reload of the model without the exuded item.
Note:- You can get a list of any excluded items from the status bar.
- The exclude added from the LSM context menu is based on the current location of the item you perform the command on. If you have made use of transformations or actions, you may find that the exclude has no effect. In this case you can set excludes in the project properties (using the original name of the item). Excluding from the LSM can be more convenient than textual patterns, so it's a good idea to set up the excludes early in the project configuration process.
Notes:
- The most common way to manipulate the LSM (create actions) is to drag an item from its current location and drop it on a new parent (appending a "move" action to the currently selected list).